5.26.1. Hardware Offloads - Comparative performance analysis
| status: | ready |
|---|---|
| version: | 1.0 |
| Abstract: | The aim of this document is to present scenarios for a comparative performance analysis of various hardware offloads. We examine differences in throughput as well as the effect on CPU utilization when these hardware offloads are enabled. The end goal is to provide documentation that a deployer of OpenStack can use to answer a number of common questions when constructing their environments:
|
| Conventions: |
|
5.26.1.1. Test Plan
The following hardware offloads were examined in this performance comparison:
- Tx checksumming
- TCP segmentation offload (TSO)
- Generic segmentation offload (GSO)
- Tx UDP tunneling segmentation
- Rx checksumming
- Generic receive offload (GRO)
The performance analysis is based on the results of running test scenarios in a lab consisting of two hardware nodes.
- Scenario #1: Baseline physical
- Scenario #2: Baseline physical over VxLAN tunnel
- Scenario #3: VM-to-VM on different hardware nodes
- Scenario #4: VM-to-VM on different nodes over VxLAN tunnel
For each of the above scenarios, we used netperf to measure the network throughput and the sar utility to measure CPU usage.
One node was used as the transmitter and the other node served as a receiver and had a netserver daemon running on it.
Performance validation involved running both TCP and UDP stream tests with all offloads on and then turning each one of the offloads off, one by one.
For the transmit side the following offloads were triggered:
- TSO
- Tx checksumming
- GSO (no VxLAN tunneling)
- Tx-udp_tnl-segmentation (VxLAN tunneling only)
For the receive side:
- GRO
- Rx checksumming
Base physical tests involved turning offloads on and off for the p514p2 physical interface on both transmitter and receiver.
Some hardware offloads require certain other offloads to be enabled or disabled in order to make any effect. For example, TSO can not be enabled without Tx checksumming being turned on while GSO only kicks in when TSO is disabled. Due to that the following order of turning off offloads was chosen for the tests:
| Transmitter | All on | TSO off | Tx checksumming off | GSO/tx-udp_tnl-segmentation off |
|---|---|---|---|---|
| Active offloads | TSO, tx checksumming |
tx checksumming, GSO/tx-udp_tnl-segmentation |
GSO/tx-udp_tnl-segmentation | All off |
| Offloads on | TSO, tx checksumming, GSO/tx-udp_tnl-segmentation |
tx checksumming, GSO/tx-udp_tnl-segmentation |
GSO/tx-udp_tnl-segmentation | All off |
| Receiver | All on | GRO off | Rx checksumming off |
|---|---|---|---|
| Active offloads | GRO, Rx checksumming |
Rx checksumming | All off |
| Offloads on | GRO, Rx checksumming |
Rx checksumming | All off |
5.26.1.1.1. Test Environment
5.26.1.1.1.1. Preparation
5.26.1.1.1.1.1. Baseline physical host setup
We force the physical device to use only one queue. This allows us to obtain consistent results between test runs as we can avoid the possibility of RSS assigning the flows to a different queue, and as a result a different CPU core:
$ sudo ethtool -L p514p2 combined 1
where p514p2 is the physical interface name.
Pin that queue to CPU0 either using set_irq_affinity script or by running
$ sudo echo 1 > /proc/irq/<irq_num>/smp_affinity
This guarantees that all interrupts related to the p514p2 interface are processed on a designated CPU (CPU0 in our case) which allows to isolate the tests.
At the same time, any traffic generators, like netperf, were manually made to use CPU1 using taskset.
$ sudo taskset -c 1 netperf -H <peer_ip> -cC [-t UDP_STREAM]
Next, it is important to prevent CPUs from switching frequencies and power states (or C-states) as this can affect CPU utilization and thus affect test results.
Make the processors keep the C0 C-state by writing 0 to /dev/cpu_dma_latency file. This will prevent any other C-states with from being used, as long as the file /dev/cpu_dma_latency is kept open. It can be easily done with this helper program:
$ make setcpulatency
$ sudo ./setcpulatency 0 &
We made the CPUs run at max frequency by choosing the “performance” scaling governor:
$ echo "performance" | sudo tee
/sys/devices/system/cpu/cpu*/cpufreq/scaling_governor
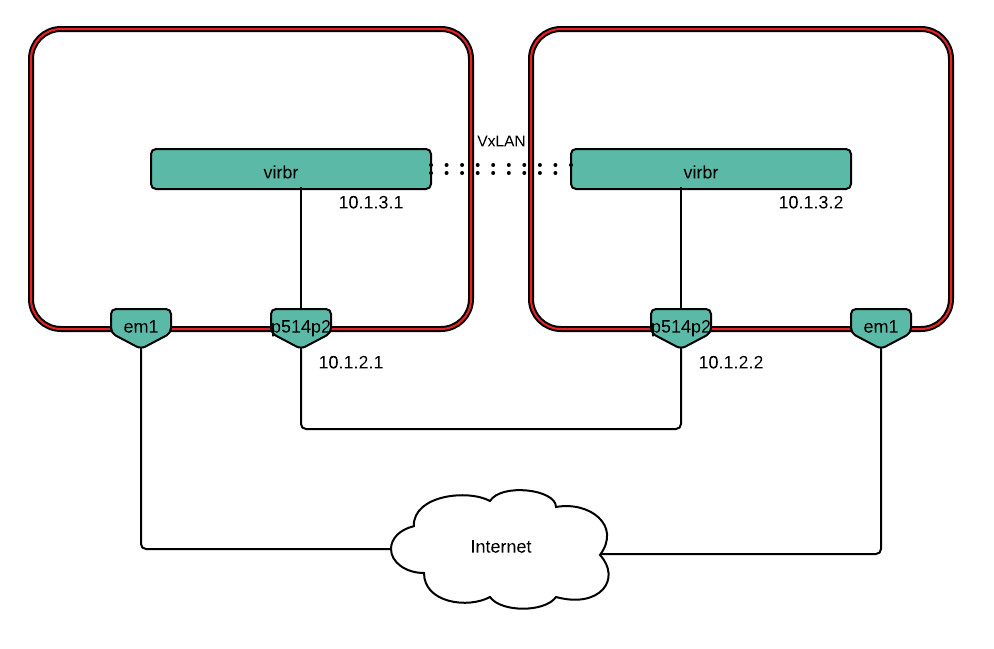
In order to set up a VxLAN tunnel, an OVS bridge (virbr) was created:
$ sudo ovs-vsctl add-br virbr
Next, we created a VxLAN port, specifying the corresponding remote ip:
$ sudo ovs-vsctl add-port virbr vxlan -- set interface vxlan type=vxlan
options:remote_ip=10.1.2.2 options:local_ip=10.1.2.1
5.26.1.1.1.1.2. VM-to-VM on different nodes setup
Scenarios 3 and 4 assess the performance impact of hardware offloads in a deployment with two VMs running on separate hardware nodes. The scenarios measure VM-to-VM TCP/UDP traffic throughput, with and without VxLAN encapsulation.
In order to get more accurate CPU consumption metrics, the CPUs on which
VMs would be running should be isolated from the kernel scheduler. This
prevents any other processes from running on those CPUs. In this
installation, half of the CPUs are isolated by adding the following to
the end of the /etc/default/grub file:
GRUB_CMDLINE_LINUX=”$GRUB_CMDLINE_LINUX isolcpus=6-11”
These settings were applied and the nodes rebooted:
$ sudo update-grub
$ sudo reboot
libvirt was installed and the default storage pool appropriately configured:
$ sudo apt-get install qemu-kvm libvirt-bin virtinst virt-manager
$ sudo virsh -c qemu:///system pool-define-as store dir --target /home/elena/store
$ sudo virsh -c qemu:///system pool-autostart store
$ sudo virsh -c qemu:///system pool-start store
An OVS bridge (virbr) was created next:
$ sudo ovs-vsctl add-br virbr
Then, we added physical interface p514p1 as a port to virbr and cleaned all IP addresses from it:
$ sudo ovs-vsctl add-port virbr p514p1
$ sudo ifconfig p514p1 0
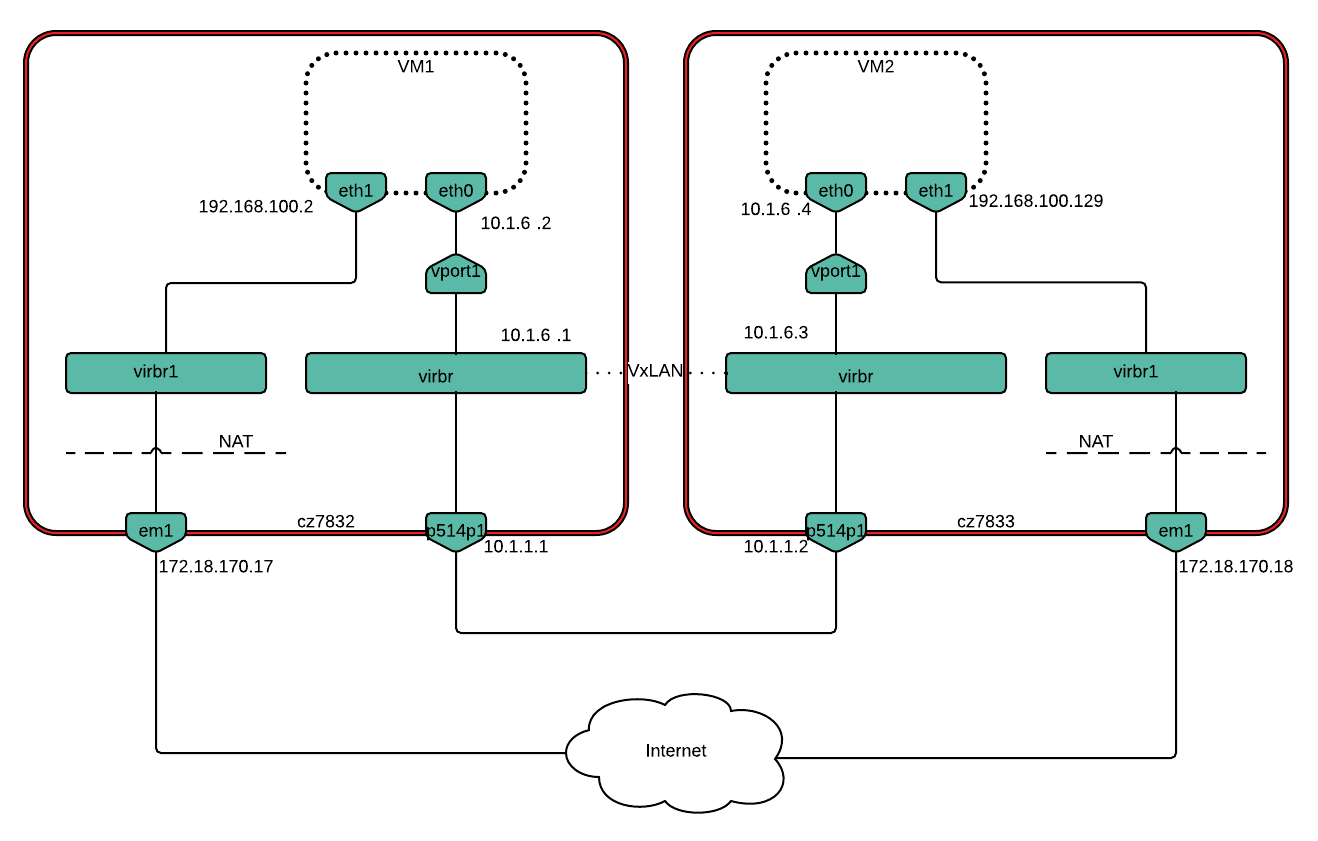
An IP address from the same subnet as the VMs was then added to virbr. In this case 10.1.6.0/24 was the subnet used for VM-to-VM communication.
$ sudo ip addr add 10.1.6.1/24 dev virbr
From that point, virbr had two IP addresses: 10.1.1.1 and 10.1.6.1 (10.1.1.2 and 10.1.6.3 on Host 2). Finally, we created a tap port vport1 that will be used to connect the VM to virbr:
$ sudo ip tuntap add mode tap vport1
$ sudo ovs-vsctl add-port virbr vport1
Guest setup
In scenarios 3 and 4, an Ubuntu Trusty cloud image is being used. The VMs were defined from an XML domain file. Each VM was pinned to a pair of CPUs that were isolated from the kernel scheduler in the following way in the libvirt.xml files:
<vcpu placement='static' cpuset='7-8'>2</vcpu>
<cputune>
    <vcpupin vcpu='0' cpuset='7'/>
    <vcpupin vcpu='1' cpuset='8'/>
</cputune>
Each VM has two interfaces: eth0 connects through a tap device (vport1) to an OVS bridge (virbr) from which there is a link to another host, eth1 is connected to em1 through a virtual network (with a NAT) which allows VM to access the Internet. Interface configuration was done as follows:
<interface type='bridge'>
    <source bridge='virbr'/>
    <virtualport type='openvswitch'/>
    <target dev='vport1'/>
    <model type='virtio'/>
    <alias name='net0'/>
</interface>
<interface type='network'>
    <source network='net1'/>
    <target dev='vnet0'/>
    <model type='rtl8139'/>
    <alias name='net1'/>
</interface>
Interface configuration for VM1 was done in the following way:
/etc/network/interfaces.d/eth0.cfg
# The primary network interface

auto eth0
iface eth0 inet static
address 10.1.6.2
netmask 255.255.255.0
network 10.1.6.0
nexthop 10.1.6.1
broadscast 10.1.6.255
/etc/network/interfaces.d/eth1.cfg
auto eth1
iface eth1 inet static
address 192.168.100.2
netmask 255.255.255.0
network 192.168.100.0
gateway 192.168.100.1
broadscast 192.168.100.255
dns-nameservers 8.8.8.8 8.8.4.4
And on VM2:
/etc/network/interfaces.d/eth0.cfg
# The primary network interface

auto eth0
iface eth0 inet static
address 10.1.6.4
netmask 255.255.255.0
network 10.1.6.0
nexthop 10.1.6.3
broadscast 10.1.6.255
/etc/network/interfaces.d/eth1.cfg
auto eth1
iface eth1 inet static
address 192.168.100.129
netmask 255.255.255.0
network 192.168.100.0
gateway 192.168.100.1
broadscast 192.168.100.255
dns-nameservers 8.8.8.8 8.8.4.4

For scenario 4, the p514p1 port was removed from virbr and its IP address restored:
$ sudo ovs-vsctl del-port virbr p514p1
$ sudo ip addr add 10.1.1.1/24 dev p514p1
For setting up a VxLAN tunnel we added a vxlan type port to the virbr bridge:
# Host1
$ sudo ovs-vsctl add-port virbr vxlan1 -- set interface vxlan1
type=vxlan options:remote_ip=10.1.1.2 options:local_ip=10.1.1.1
# Host2
$ sudo ovs-vsctl add-port virbr vxlan1 -- set interface vxlan1
type=vxlan options:remote_ip=10.1.1.1 options:local_ip=10.1.1.2
5.26.1.1.1.2. Environment description
5.26.1.1.1.2.1. Hardware
The environment consists of two hardware nodes with the following configuration:
| Parameter | Value | Comments |
| Server | Supermicro SYS-5018R-WR, 1U, 1xCPU, 4/6 FAN, 4x 3,5” SAS/SATA Hotswap, 2x PS | |
| Motherboard | Supermicro X10SRW-F, 1xCPU(LGA 2011), Intel C612, 8xDIMM Up To 512GB RAM, 10xSATA3, IPMI, 2xGbE LAN,,sn: NM15BS004776 | |
| CPU | Intel Xeon E5-2620v3, 2.4GHz, Socket 2011, 15MB Cache, 6 core, 85W | |
| RAM | 4x 16GB Samsung M393A2G40DB0-CPB DDR-IV PC4-2133P ECC Reg. CL13 | |
| Storage | HDD: 2x 1TB Seagate Constellation ES.3, ST1000NM0033, SATA,6.0Gb/s,7200 RPM,128MB Cache, 3.5” | |
| NIC | AOC-STG-i4S, PCI Express 3.0, STD 4-port 10 Gigabit Ethernet SFP+ (Intel XL710 controller) |
5.26.1.1.1.2.2. Software
This section describes installed software.
| Parameter | Value | Comment |
| OS | Ubuntu 14.04 | |
| Kernel | 4.2.0-27-generic | |
| QEMU | 2.0.0 | |
| Libvirt | 1.2.2 | |
| Open vSwitch | 2.0.2 | |
| Netperf | 2.7.0 |
5.26.1.1.2. Test Case 1: Baseline physical scenario
5.26.1.1.2.1. Description
This test measures network performance with hardware offloads on/off for two hardware nodes when sending non-encapsulated traffic.
5.26.1.1.2.2. List of performance metrics
| Priority | Value | Measurement Units | Description |
|---|---|---|---|
| 1 | TCP throughput | 10^6 bits/sec | Average throughput for TCP traffic |
| 1 | UDP throughput | 10^6 bits/sec | Average throughput for UDP traffic |
| 1 | CPU consumption | % | Average utilization of CPU used for packet processing |
5.26.1.1.3. Test Case 2: Baseline physical over VxLAN scenario
5.26.1.1.3.1. Description
This test measures network performance with hardware offloads on/off for two hardware nodes when sending VxLAN-encapsulated traffic.
5.26.1.1.3.2. List of performance metrics
| Priority | Value | Measurement Units | Description |
|---|---|---|---|
| 1 | TCP throughput | 10^6 bits/sec | Average throughput for TCP traffic |
| 1 | UDP throughput | 10^6 bits/sec | Average throughput for UDP traffic |
| 1 | CPU consumption | % | Average utilization of CPU used for packet processing |
5.26.1.1.4. Test Case 3: VM-to-VM on different nodes scenario
5.26.1.1.4.1. Description
This test assesses the performance impact of hardware offloads in a deployment with two VMs running on separate hardware nodes. The scenarios measure VM-to-VM TCP/UDP traffic throughput as well as host CPU consumption.
5.26.1.1.4.2. List of performance metrics
| Priority | Value | Measurement Units | Description |
|---|---|---|---|
| 1 | TCP throughput | 10^6 bits/sec | Average throughput for TCP traffic |
| 1 | UDP throughput | 10^6 bits/sec | Average throughput for UDP traffic |
| 1 | CPU consumption | % | Average utilization of CPU used for packet processing |
5.26.1.1.5. Test Case 4: VM-to-VM on different nodes over VxLAN scenario
5.26.1.1.5.1. Description
This test assesses the performance impact of hardware offloads in a deployment with two VMs running on separate hardware nodes. The scenarios measure VM-to-VM TCP/UDP traffic throughput as well as host CPU consumption in case VxLAN encapsulation is used.
5.26.1.1.5.2. List of performance metrics
| Priority | Value | Measurement Units | Description |
|---|---|---|---|
| 1 | TCP throughput | 10^6 bits/sec | Average throughput for TCP traffic |
| 1 | UDP throughput | 10^6 bits/sec | Average throughput for UDP traffic |
| 1 | CPU consumption | % | Average utilization of CPU used for packet processing |
5.26.1.2. Reports
- Test plan execution reports: