Images and instances
Virtual machine images contain a virtual disk that holds a bootable operating system on it. Disk images provide templates for virtual machine file systems. The Image service controls image storage and management.
Instances are the individual virtual machines that run on physical compute nodes inside the cloud. Users can launch any number of instances from the same image. Each launched instance runs from a copy of the base image. Any changes made to the instance do not affect the base image. Snapshots capture the state of an instances running disk. Users can create a snapshot, and build a new image based on these snapshots. The Compute service controls instance, image, and snapshot storage and management.
When you launch an instance, you must choose a flavor, which
represents a set of virtual resources. Flavors define virtual
CPU number, RAM amount available, and ephemeral disks size. Users
must select from the set of available flavors
defined on their cloud. OpenStack provides a number of predefined
flavors that you can edit or add to.
Note
- For more information about creating and troubleshooting images, see the OpenStack Virtual Machine Image Guide.
- For more information about image configuration options, see the Image services section of the OpenStack Configuration Reference.
You can add and remove additional resources from running instances, such
as persistent volume storage, or public IP addresses. The example used
in this chapter is of a typical virtual system within an OpenStack
cloud. It uses the cinder-volume service, which provides persistent
block storage, instead of the ephemeral storage provided by the selected
instance flavor.
This diagram shows the system state prior to launching an instance. The
image store has a number of predefined images, supported by the Image
service. Inside the cloud, a compute node contains the
available vCPU, memory, and local disk resources. Additionally, the
cinder-volume service stores predefined volumes.
The base image state with no running instances

Instance Launch
To launch an instance, select an image, flavor, and any optional
attributes. The selected flavor provides a root volume, labeled vda
in this diagram, and additional ephemeral storage, labeled vdb. In
this example, the cinder-volume store is mapped to the third virtual
disk on this instance, vdc.
Instance creation from an image
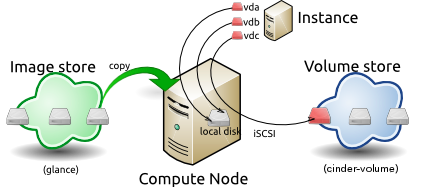
The Image service copies the base image from the image store to the
local disk. The local disk is the first disk that the instance
accesses, which is the root volume labeled vda. Smaller
instances start faster. Less data needs to be copied across
the network.
The new empty ephemeral disk is also created, labeled vdb.
This disk is deleted when you delete the instance.
The compute node connects to the attached cinder-volume using iSCSI. The
cinder-volume is mapped to the third disk, labeled vdc in this
diagram. After the compute node provisions the vCPU and memory
resources, the instance boots up from root volume vda. The instance
runs and changes data on the disks (highlighted in red on the diagram).
If the volume store is located on a separate network, the
my_block_storage_ip option specified in the storage node
configuration file directs image traffic to the compute node.
Note
Some details in this example scenario might be different in your
environment. For example, you might use a different type of back-end
storage, or different network protocols. One common variant is that
the ephemeral storage used for volumes vda and vdb could be
backed by network storage rather than a local disk.
When you delete an instance, the state is reclaimed with the exception of the persistent volume. The ephemeral storage, whether encrypted or not, is purged. Memory and vCPU resources are released. The image remains unchanged throughout this process.
The end state of an image and volume after the instance exits
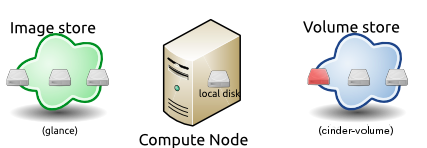
Image properties and property protection
An image property is a key and value pair that the administrator or the image owner attaches to an OpenStack Image service image, as follows:
- The administrator defines core properties, such as the image name.
- The administrator and the image owner can define additional properties, such as licensing and billing information.
The administrator can configure any property as protected, which limits which policies or user roles can perform CRUD operations on that property. Protected properties are generally additional properties to which only administrators have access.
For unprotected image properties, the administrator can manage core properties and the image owner can manage additional properties.
To configure property protection
To configure property protection, edit the policy.json file. This file
can also be used to set policies for Image service actions.
Define roles or policies in the
policy.jsonfile:{ "context_is_admin": "role:admin", "default": "", "add_image": "", "delete_image": "", "get_image": "", "get_images": "", "modify_image": "", "publicize_image": "role:admin", "copy_from": "", "download_image": "", "upload_image": "", "delete_image_location": "", "get_image_location": "", "set_image_location": "", "add_member": "", "delete_member": "", "get_member": "", "get_members": "", "modify_member": "", "manage_image_cache": "role:admin", "get_task": "", "get_tasks": "", "add_task": "", "modify_task": "", "deactivate": "", "reactivate": "", "get_metadef_namespace": "", "get_metadef_namespaces":"", "modify_metadef_namespace":"", "add_metadef_namespace":"", "delete_metadef_namespace":"", "get_metadef_object":"", "get_metadef_objects":"", "modify_metadef_object":"", "add_metadef_object":"", "list_metadef_resource_types":"", "get_metadef_resource_type":"", "add_metadef_resource_type_association":"", "get_metadef_property":"", "get_metadef_properties":"", "modify_metadef_property":"", "add_metadef_property":"", "get_metadef_tag":"", "get_metadef_tags":"", "modify_metadef_tag":"", "add_metadef_tag":"", "add_metadef_tags":"" }
For each parameter, use
"rule:restricted"to restrict access to all users or"role:admin"to limit access to administrator roles. For example:{ "download_image": "upload_image": }
Define which roles or policies can manage which properties in a property protections configuration file. For example:
[x_none_read]
create = context_is_admin
read = !
update = !
delete = !

[x_none_update]
create = context_is_admin
read = context_is_admin
update = !
delete = context_is_admin

[x_none_delete]
create = context_is_admin
read = context_is_admin
update = context_is_admin
delete = !
- A value of
@allows the corresponding operation for a property. - A value of
!disallows the corresponding operation for a property.
- A value of
In the
glance-api.conffile, define the location of a property protections configuration file.property_protection_file = {file_name}
This file contains the rules for property protections and the roles and policies associated with it.
By default, property protections are not enforced.
If you specify a file name value and the file is not found, the
glance-apiservice does not start.To view a sample configuration file, see glance-api.conf.
Optionally, in the
glance-api.conffile, specify whether roles or policies are used in the property protections configuration fileproperty_protection_rule_format = roles
The default is
roles.To view a sample configuration file, see glance-api.conf.
Image download: how it works
Prior to starting a virtual machine, transfer the virtual machine image to the compute node from the Image service. How this works can change depending on the settings chosen for the compute node and the Image service.
Typically, the Compute service will use the image identifier passed to it by the scheduler service and request the image from the Image API. Though images are not stored in glance—rather in a back end, which could be Object Storage, a filesystem or any other supported method—the connection is made from the compute node to the Image service and the image is transferred over this connection. The Image service streams the image from the back end to the compute node.
It is possible to set up the Object Storage node on a separate network,
and still allow image traffic to flow between the compute and object
storage nodes. Configure the my_block_storage_ip option in the
storage node configuration file to allow block storage traffic to reach
the compute node.
Certain back ends support a more direct method, where on request the
Image service will return a URL that links directly to the back-end store.
You can download the image using this approach. Currently, the only store
to support the direct download approach is the filesystem store.
Configured the approach using the filesystems option in
the image_file_url section of the nova.conf file on
compute nodes.
Compute nodes also implement caching of images, meaning that if an image has been used before it won’t necessarily be downloaded every time. Information on the configuration options for caching on compute nodes can be found in the Configuration Reference.
Instance building blocks
In OpenStack, the base operating system is usually copied from an image stored in the OpenStack Image service. This results in an ephemeral instance that starts from a known template state and loses all accumulated states on shutdown.
You can also put an operating system on a persistent volume in Compute or the Block Storage volume system. This gives a more traditional, persistent system that accumulates states that are preserved across restarts. To get a list of available images on your system, run:
$ openstack image list
+--------------------------------------+-----------------------------+--------+
| ID                                   | Name                        | Status |
+--------------------------------------+-----------------------------+--------+
| aee1d242-730f-431f-88c1-87630c0f07ba | Ubuntu 14.04 cloudimg amd64 | active |
+--------------------------------------+-----------------------------+--------+
| 0b27baa1-0ca6-49a7-b3f4-48388e440245 | Ubuntu 14.10 cloudimg amd64 | active |
+--------------------------------------+-----------------------------+--------+
| df8d56fc-9cea-4dfd-a8d3-28764de3cb08 | jenkins                     | active |
+--------------------------------------+-----------------------------+--------+
The displayed image attributes are:
ID- Automatically generated UUID of the image.
Name- Free form, human-readable name for the image.
Status- The status of the image. Images marked
activeare available for use.
Virtual hardware templates are called flavors, and are defined by
administrators. Prior to the Newton release, a default installation also
includes five predefined flavors.
For a list of flavors that are available on your system, run:
$ openstack flavor list
+-----+-----------+-------+------+-----------+-------+-----------+
| ID  | Name      |   RAM | Disk | Ephemeral | VCPUs | Is_Public |
+-----+-----------+-------+------+-----------+-------+-----------+
| 1   | m1.tiny   |   512 |    1 |         0 |     1 | True      |
| 2   | m1.small  |  2048 |   20 |         0 |     1 | True      |
| 3   | m1.medium |  4096 |   40 |         0 |     2 | True      |
| 4   | m1.large  |  8192 |   80 |         0 |     4 | True      |
| 5   | m1.xlarge | 16384 |  160 |         0 |     8 | True      |
+-----+-----------+-------+------+-----------+-------+-----------+
By default, administrative users can configure the flavors. You can
change this behavior by redefining the access controls for
compute_extension:flavormanage in /etc/nova/policy.json on the
compute-api server.
Instance management tools
OpenStack provides command-line, web interface, and API-based instance management tools. Third-party management tools are also available, using either the native API or the provided EC2-compatible API.
The OpenStack python-openstackclient package provides a basic command-line utility, which uses the openstack command. This is available as a native package for most Linux distributions, or you can install the latest version using the pip python package installer:
# pip install python-openstackclient
For more information about python-openstackclient and other command-line tools, see the OpenStack End User Guide.
Control where instances run
The Scheduling section of OpenStack Configuration Reference provides detailed information on controlling where your instances run, including ensuring a set of instances run on different compute nodes for service resiliency or on the same node for high performance inter-instance communications.
Administrative users can specify which compute node their instances
run on. To do this, specify the --availability-zone
AVAILABILITY_ZONE:COMPUTE_HOST parameter.
Launch instances with UEFI
Unified Extensible Firmware Interface (UEFI) is a standard firmware designed to replace legacy BIOS. There is a slow but steady trend for operating systems to move to the UEFI format and, in some cases, make it their only format.
To configure UEFI environment
To successfully launch an instance from an UEFI image in QEMU/KVM environment, the administrator has to install the following packages on compute node:
- OVMF, a port of Intel’s tianocore firmware to QEMU virtual machine.
- libvirt, which has been supporting UEFI boot since version 1.2.9.
Because default UEFI loader path is /usr/share/OVMF/OVMF_CODE.fd, the
administrator must create one link to this location after UEFI package
is installed.
To upload UEFI images
To launch instances from a UEFI image, the administrator first has to
upload one UEFI image. To do so, hw_firmware_type property must
be set to uefi when the image is created. For example:
$ openstack image create --container-format bare --disk-format qcow2 \
  --property hw_firmware_type=uefi --file /tmp/cloud-uefi.qcow --name uefi
After that, you can launch instances from this UEFI image.

Except where otherwise noted, this document is licensed under Creative Commons Attribution 3.0 License. See all OpenStack Legal Documents.