Private project network
If you chose networking option 2, you can also create a private project virtual network that connects to the physical network infrastructure via layer-3 (routing) and NAT. This network includes a DHCP server that provides IP addresses to instances. An instance on this network can automatically access external networks such as the Internet. However, access to an instance on this network from external networks such as the Internet requires a floating IP address.
The demo or other unprivileged user can create this network because it only provides connectivity to instances within the demo project.
Warning
You must create the public provider network before the private project network.
Note
The following instructions and diagrams use example IP address ranges. You must adjust them for your particular environment.
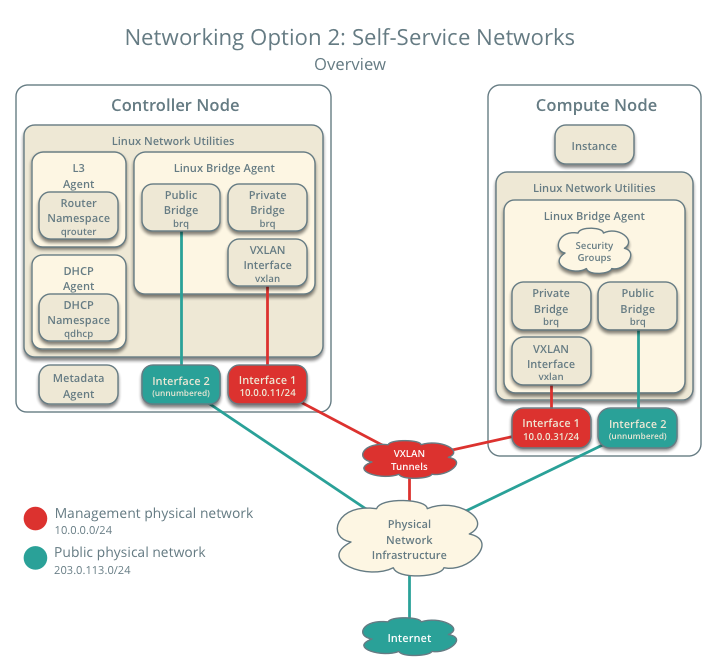
Networking Option 2: Self-service networks - Overview
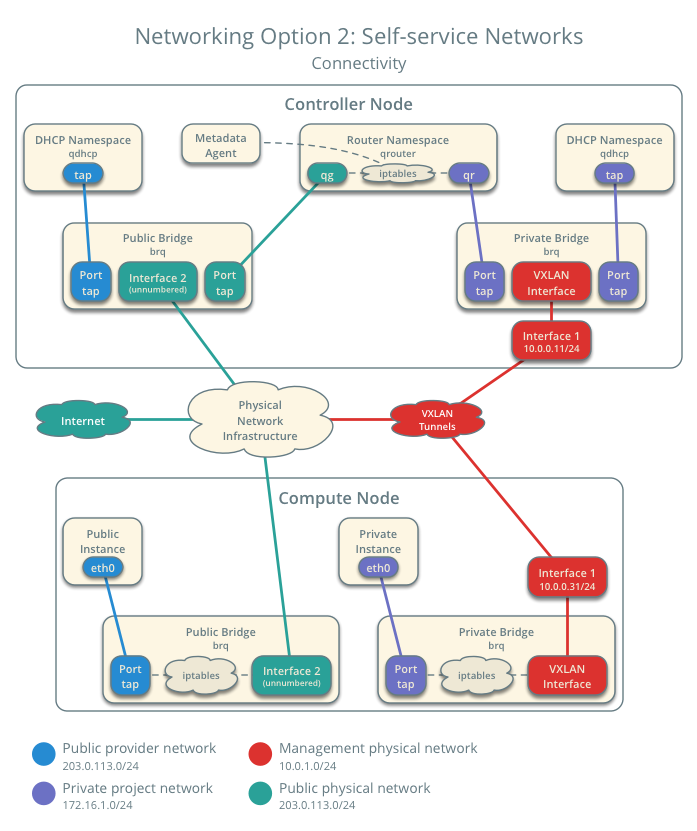
Networking Option 2: Self-service networks - Connectivity
Create the private project network
On the controller node, source the demo credentials to gain access to user-only CLI commands:
$ source demo-openrc.sh
Create the network:
$ neutron net-create private
Created a new network:
+-----------------------+--------------------------------------+
| Field                 | Value                                |
+-----------------------+--------------------------------------+
| admin_state_up        | True                                 |
| id                    | 7c6f9b37-76b4-463e-98d8-27e5686ed083 |
| mtu                   | 0                                    |
| name                  | private                              |
| port_security_enabled | True                                 |
| router:external       | False                                |
| shared                | False                                |
| status                | ACTIVE                               |
| subnets               |                                      |
| tenant_id             | f5b2ccaa75ac413591f12fcaa096aa5c     |
+-----------------------+--------------------------------------+
Non-privileged users typically cannot supply additional parameters to this command. The service automatically chooses paramters using information from the following files:
ml2_conf.ini:
[ml2]
tenant_network_types = vxlan

[ml2_type_vxlan]
vni_ranges = 1:1000
Create a subnet on the network:
$ neutron subnet-create private PRIVATE_NETWORK_CIDR --name private \
  --dns-nameserver DNS_RESOLVER --gateway PRIVATE_NETWORK_GATEWAY
Replace PRIVATE_NETWORK_CIDR with the subnet you want to use on the private network. You can use any arbitrary value, although we recommend a network from RFC 1918.
Replace DNS_RESOLVER with the IP address of a DNS resolver. In most cases, you can use one from the /etc/resolv.conf file on the host.
Replace PRIVATE_NETWORK_GATEWAY with the gateway you want to use on the private network, typically the ”.1” IP address.
Example
The private network uses 172.16.1.0/24 with a gateway on 172.16.1.1. A DHCP server assigns each instance an IP address from 172.16.1.2 to 172.16.1.254. All instances use 8.8.4.4 as a DNS resolver.
$ neutron subnet-create private 172.16.1.0/24 --name private \
  --dns-nameserver 8.8.4.4 --gateway 172.16.1.1
Created a new subnet:
+-------------------+------------------------------------------------+
| Field             | Value                                          |
+-------------------+------------------------------------------------+
| allocation_pools  | {"start": "172.16.1.2", "end": "172.16.1.254"} |
| cidr              | 172.16.1.0/24                                  |
| dns_nameservers   | 8.8.4.4                                        |
| enable_dhcp       | True                                           |
| gateway_ip        | 172.16.1.1                                     |
| host_routes       |                                                |
| id                | 3482f524-8bff-4871-80d4-5774c2730728           |
| ip_version        | 4                                              |
| ipv6_address_mode |                                                |
| ipv6_ra_mode      |                                                |
| name              | private                                        |
| network_id        | 7c6f9b37-76b4-463e-98d8-27e5686ed083           |
| subnetpool_id     |                                                |
| tenant_id         | f5b2ccaa75ac413591f12fcaa096aa5c               |
+-------------------+------------------------------------------------+
Create a router
Private project networks connect to public provider networks using a virtual router. Each router contains an interface to at least one private project network and a gateway on a public provider network.
The public provider network must include the router: external option to enable project routers to use it for connectivity to external networks such as the Internet. The admin or other privileged user must include this option during network creation or add it later. In this case, we can add it to the existing public provider network.
On the controller node, source the admin credentials to gain access to admin-only CLI commands:
$ source admin-openrc.sh
Add the router: external option to the public provider network:
$ neutron net-update public --router:external
Updated network: public
Source the demo credentials to gain access to user-only CLI commands:
$ source demo-openrc.sh
Create the router:
$ neutron router-create router
Created a new router:
+-----------------------+--------------------------------------+
| Field                 | Value                                |
+-----------------------+--------------------------------------+
| admin_state_up        | True                                 |
| external_gateway_info |                                      |
| id                    | 89dd2083-a160-4d75-ab3a-14239f01ea0b |
| name                  | router                               |
| routes                |                                      |
| status                | ACTIVE                               |
| tenant_id             | f5b2ccaa75ac413591f12fcaa096aa5c     |
+-----------------------+--------------------------------------+
Add the private network subnet as an interface on the router:
$ neutron router-interface-add router private
Added interface bff6605d-824c-41f9-b744-21d128fc86e1 to router router.
Set a gateway on the public network on the router:
$ neutron router-gateway-set router public
Set gateway for router router
Verify operation
We recommend that you verify operation and fix any issues before proceeding. The following steps use the IP address ranges from the network and subnet creation examples.
On the controller node, source the admin credentials to gain access to admin-only CLI commands:
$ source admin-openrc.sh
List network namespaces. You should see one qrouter namespace and two qdhcp namespaces.
$ ip netns
qrouter-89dd2083-a160-4d75-ab3a-14239f01ea0b
qdhcp-7c6f9b37-76b4-463e-98d8-27e5686ed083
qdhcp-0e62efcd-8cee-46c7-b163-d8df05c3c5ad
List ports on the router to determine the gateway IP address on the public provider network:
$ neutron router-port-list router
+--------------------------------------+------+-------------------+------------------------------------------+
| id                                   | name | mac_address       | fixed_ips                                |
+--------------------------------------+------+-------------------+------------------------------------------+
| bff6605d-824c-41f9-b744-21d128fc86e1 |      | fa:16:3e:2f:34:9b | {"subnet_id":                            |
|                                      |      |                   | "3482f524-8bff-4871-80d4-5774c2730728",  |
|                                      |      |                   | "ip_address": "172.16.1.1"}              |
| d6fe98db-ae01-42b0-a860-37b1661f5950 |      | fa:16:3e:e8:c1:41 | {"subnet_id":                            |
|                                      |      |                   | "5cc70da8-4ee7-4565-be53-b9c011fca011",  |
|                                      |      |                   | "ip_address": "203.0.113.102"}           |
+--------------------------------------+------+-------------------+------------------------------------------+
Ping this IP address from the controller node or any host on the public physical network:
$ ping -c 4 203.0.113.102
PING 203.0.113.102 (203.0.113.102) 56(84) bytes of data.
64 bytes from 203.0.113.102: icmp_req=1 ttl=64 time=0.619 ms
64 bytes from 203.0.113.102: icmp_req=2 ttl=64 time=0.189 ms
64 bytes from 203.0.113.102: icmp_req=3 ttl=64 time=0.165 ms
64 bytes from 203.0.113.102: icmp_req=4 ttl=64 time=0.216 ms

--- 203.0.113.102 ping statistics ---
rtt min/avg/max/mdev = 0.165/0.297/0.619/0.187 ms
Return to Launch an instance - Create virtual networks.

Except where otherwise noted, this document is licensed under Creative Commons Attribution 3.0 License. See all OpenStack Legal Documents.