Magnum User Guide
This guide is intended for users who use Magnum to deploy and manage clusters of hosts for a Container Orchestration Engine. It describes the infrastructure that Magnum creates and how to work with them.
Section 1-3 describe Magnum itself, including an overview, the CLI and Horizon interface. Section 4-9 describe the Container Orchestration Engine (COE) supported along with a guide on how to select one that best meets your needs and how to develop a driver for a new COE. Section 10-15 describe the low level OpenStack infrastructure that is created and managed by Magnum to support the COE’s.
Warning
The heat driver described here is deprecated in favor of the k8s_capi_helm or k8s_cluster_api driver and will be removed in a future Magnum version.
Overview
Magnum is an OpenStack API service developed by the OpenStack Containers Team making container orchestration engines (COE) such as Kubernetes available as first class resources in OpenStack.
Magnum uses Heat to orchestrate an OS image which contains Docker and COE and runs that image in either virtual machines or bare metal in a cluster configuration.
Magnum offers complete life-cycle management of COEs in an OpenStack environment, integrated with other OpenStack services for a seamless experience for OpenStack users who wish to run containers in an OpenStack environment.
Following are few salient features of Magnum:
Standard API based complete life-cycle management for Container Clusters
Multi-tenancy for container clusters
Choice of COE: Kubernetes
Choice of container cluster deployment model: VM or Bare-metal
Keystone-based multi-tenant security and auth management
Neutron based multi-tenant network control and isolation
Cinder based volume service for containers
Integrated with OpenStack: SSO experience for cloud users
Secure container cluster access (TLS enabled)
ClusterTemplate
A ClusterTemplate (previously known as BayModel) is a collection of parameters to describe how a cluster can be constructed. Some parameters are relevant to the infrastructure of the cluster, while others are for the particular COE. In a typical workflow, a user would create a ClusterTemplate, then create one or more clusters using the ClusterTemplate. A cloud provider can also define a number of ClusterTemplates and provide them to the users. A ClusterTemplate cannot be updated or deleted if a cluster using this ClusterTemplate still exists.
The definition and usage of the parameters of a ClusterTemplate are as follows. They are loosely grouped as: mandatory, infrastructure, COE specific.
- <name>
Name of the ClusterTemplate to create. The name does not have to be unique. If multiple ClusterTemplates have the same name, you will need to use the UUID to select the ClusterTemplate when creating a cluster or updating, deleting a ClusterTemplate. If a name is not specified, a random name will be generated using a string and a number, for example “pi-13-model”.
- –coe <coe>
Specify the Container Orchestration Engine to use. Supported COE is ‘kubernetes’. If your environment has additional cluster drivers installed, refer to the cluster driver documentation for the new COE names. This is a mandatory parameter and there is no default value.
- –image <image>
The name or UUID of the base image in Glance to boot the servers for the cluster. The image must have the attribute ‘os_distro’ defined as appropriate for the cluster driver. For the currently supported images, the os_distro names are:
COE
os_distro
Kubernetes
fedora-coreos
This is a mandatory parameter and there is no default value. Note that the os_distro attribute is case sensitive.
- –keypair <keypair>
The name of the SSH keypair to configure in the cluster servers for ssh access. You will need the key to be able to ssh to the servers in the cluster. The login name is specific to the cluster driver. If keypair is not provided in template it will be required at Cluster create. This value will be overridden by any keypair value that is provided during Cluster create.
- –external-network <external-network>
The name or network ID of a Neutron network to provide connectivity to the external internet for the cluster. This network must be an external network, i.e. its attribute ‘router:external’ must be ‘True’. The servers in the cluster will be connected to a private network and Magnum will create a router between this private network and the external network. This will allow the servers to download images, access discovery service, etc, and the containers to install packages, etc. In the opposite direction, floating IP’s will be allocated from the external network to provide access from the external internet to servers and the container services hosted in the cluster. This is a mandatory parameter and there is no default value.
- --public
Access to a ClusterTemplate is normally limited to the admin, owner or users within the same tenant as the owners. Setting this flag makes the ClusterTemplate public and accessible by other users. The default is not public.
- –server-type <server-type>
The servers in the cluster can be VM or baremetal. This parameter selects the type of server to create for the cluster. The default is ‘vm’. Possible values are ‘vm’, ‘bm’.
- –network-driver <network-driver>
The name of a network driver for providing the networks for the containers. Note that this is different and separate from the Neutron network for the cluster. The operation and networking model are specific to the particular driver; refer to the Networking section for more details. Supported network drivers and the default driver are:
COE
Network-Driver
Default
Kubernetes
flannel, calico
flannel
Note that the network driver name is case sensitive.
- –volume-driver <volume-driver>
The name of a volume driver for managing the persistent storage for the containers. The functionality supported are specific to the driver. Supported volume drivers and the default driver are:
COE
Volume-Driver
Default
Kubernetes
cinder
No Driver
Note that the volume driver name is case sensitive.
- –dns-nameserver <dns-nameserver>
The DNS nameserver for the servers and containers in the cluster to use. This is configured in the private Neutron network for the cluster. The default is ‘8.8.8.8’.
- –flavor <flavor>
The nova flavor id for booting the node servers. The default is ‘m1.small’. This value can be overridden at cluster creation.
- –master-flavor <master-flavor>
The nova flavor id for booting the master or manager servers. The default is ‘m1.small’. This value can be overridden at cluster creation.
- –http-proxy <http-proxy>
The IP address for a proxy to use when direct http access from the servers to sites on the external internet is blocked. This may happen in certain countries or enterprises, and the proxy allows the servers and containers to access these sites. The format is a URL including a port number. The default is ‘None’.
- –https-proxy <https-proxy>
The IP address for a proxy to use when direct https access from the servers to sites on the external internet is blocked. This may happen in certain countries or enterprises, and the proxy allows the servers and containers to access these sites. The format is a URL including a port number. The default is ‘None’.
- –no-proxy <no-proxy>
When a proxy server is used, some sites should not go through the proxy and should be accessed normally. In this case, you can specify these sites as a comma separated list of IP’s. The default is ‘None’.
- –docker-volume-size <docker-volume-size>
If specified, container images will be stored in a cinder volume of the specified size in GB. Each cluster node will have a volume attached of the above size. If not specified, images will be stored in the compute instance’s local disk. For the ‘devicemapper’ storage driver, must specify volume and the minimum value is 3GB. For the ‘overlay’ and ‘overlay2’ storage driver, the minimum value is 1GB or None(no volume). This value can be overridden at cluster creation.
- –docker-storage-driver <docker-storage-driver>
The name of a driver to manage the storage for the images and the container’s writable layer. The default is ‘devicemapper’.
- –labels <KEY1=VALUE1,KEY2=VALUE2;KEY3=VALUE3…>
Arbitrary labels in the form of key=value pairs. The accepted keys and valid values are defined in the cluster drivers. They are used as a way to pass additional parameters that are specific to a cluster driver. Refer to the subsection on labels for a list of the supported key/value pairs and their usage. The value can be overridden at cluster creation.
- --tls-disabled
Transport Layer Security (TLS) is normally enabled to secure the cluster. In some cases, users may want to disable TLS in the cluster, for instance during development or to troubleshoot certain problems. Specifying this parameter will disable TLS so that users can access the COE endpoints without a certificate. The default is TLS enabled.
- --registry-enabled
Docker images by default are pulled from the public Docker registry, but in some cases, users may want to use a private registry. This option provides an alternative registry based on the Registry V2: Magnum will create a local registry in the cluster backed by swift to host the images. Refer to Docker Registry 2.0 for more details. The default is to use the public registry.
- --master-lb-enabled
Since multiple masters may exist in a cluster, a load balancer is created to provide the API endpoint for the cluster and to direct requests to the masters. In some cases, such as when the LBaaS service is not available, this option can be set to ‘false’ to create a cluster without the load balancer. In this case, one of the masters will serve as the API endpoint. The default is ‘true’, i.e. to create the load balancer for the cluster.
Labels
Labels is a general method to specify supplemental parameters that are specific to certain COE or associated with certain options. Their format is key/value pair and their meaning is interpreted by the drivers that uses them. The drivers do validate the key/value pairs. Their usage is explained in details in the appropriate sections, however, since there are many possible labels, the following table provides a summary to help give a clearer picture. The label keys in the table are linked to more details elsewhere in the user guide.
label key |
label value |
default |
|---|---|---|
IPv4 CIDR |
10.100.0.0/16 |
|
|
vxlan |
|
size of subnet to assign to node |
24 |
|
|
false |
|
metrics_server_chart_tag |
see below |
see below |
metrics_server_enabled |
|
true |
monitoring_enabled |
|
false |
monitoring_retention_days |
see below |
see below |
monitoring_retention_size |
see below |
see below |
monitoring_storage_class_name |
see below |
see below |
monitoring_interval_seconds |
see below |
see below |
monitoring_ingress_enabled |
|
false |
cluster_basic_auth_secret |
see below |
see below |
cluster_root_domain_name |
see below |
see below |
prometheus_operator_chart_tag |
see below |
see below |
prometheus_adapter_enabled |
|
true |
prometheus_adapter_chart_tag |
see below |
see below |
prometheus_adapter_configmap |
(rules CM name) |
“” |
see below |
see below |
|
see below |
see below |
|
prometheus_monitoring (deprecated) |
|
false |
grafana_admin_passwd |
(any string) |
“admin” |
see below |
see below |
|
see below |
see below |
|
see below |
see below |
|
see below |
see below |
|
see below |
see below |
|
see below |
see below |
|
see below |
see below |
|
see below |
see below |
|
|
true |
|
see below |
see below |
|
see below |
see below |
|
|
false |
|
see below |
see below |
|
see below |
see below |
|
see below |
see below |
|
etcd storage volume size |
0 |
|
see below |
see below |
|
see below |
“” |
|
AZ for the cluster nodes |
“” |
|
see below |
false |
|
see below |
“” |
|
see below |
“ingress” |
|
see below |
see below |
|
see below |
see below |
|
see below |
see below |
|
extra kubelet args |
“” |
|
extra kubeapi args |
“” |
|
extra kubescheduler args |
“” |
|
extra kubecontroller args |
“” |
|
extra kubeproxy args |
“” |
|
|
“cgroupfs” |
|
|
see below |
|
service_cluster_ip_range |
IPv4 CIDR for k8s service portals |
10.254.0.0/16 |
see below |
true |
|
see below |
see below |
|
see below |
see below |
|
see below |
see below |
|
see below |
see below |
|
|
see below |
|
see below |
“” |
|
|
false |
|
see below |
“draino” |
|
see below |
see below |
|
|
false |
|
see below |
see below |
|
see below |
see below |
|
see below |
see below |
|
see below |
see below |
|
see below |
see below |
|
|
true |
|
|
see below |
|
|
see below |
|
|
“” |
|
see below |
see below |
|
see below |
see below |
|
see below |
see below |
|
see below |
see below |
|
see below |
10.100.0.0/16 |
|
see below |
Off |
|
see below |
“” |
|
see below |
amphora |
|
see bellow |
ROUND_ROBIN |
|
see bellow |
true |
Cluster
A cluster is an instance of the ClusterTemplate of a COE. Magnum deploys a cluster by referring to the attributes defined in the particular ClusterTemplate as well as a few additional parameters for the cluster. Magnum deploys the orchestration templates provided by the cluster driver to create and configure all the necessary infrastructure. When ready, the cluster is a fully operational COE that can host containers.
Infrastructure
The infrastructure of the cluster consists of the resources provided by the various OpenStack services. Existing infrastructure, including infrastructure external to OpenStack, can also be used by the cluster, such as DNS, public network, public discovery service, Docker registry. The actual resources created depends on the COE type and the options specified; therefore you need to refer to the cluster driver documentation of the COE for specific details. For instance, the option ‘–master-lb-enabled’ in the ClusterTemplate will cause a load balancer pool along with the health monitor and floating IP to be created. It is important to distinguish resources in the IaaS level from resources in the PaaS level. For instance, the infrastructure networking in OpenStack IaaS is different and separate from the container networking in Kubernetes PaaS.
Typical infrastructure includes the following.
- Servers
The servers host the containers in the cluster and these servers can be VM or bare metal. VM’s are provided by Nova. Since multiple VM’s are hosted on a physical server, the VM’s provide the isolation needed for containers between different tenants running on the same physical server. Bare metal servers are provided by Ironic and are used when peak performance with virtually no overhead is needed for the containers.
- Identity
Keystone provides the authentication and authorization for managing the cluster infrastructure.
- Network
Networking among the servers is provided by Neutron. Since COE currently are not multi-tenant, isolation for multi-tenancy on the networking level is done by using a private network for each cluster. As a result, containers belonging to one tenant will not be accessible to containers or servers of another tenant. Other networking resources may also be used, such as load balancer and routers. Networking among containers can be provided by Kuryr if needed.
- Storage
Cinder provides the block storage that can be used to host the containers and as persistent storage for the containers.
- Security
Barbican provides the storage of secrets such as certificates used for Transport Layer Security (TLS) within the cluster.
Life cycle
The set of life cycle operations on the cluster is one of the key value that Magnum provides, enabling clusters to be managed painlessly on OpenStack. The current operations are the basic CRUD operations, but more advanced operations are under discussion in the community and will be implemented as needed.
NOTE The OpenStack resources created for a cluster are fully accessible to the cluster owner. Care should be taken when modifying or reusing these resources to avoid impacting Magnum operations in unexpected manners. For instance, if you launch your own Nova instance on the cluster private network, Magnum would not be aware of this instance. Therefore, the cluster-delete operation will fail because Magnum would not delete the extra Nova instance and the private Neutron network cannot be removed while a Nova instance is still attached.
NOTE Currently Heat nested templates are used to create the resources; therefore if an error occurs, you can troubleshoot through Heat. For more help on Heat stack troubleshooting, refer to the Magnum Troubleshooting Guide.
Create
The ‘cluster-create’ command deploys a cluster, for example:
openstack coe cluster create mycluster \
                  --cluster-template mytemplate \
                  --node-count 8 \
                  --master-count 3
The ‘cluster-create’ operation is asynchronous; therefore you can initiate another ‘cluster-create’ operation while the current cluster is being created. If the cluster fails to be created, the infrastructure created so far may be retained or deleted depending on the particular orchestration engine. As a common practice, a failed cluster is retained during development for troubleshooting, but they are automatically deleted in production. The current cluster drivers use Heat templates and the resources of a failed ‘cluster-create’ are retained.
The definition and usage of the parameters for ‘cluster-create’ are as follows:
- <name>
Name of the cluster to create. If a name is not specified, a random name will be generated using a string and a number, for example “gamma-7-cluster”.
- –cluster-template <cluster-template>
The ID or name of the ClusterTemplate to use. This is a mandatory parameter. Once a ClusterTemplate is used to create a cluster, it cannot be deleted or modified until all clusters that use the ClusterTemplate have been deleted.
- –keypair <keypair>
The name of the SSH keypair to configure in the cluster servers for ssh access. You will need the key to be able to ssh to the servers in the cluster. The login name is specific to the cluster driver. If keypair is not provided it will attempt to use the value in the ClusterTemplate. If the ClusterTemplate is also missing a keypair value then an error will be returned. The keypair value provided here will override the keypair value from the ClusterTemplate.
- –node-count <node-count>
The number of servers that will serve as node in the cluster. The default is 1.
- –master-count <master-count>
The number of servers that will serve as master for the cluster. The default is 1. Set to more than 1 master to enable High Availability. If the option ‘–master-lb-enabled’ is specified in the ClusterTemplate, the master servers will be placed in a load balancer pool.
- –discovery-url <discovery-url>
The custom discovery url for node discovery. This is used by the COE to discover the servers that have been created to host the containers. The actual discovery mechanism varies with the COE. In some cases, Magnum fills in the server info in the discovery service. In other cases, if the discovery-url is not specified, Magnum will use the public discovery service at:
https://discovery.etcd.io
In this case, Magnum will generate a unique url here for each cluster and store the info for the servers.
- –timeout <timeout>
The timeout for cluster creation in minutes. The value expected is a positive integer and the default is 60 minutes. If the timeout is reached during cluster-create, the operation will be aborted and the cluster status will be set to ‘CREATE_FAILED’.
- --master-lb-enabled
Indicates whether created clusters should have a load balancer for master nodes or not.
List
The ‘cluster-list’ command lists all the clusters that belong to the tenant, for example:
openstack coe cluster list
Show
The ‘cluster-show’ command prints all the details of a cluster, for example:
openstack coe cluster show mycluster
The properties include those not specified by users that have been assigned default values and properties from new resources that have been created for the cluster.
Update
A cluster can be modified using the ‘cluster-update’ command, for example:
openstack coe cluster update mycluster replace node_count=8
The parameters are positional and their definition and usage are as follows.
- <cluster>
This is the first parameter, specifying the UUID or name of the cluster to update.
- <op>
This is the second parameter, specifying the desired change to be made to the cluster attributes. The allowed changes are ‘add’, ‘replace’ and ‘remove’.
- <attribute=value>
This is the third parameter, specifying the targeted attributes in the cluster as a list separated by blank space. To add or replace an attribute, you need to specify the value for the attribute. To remove an attribute, you only need to specify the name of the attribute. Currently the only attribute that can be replaced or removed is ‘node_count’. The attributes ‘name’, ‘master_count’ and ‘discovery_url’ cannot be replaced or delete. The table below summarizes the possible change to a cluster.
Attribute
add
replace
remove
node_count
no
add/remove nodes in default-worker nodegroup.
reset to default of 1
master_count
no
no
no
name
no
no
no
discovery_url
no
no
no
The ‘cluster-update’ operation cannot be initiated when another operation is in progress.
NOTE: The attribute names in cluster-update are slightly different from the corresponding names in the cluster-create command: the dash ‘-’ is replaced by an underscore ‘_’. For instance, ‘node-count’ in cluster-create is ‘node_count’ in cluster-update.
Scale
Scaling a cluster means adding servers to or removing servers from the cluster. Currently, this is done through the ‘cluster-update’ operation by modifying the node-count attribute, for example:
openstack coe cluster update mycluster replace node_count=2
When some nodes are removed, Magnum will attempt to find nodes with no containers to remove. If some nodes with containers must be removed, Magnum will log a warning message.
Delete
The ‘cluster-delete’ operation removes the cluster by deleting all resources such as servers, network, storage; for example:
openstack coe cluster delete mycluster
The only parameter for the cluster-delete command is the ID or name of the cluster to delete. Multiple clusters can be specified, separated by a blank space.
If the operation fails, there may be some remaining resources that have not been deleted yet. In this case, you can troubleshoot through Heat. If the templates are deleted manually in Heat, you can delete the cluster in Magnum to clean up the cluster from Magnum database.
The ‘cluster-delete’ operation can be initiated when another operation is still in progress.
Python Client
Installation
Follow the instructions in the OpenStack Installation Guide to enable the repositories for your distribution:
Install using distribution packages for RHEL/CentOS/Fedora:
$ sudo dnf install python3-magnumclient
Install using distribution packages for Ubuntu/Debian:
$ sudo apt-get install python3-magnumclient
Install using distribution packages for openSUSE and SUSE Enterprise Linux:
$ sudo zypper install python3-magnumclient
Verifying installation
Execute the openstack coe cluster list command to confirm that the client is installed and in the system path:
$ openstack coe cluster list
Using the command-line client
Refer to the OpenStack Command-Line Interface Reference for a full list of the commands supported by the openstack coe command-line client.
Horizon Interface
Magnum provides a Horizon plugin so that users can access the Container Infrastructure Management service through the OpenStack browser-based graphical UI. The plugin is available from magnum-ui. It is not installed by default in the standard Horizon service, but you can follow the instruction for installing a Horizon plugin.
In Horizon, the container infrastructure panel is part of the ‘Project’ view and it currently supports the following operations:
View list of cluster templates
View details of a cluster template
Create a cluster template
Delete a cluster template
View list of clusters
View details of a cluster
Create a cluster
Delete a cluster
Get the Certificate Authority for a cluster
Sign a user key and obtain a signed certificate for accessing the secured COE API endpoint in a cluster.
Other operations are not yet supported and the CLI should be used for these.
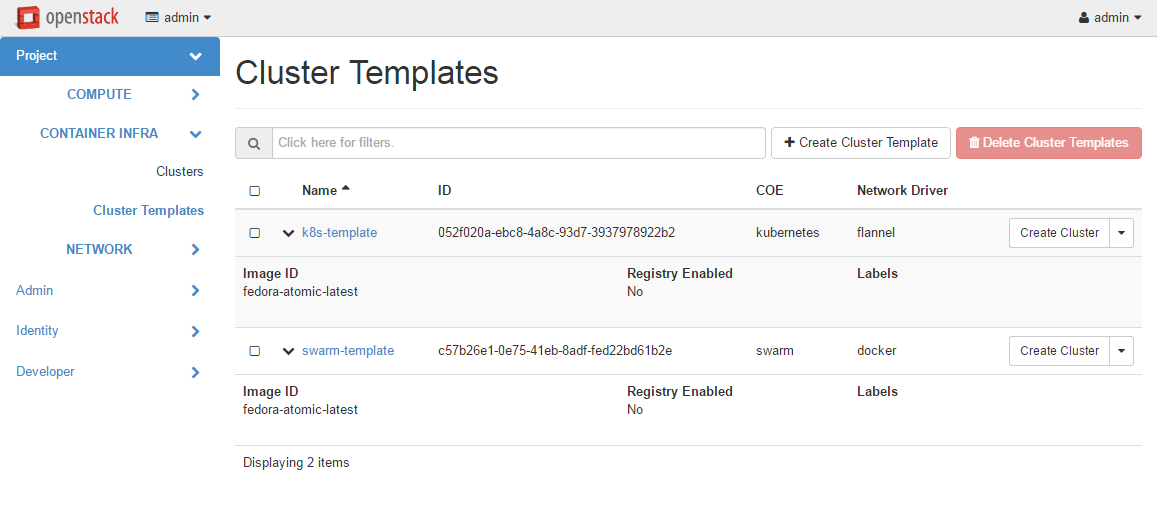
Following is the screenshot of the Horizon view showing the list of cluster templates.
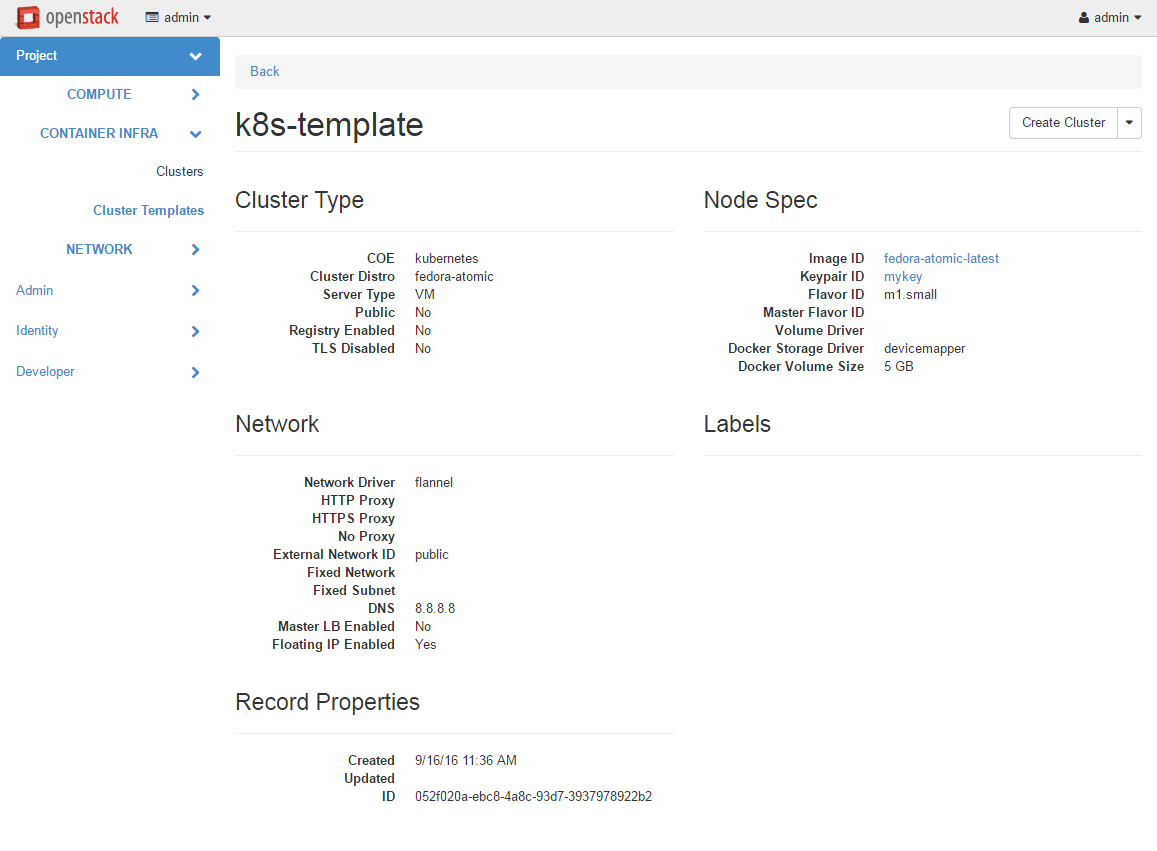
Following is the screenshot of the Horizon view showing the details of a cluster template.
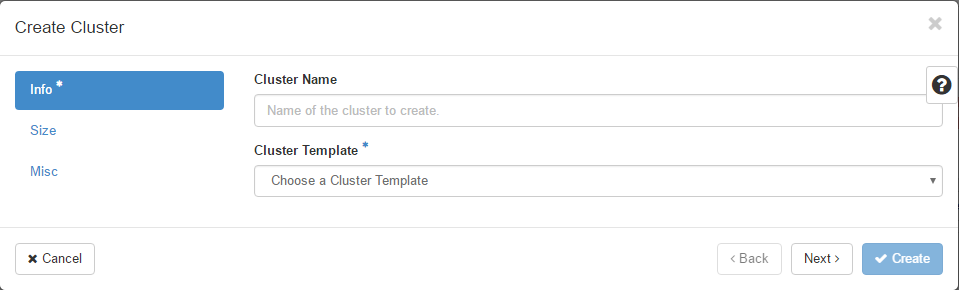
Following is the screenshot of the dialog to create a new cluster.
Cluster Drivers
A cluster driver is a collection of python code, heat templates, scripts, images, and documents for a particular COE on a particular distro. Magnum presents the concept of ClusterTemplates and clusters. The implementation for a particular cluster type is provided by the cluster driver. In other words, the cluster driver provisions and manages the infrastructure for the COE. Magnum includes default drivers for the following COE and distro pairs:
COE |
distro |
|---|---|
Kubernetes |
Fedora CoreOS |
Magnum is designed to accommodate new cluster drivers to support custom COE’s and this section describes how a new cluster driver can be constructed and enabled in Magnum.
Directory structure
Magnum expects the components to be organized in the following directory structure under the directory ‘drivers’:
COE_Distro/
   image/
   templates/
   api.py
   driver.py
   monitor.py
   scale.py
   template_def.py
   version.py
The minimum required components are:
- driver.py
Python code that implements the controller operations for the particular COE. The driver must implement: Currently supported:
cluster_create,cluster_update,cluster_delete.- templates
A directory of orchestration templates for managing the lifecycle of clusters, including creation, configuration, update, and deletion. Currently only Heat templates are supported, but in the future other orchestration mechanism such as Ansible may be supported.
- template_def.py
Python code that maps the parameters from the ClusterTemplate to the input parameters for the orchestration and invokes the orchestration in the templates directory.
- version.py
Tracks the latest version of the driver in this directory. This is defined by a
versionattribute and is represented in the form of1.0.0. It should also include aDriverattribute with descriptive name such ask8s_fedora_coreos.
The remaining components are optional:
- image
Instructions for obtaining or building an image suitable for the COE.
- api.py
Python code to interface with the COE.
- monitor.py
Python code to monitor the resource utilization of the cluster.
- scale.py
Python code to scale the cluster by adding or removing nodes.
Sample cluster driver
To help developers in creating new COE drivers, a minimal cluster driver is provided as an example. The ‘docker’ cluster driver will simply deploy a single VM running Ubuntu with the latest Docker version installed. It is not a true cluster, but the simplicity will help to illustrate the key concepts.
To be filled in
Installing a cluster driver
To be filled in
Heat Stack Templates
Heat Stack Templates are what Magnum passes to Heat to generate a cluster. For each ClusterTemplate resource in Magnum, a Heat stack is created to arrange all of the cloud resources needed to support the container orchestration environment. These Heat stack templates provide a mapping of Magnum object attributes to Heat template parameters, along with Magnum consumable stack outputs. Magnum passes the Heat Stack Template to the Heat service to create a Heat stack. The result is a full Container Orchestration Environment.
Choosing a COE
Choosing which COE to use depends on what tools you want to use to manage your containers once you start your app.
Kubernetes offers an attractive YAML file description of a pod, which is a grouping of containers that run together as part of a distributed application. This file format allows you to model your application deployment using a declarative style. It has support for auto scaling and fault recovery, as well as features that allow for sophisticated software deployments, including canary deploys and blue/green deploys. Kubernetes is very popular, especially for web applications.
Finding the right COE for your workload is up to you, but Magnum offers you a choice to select among the prevailing leading options. Once you decide, see the next sections for examples of how to create a cluster with your desired COE.
Native Clients
Magnum preserves the native user experience with a COE and does not provide a separate API or client. This means you will need to use the native client for the particular cluster type to interface with the clusters. In the typical case, there are two clients to consider:
- COE level
This is the orchestration or management level such as Kubernetes its frameworks.
- Container level
This is the low level container operation. Currently it is Docker for all clusters.
The clients can be CLI and/or browser-based. You will need to refer to the documentation for the specific native client and appropriate version for details, but following are some pointers for reference.
Kubernetes CLI is the tool ‘kubectl’, which can be simply copied from a node in the cluster or downloaded from the Kubernetes release. For instance, if the cluster is running Kubernetes release 1.2.0, the binary for ‘kubectl’ can be downloaded as and set up locally as follows:
curl -O https://storage.googleapis.com/kubernetes-release/release/v1.2.0/bin/linux/amd64/kubectl
chmod +x kubectl
sudo mv kubectl /usr/local/bin/kubectl
Kubernetes also provides a browser UI. If the cluster has the Kubernetes Dashboard running; it can be accessed using:
eval $(openstack coe cluster config <cluster-name>)
kubectl proxy

The browser can be accessed at http://localhost:8001/ui
Depending on the client requirement, you may need to use a version of the client that matches the version in the cluster. To determine the version of the COE and container, use the command ‘cluster-show’ and look for the attribute coe_version and container_version:
openstack coe cluster show k8s-cluster
+--------------------+------------------------------------------------------------+
| Property           | Value                                                      |
+--------------------+------------------------------------------------------------+
| status             | CREATE_COMPLETE                                            |
| uuid               | 04952c60-a338-437f-a7e7-d016d1d00e65                       |
| stack_id           | b7bf72ce-b08e-4768-8201-e63a99346898                       |
| status_reason      | Stack CREATE completed successfully                        |
| created_at         | 2016-07-25T23:14:06+00:00                                  |
| updated_at         | 2016-07-25T23:14:10+00:00                                  |
| create_timeout     | 60                                                         |
| coe_version        | v1.2.0                                                     |
| api_address        | https://192.168.19.86:6443                                 |
| cluster_template_id| da2825a0-6d09-4208-b39e-b2db666f1118                       |
| master_addresses   | ['192.168.19.87']                                          |
| node_count         | 1                                                          |
| node_addresses     | ['192.168.19.88']                                          |
| master_count       | 1                                                          |
| container_version  | 1.9.1                                                      |
| discovery_url      | https://discovery.etcd.io/3b7fb09733429d16679484673ba3bfd5 |
| name               | k8s-cluster                                                |
+--------------------+------------------------------------------------------------+
Kubernetes
Kubernetes uses a range of terminology that we refer to in this guide. We define these common terms in the Glossary for your reference.
When Magnum deploys a Kubernetes cluster, it uses parameters defined in the ClusterTemplate and specified on the cluster-create command, for example:
openstack coe cluster template create k8s-cluster-template \
                           --image fedora-coreos-latest \
                           --keypair testkey \
                           --external-network public \
                           --dns-nameserver 8.8.8.8 \
                           --flavor m1.small \
                           --docker-volume-size 5 \
                           --network-driver flannel \
                           --coe kubernetes

openstack coe cluster create k8s-cluster \
                      --cluster-template k8s-cluster-template \
                      --master-count 3 \
                      --node-count 8
Refer to the ClusterTemplate and Cluster sections for the full list of parameters. Following are further details relevant to a Kubernetes cluster:
- Number of masters (master-count)
Specified in the cluster-create command to indicate how many servers will run as master in the cluster. Having more than one will provide high availability. The masters will be in a load balancer pool and the virtual IP address (VIP) of the load balancer will serve as the Kubernetes API endpoint. For external access, a floating IP associated with this VIP is available and this is the endpoint shown for Kubernetes in the ‘cluster-show’ command.
- Number of nodes (node-count)
Specified in the cluster-create command to indicate how many servers will run as node in the cluster to host the users’ pods. The nodes are registered in Kubernetes using the Nova instance name.
- Network driver (network-driver)
Specified in the ClusterTemplate to select the network driver. The supported and default network driver is ‘flannel’, an overlay network providing a flat network for all pods. Refer to the Networking section for more details.
- Volume driver (volume-driver)
Specified in the ClusterTemplate to select the volume driver. The supported volume driver is ‘cinder’, allowing Cinder volumes to be mounted in containers for use as persistent storage. Data written to these volumes will persist after the container exits and can be accessed again from other containers, while data written to the union file system hosting the container will be deleted. Refer to the Storage section for more details.
- Storage driver (docker-storage-driver)
Specified in the ClusterTemplate to select the Docker storage driver. The default is ‘devicemapper’. Refer to the Storage section for more details.
NOTE: For Fedora CoreOS driver, devicemapper is not supported.
- Image (image)
Specified in the ClusterTemplate to indicate the image to boot the servers. The image binary is loaded in Glance with the attribute ‘os_distro = fedora-coreos’. Current supported images is Fedora CoreOS (download from Fedora CoreOS )
- TLS (tls-disabled)
Transport Layer Security is enabled by default, so you need a key and signed certificate to access the Kubernetes API and CLI. Magnum handles its own key and certificate when interfacing with the Kubernetes cluster. In development mode, TLS can be disabled. Refer to the ‘Transport Layer Security’_ section for more details.
- What runs on the servers
The servers for Kubernetes master host containers in the ‘kube-system’ name space to run the Kubernetes proxy, scheduler and controller manager. The masters will not host users’ pods. Kubernetes API server, docker daemon, etcd and flannel run as systemd services. The servers for Kubernetes node also host a container in the ‘kube-system’ name space to run the Kubernetes proxy, while Kubernetes kubelet, docker daemon and flannel run as systemd services.
- Log into the servers
You can log into the master servers using the login ‘fedora’ and the keypair specified in the ClusterTemplate.
In addition to the common attributes in the ClusterTemplate, you can specify the following attributes that are specific to Kubernetes by using the labels attribute.
- admission_control_list
This label corresponds to Kubernetes parameter for the API server ‘–admission-control’. For more details, refer to the Admission Controllers. The default value corresponds to the one recommended in this doc for our current Kubernetes version.
- boot_volume_size
This label overrides the default_boot_volume_size of instances which is useful if your flavors are boot from volume only. The default value is 0, meaning that cluster instances will not boot from volume.
- boot_volume_type
This label overrides the default_boot_volume_type of instances which is useful if your flavors are boot from volume only. The default value is ‘’, meaning that Magnum will randomly select a Cinder volume type from all available options.
- etcd_volume_size
This label sets the size of a volume holding the etcd storage data. The default value is 0, meaning the etcd data is not persisted (no volume).
- etcd_volume_type
This label overrides the default_etcd_volume_type holding the etcd storage data. The default value is ‘’, meaning that Magnum will randomly select a Cinder volume type from all available options.
- container_infra_prefix
Prefix of all container images used in the cluster (kubernetes components, coredns, kubernetes-dashboard, node-exporter). For example, kubernetes-apiserver is pulled from docker.io/openstackmagnum/kubernetes-apiserver, with this label it can be changed to myregistry.example.com/mycloud/kubernetes-apiserver. Similarly, all other components used in the cluster will be prefixed with this label, which assumes an operator has cloned all expected images in myregistry.example.com/mycloud.
Images that must be mirrored:
docker.io/coredns/coredns:1.3.1
quay.io/coreos/etcd:v3.4.6
docker.io/k8scloudprovider/k8s-keystone-auth:v1.18.0
docker.io/k8scloudprovider/openstack-cloud-controller-manager:v1.18.0
gcr.io/google_containers/pause:3.1
Images that might be needed when ‘use_podman’ is ‘false’:
docker.io/openstackmagnum/kubernetes-apiserver
docker.io/openstackmagnum/kubernetes-controller-manager
docker.io/openstackmagnum/kubernetes-kubelet
docker.io/openstackmagnum/kubernetes-proxy
docker.io/openstackmagnum/kubernetes-scheduler
Images that might be needed:
k8s.gcr.io/hyperkube:v1.18.2
docker.io/grafana/grafana:5.1.5
docker.io/prom/node-exporter:latest
docker.io/prom/prometheus:latest
docker.io/traefik:v1.7.28
gcr.io/google_containers/kubernetes-dashboard-amd64:v1.5.1
gcr.io/google_containers/metrics-server-amd64:v0.3.6
k8s.gcr.io/node-problem-detector:v0.6.2
docker.io/planetlabs/draino:abf028a
docker.io/openstackmagnum/cluster-autoscaler:v1.18.1
quay.io/calico/cni:v3.13.1
quay.io/calico/pod2daemon-flexvol:v3.13.1
quay.io/calico/kube-controllers:v3.13.1
quay.io/calico/node:v3.13.1
quay.io/coreos/flannel-cni:v0.3.0
quay.io/coreos/flannel:v0.12.0-amd64
Images that might be needed if ‘monitoring_enabled’ is ‘true’:
quay.io/prometheus/alertmanager:v0.20.0
docker.io/squareup/ghostunnel:v1.5.2
docker.io/jettech/kube-webhook-certgen:v1.0.0
quay.io/coreos/prometheus-operator:v0.37.0
quay.io/coreos/configmap-reload:v0.0.1
quay.io/coreos/prometheus-config-reloader:v0.37.0
quay.io/prometheus/prometheus:v2.15.2
Images that might be needed if ‘cinder_csi_enabled’ is ‘true’:
docker.io/k8scloudprovider/cinder-csi-plugin:v1.18.0
quay.io/k8scsi/csi-attacher:v2.0.0
quay.io/k8scsi/csi-provisioner:v1.4.0
quay.io/k8scsi/csi-snapshotter:v1.2.2
quay.io/k8scsi/csi-resizer:v0.3.0
quay.io/k8scsi/csi-node-driver-registrar:v1.1.0
- hyperkube_prefix
This label allows users to specify a custom prefix for Hyperkube container source since official Hyperkube images have been discontinued for kube_tag greater than 1.18.x. If you wish you use 1.19.x onwards, you may want to use unofficial sources like docker.io/rancher/, ghcr.io/openstackmagnum/ or your own container registry. If container_infra_prefix label is defined, it still takes precedence over this label. Default: docker.io/rancher/
- kube_tag
This label allows users to select a specific Kubernetes release based on its container tag for Fedora CoreOS image. If unset, the current Magnum version’s default Kubernetes release is installed. Stein default: v1.11.6 Train default: v1.15.7 Ussuri default: v1.18.2 Victoria default: v1.18.16 Yoga default: v1.23.3-rancher1
- heapster_enabled
heapster_enabled is used to enable disable the installation of heapster. Ussuri default: false Train default: true
- cloud_provider_tag
This label allows users to override the default openstack-cloud-controller-manager container image tag. Refer to openstack-cloud-controller-manager page for available tags. Stein default: v0.2.0 Train default: v1.15.0 Ussuri default: v1.18.0
- etcd_tag
This label allows users to select a specific etcd version, based on its container tag. If unset, the current Magnum version’s a default etcd version. Stein default: v3.2.7 Train default: 3.2.26 Ussuri default: v3.4.6
- coredns_tag
This label allows users to select a specific coredns version, based on its container tag. If unset, the current Magnum version’s a default etcd version. Stein default: 1.3.1 Train default: 1.3.1 Ussuri default: 1.6.6
- flannel_tag
This label allows users to select a specific flannel version, based on its container tag:
If unset, the default version will be used.
- flannel_cni_tag
This label allows users to select a specific flannel_cni version, based on its container tag. This container adds the cni plugins in the host under /opt/cni/bin. If unset, the current Magnum version’s a default flannel version. Stein default: v0.3.0 Train default: v0.3.0 Ussuri default: v0.3.0
- heat_container_agent_tag
This label allows users to select a specific heat_container_agent version, based on its container tag. Train-default: train-stable-3 Ussuri-default: ussuri-stable-1 Victoria-default: victoria-stable-1 Wallaby-default: wallaby-stable-1
- kube_dashboard_enabled
This label triggers the deployment of the kubernetes dashboard. The default value is 1, meaning it will be enabled.
- cert_manager_api
This label enables the kubernetes certificate manager api.
- kubelet_options
This label can hold any additional options to be passed to the kubelet. For more details, refer to the kubelet admin guide. By default no additional options are passed.
- kubeproxy_options
This label can hold any additional options to be passed to the kube proxy. For more details, refer to the kube proxy admin guide. By default no additional options are passed.
- kubecontroller_options
This label can hold any additional options to be passed to the kube controller manager. For more details, refer to the kube controller manager admin guide. By default no additional options are passed.
- kubeapi_options
This label can hold any additional options to be passed to the kube api server. For more details, refer to the kube api admin guide. By default no additional options are passed.
- kubescheduler_options
This label can hold any additional options to be passed to the kube scheduler. For more details, refer to the kube scheduler admin guide. By default no additional options are passed.
- influx_grafana_dashboard_enabled
The kubernetes dashboard comes with heapster enabled. If this label is set, an influxdb and grafana instance will be deployed, heapster will push data to influx and grafana will project them.
- cgroup_driver
This label tells kubelet which Cgroup driver to use. Ideally this should be identical to the Cgroup driver that Docker has been started with.
- cloud_provider_enabled
Add ‘cloud_provider_enabled’ label for the k8s_fedora_atomic driver. Defaults to the value of ‘cluster_user_trust’ (default: ‘false’ unless explicitly set to ‘true’ in magnum.conf due to CVE-2016-7404). Consequently, ‘cloud_provider_enabled’ label cannot be overridden to ‘true’ when ‘cluster_user_trust’ resolves to ‘false’. For specific kubernetes versions, if ‘cinder’ is selected as a ‘volume_driver’, it is implied that the cloud provider will be enabled since they are combined.
- cinder_csi_enabled
When ‘true’, out-of-tree Cinder CSI driver will be enabled. Requires ‘cinder’ to be selected as a ‘volume_driver’ and consequently also requires label ‘cloud_provider_enabled’ to be ‘true’ (see ‘cloud_provider_enabled’ section). Ussuri default: false Victoria default: true
- cinder_csi_plugin_tag
This label allows users to override the default cinder-csi-plugin container image tag. Refer to cinder-csi-plugin page for available tags. Train default: v1.16.0 Ussuri default: v1.18.0 Yoga default: v1.23.0
- csi_attacher_tag
This label allows users to override the default container tag for CSI attacher. For additional tags, refer to CSI attacher page. Ussuri-default: v2.0.0 Yoga-default: v3.3.0
- csi_provisioner_tag
This label allows users to override the default container tag for CSI provisioner. For additional tags, refer to CSI provisioner page. Ussuri-default: v1.4.0 Yoga-default: v3.0.0
- csi_snapshotter_tag
This label allows users to override the default container tag for CSI snapshotter. For additional tags, refer to CSI snapshotter page. Ussuri-default: v1.2.2 Yoga-default: v4.2.1
- csi_resizer_tag
This label allows users to override the default container tag for CSI resizer. For additional tags, refer to CSI resizer page. Ussuri-default: v0.3.0 Yoga-default: v1.3.0
- csi_node_driver_registrar_tag
This label allows users to override the default container tag for CSI node driver registrar. For additional tags, refer to CSI node driver registrar page. Ussuri-default: v1.1.0 Yoga-default: v2.4.0
- -csi_liveness_probe_tag
This label allows users to override the default container tag for CSI liveness probe. Yoga-default: v2.5.0
- keystone_auth_enabled
If this label is set to True, Kubernetes will support use Keystone for authorization and authentication.
- k8s_keystone_auth_tag
This label allows users to override the default k8s-keystone-auth container image tag. Refer to k8s-keystone-auth page for available tags. Stein default: v1.13.0 Train default: v1.14.0 Ussuri default: v1.18.0
- helm_client_url
URL of the helm client binary. Default: ‘’
- helm_client_sha256
SHA256 checksum of the helm client binary. Ussuri default: 018f9908cb950701a5d59e757653a790c66d8eda288625dbb185354ca6f41f6b
- helm_client_tag
This label allows users to override the default container tag for Helm client. For additional tags, refer to Helm client page. Ussuri default: v3.2.1
- master_lb_floating_ip_enabled
Controls if Magnum allocates floating IP for the load balancer of master nodes. This label only takes effect when the template property
master_lb_enabledis set. If not specified, the default value is the same as template propertyfloating_ip_enabled.- master_lb_allowed_cidrs
A CIDR list which can be used to control the access for the load balancer of master nodes. The input format is comma delimited list. For example, 192.168.0.0/16,10.0.0.0/24. Default: “” (which opens to 0.0.0.0/0)
- auto_healing_enabled
If set to true, auto healing feature will be enabled. Defaults to false.
- auto_healing_controller
This label sets the auto-healing service to be used. Currently
drainoandmagnum-auto-healerare supported. The default isdraino. For more details, see draino doc and magnum-auto-healer doc.- draino_tag
This label allows users to select a specific Draino version.
- magnum_auto_healer_tag
This label allows users to override the default magnum-auto-healer container image tag. Refer to magnum-auto-healer page for available tags. Stein default: v1.15.0 Train default: v1.15.0 Ussuri default: v1.18.0
- auto_scaling_enabled
If set to true, auto scaling feature will be enabled. Default: false.
- autoscaler_tag
This label allows users to override the default cluster-autoscaler container image tag. Refer to cluster-autoscaler page for available tags. Stein default: v1.0 Train default: v1.0 Ussuri default: v1.18.1
- npd_enabled
Set Node Problem Detector service enabled or disabled. Default: true
- node_problem_detector_tag
This label allows users to select a specific Node Problem Detector version.
- min_node_count
The minmium node count of the cluster when doing auto scaling or auto healing. Default: 1
- max_node_count
The maxmium node count of the cluster when doing auto scaling or auto healing.
- use_podman
Choose whether system containers etcd, kubernetes and the heat-agent will be installed with podman or atomic. This label is relevant for k8s_fedora drivers.
k8s_fedora_atomic_v1 defaults to use_podman=false, meaning atomic will be used pulling containers from docker.io/openstackmagnum. use_podman=true is accepted as well, which will pull containers by k8s.gcr.io.
k8s_fedora_coreos_v1 defaults and accepts only use_podman=true.
Note that, to use kubernetes version greater or equal to v1.16.0 with the k8s_fedora_atomic_v1 driver, you need to set use_podman=true. This is necessary since v1.16 dropped the –containerized flag in kubelet. https://github.com/kubernetes/kubernetes/pull/80043/files
- selinux_mode
Choose SELinux mode between enforcing, permissive and disabled. This label is currently only relevant for k8s_fedora drivers.
k8s_fedora_atomic_v1 driver defaults to selinux_mode=permissive because this was the only way atomic containers were able to start Kubernetes services. On the other hand, if the opt-in use_podman=true label is supplied, selinux_mode=enforcing is supported. Note that if selinux_mode=disabled is chosen, this only takes full effect once the instances are manually rebooted but they will be set to permissive mode in the meantime.
k8s_fedora_coreos_v1 driver defaults to selinux_mode=enforcing.
- container_runtime
The container runtime to use. Empty value means, use docker from the host. Since ussuri, apart from empty (host-docker), containerd is also an option.
- containerd_version
The containerd version to use as released in https://github.com/containerd/containerd/releases and https://storage.googleapis.com/cri-containerd-release/ Victoria default: 1.4.4 Ussuri default: 1.2.8
- containerd_tarball_url
Url with the tarball of containerd’s binaries.
- containerd_tarball_sha256
sha256 of the tarball fetched with containerd_tarball_url or from https://github.com/containerd/containerd/releases.
- kube_dashboard_version
Default version of Kubernetes dashboard. Train default: v1.8.3 Ussuri default: v2.0.0
- metrics_scraper_tag
The version of metrics-scraper used by kubernetes dashboard. Ussuri default: v1.0.4
- fixed_subnet_cidr
CIDR of the fixed subnet created by Magnum when a user has not specified an existing fixed_subnet during cluster creation. Ussuri default: 10.0.0.0/24
- octavia_provider
Octavia provider driver to be used for creating load balancers.
- octavia_lb_algorithm
Octavia Octavia lb algorithm to use for LoadBalancer type service Default: ROUND_ROBIN
- octavia_lb_healthcheck
If true, enable Octavia load balancer healthcheck Default: true
Supported versions
The supported (tested) versions of Kubernetes and Operating Systems are:
Release |
kube_tag |
os distro and version |
|---|---|---|
19.0.0 (Dalmatian) |
v1.28.9-rancher1 |
fedora-coreos-38.20230806.3.0 |
18.0.0 (Caracal) |
v1.27.8-rancher2 |
fedora-coreos-38.20230806.3.0 |
17.0.0 (Bobcat) |
v1.26.8-rancher1 |
fedora-coreos-38.20230806.3.0 |
16.0.0 (Antelope) |
v1.23.3-rancher1 |
fedora-coreos-35.20220116.3.0 |
15.0.0 (Zed) |
v1.23.3-rancher1 |
fedora-coreos-35.20220116.3.0 |
14.0.0 (Yoga) |
v1.23.3-rancher1 |
fedora-coreos-35.20220116.3.0 |
13.0.0 (Xena) |
v1.21.x |
fedora-coreos-31.20200323.3.2 |
12.0.0 (Wallaby) |
v1.21.x |
fedora-coreos-31.20200323.3.2 |
11.1.1 (Victoria) |
v1.21.x |
fedora-coreos-31.20200323.3.2 |
Note: It is important to try to use the exact image version tested. Sometimes Fedora updates packages within the same major version, so Magnum may not work if it is expecting different software versions. e.g.
fedora-coreos-35.20220116.3.0 - containerd 1.5
fedora-coreos-35.20220424.3.0 - containerd 1.6
Due to config file differences between containerd 1.5 and 1.6, a newer version of fcos 35 will not work without patches.
Supported labels
The tested labels for each release is as follow
Dalmatian
kube_tag=v1.28.9-rancher1,container_runtime=containerd,containerd_version=1.6.31,containerd_tarball_sha256=75afb9b9674ff509ae670ef3ab944ffcdece8ea9f7d92c42307693efa7b6109d,cloud_provider_tag=v1.27.3,cinder_csi_plugin_tag=v1.27.3,k8s_keystone_auth_tag=v1.27.3,magnum_auto_healer_tag=v1.27.3,octavia_ingress_controller_tag=v1.27.3,calico_tag=v3.26.4
kube_tag=v1.27.8-rancher2,container_runtime=containerd,containerd_version=1.6.31,containerd_tarball_sha256=75afb9b9674ff509ae670ef3ab944ffcdece8ea9f7d92c42307693efa7b6109d,cloud_provider_tag=v1.27.3,cinder_csi_plugin_tag=v1.27.3,k8s_keystone_auth_tag=v1.27.3,magnum_auto_healer_tag=v1.27.3,octavia_ingress_controller_tag=v1.27.3,calico_tag=v3.26.4
Caracal
kube_tag=v1.27.8-rancher2,container_runtime=containerd,containerd_version=1.6.28,containerd_tarball_sha256=f70736e52d61e5ad225f4fd21643b5ca1220013ab8b6c380434caeefb572da9b,cloud_provider_tag=v1.27.3,cinder_csi_plugin_tag=v1.27.3,k8s_keystone_auth_tag=v1.27.3,magnum_auto_healer_tag=v1.27.3,octavia_ingress_controller_tag=v1.27.3,calico_tag=v3.26.4
Bobcat
kube_tag=v1.25.9-rancher1,flannel_tag=v0.21.5,master_lb_floating_ip_enabled=true,cinder_csi_enabled=true,ingress_controller=octavia,container_runtime=containerd,containerd_version=1.6.20,containerd_tarball_sha256=1d86b534c7bba51b78a7eeb1b67dd2ac6c0edeb01c034cc5f590d5ccd824b416,cloud_provider_tag=v1.25.5,cinder_csi_plugin_tag=v1.25.5,k8s_keystone_auth_tag=v1.25.5,octavia_ingress_controller_tag=v1.25.5,coredns_tag=1.10.1,csi_snapshotter_tag=v6.2.1,csi_attacher_tag=v4.2.0,csi_resizer_tag=v1.7.0,csi_provisioner_tag=v3.4.1,csi_node_driver_registrar_tag=v2.8.0
kube_tag=v1.26.8-rancher1,flannel_tag=v0.21.5,master_lb_floating_ip_enabled=true,cinder_csi_enabled=true,ingress_controller=octavia,container_runtime=containerd,containerd_version=1.6.20,containerd_tarball_sha256=1d86b534c7bba51b78a7eeb1b67dd2ac6c0edeb01c034cc5f590d5ccd824b416,cloud_provider_tag=v1.26.3,cinder_csi_plugin_tag=v1.26.3,k8s_keystone_auth_tag=v1.26.3,octavia_ingress_controller_tag=v1.26.3,coredns_tag=1.10.1,csi_snapshotter_tag=v6.2.1,csi_attacher_tag=v4.2.0,csi_resizer_tag=v1.7.0,csi_provisioner_tag=v3.4.1,csi_node_driver_registrar_tag=v2.8.0
Antelope
kube_tag=v1.23.8-rancher1,flannel_tag=v0.18.1,master_lb_floating_ip_enabled=true,cinder_csi_enabled=true,ingress_controller=octavia,container_runtime=containerd,containerd_version=1.6.6,containerd_tarball_sha256=a64568c8ce792dd73859ce5f336d5485fcbceab15dc3e06d5d1bc1c3353fa20f,cloud_provider_tag=v1.23.4,cinder_csi_plugin_tag=v1.23.4,k8s_keystone_auth_tag=v1.23.4,magnum_auto_healer_tag=v1.23.4,octavia_ingress_controller_tag=v1.23.4,autoscaler_tag=v1.23.0,coredns_tag=1.9.3,csi_snapshotter_tag=v4.2.1,csi_attacher_tag=v3.3.0,csi_resizer_tag=v1.3.0,csi_provisioner_tag=v3.0.0,csi_node_driver_registrar_tag=v2.4.0
Images
The supported images can be downloaded from the following locations
fedora-coreos-38.20230806.3.0 - https://builds.coreos.fedoraproject.org/prod/streams/stable/builds/38.20230806.3.0/x86_64/fedora-coreos-38.20230806.3.0-openstack.x86_64.qcow2.xz
fedora-coreos-37.20230322.3.0 - https://builds.coreos.fedoraproject.org/prod/streams/stable/builds/37.20230322.3.0/x86_64/fedora-coreos-37.20230322.3.0-openstack.x86_64.qcow2.xz
fedora-coreos-35.20220116.3.0 - https://builds.coreos.fedoraproject.org/prod/streams/stable/builds/35.20220116.3.0/x86_64/fedora-coreos-35.20220116.3.0-openstack.x86_64.qcow2.xz
fedora-coreos-31.20200323.3.2 - https://builds.coreos.fedoraproject.org/prod/streams/stable/builds/31.20200323.3.2/x86_64/fedora-coreos-31.20200323.3.2-openstack.x86_64.qcow2.xz
External load balancer for services
All Kubernetes pods and services created in the cluster are assigned IP addresses on a private container network so they can access each other and the external internet. However, these IP addresses are not accessible from an external network.
To publish a service endpoint externally so that the service can be accessed from the external network, Kubernetes provides the external load balancer feature. This is done by simply specifying in the service manifest the attribute “type: LoadBalancer”. Magnum enables and configures the Kubernetes plugin for OpenStack so that it can interface with Neutron and manage the necessary networking resources.
When the service is created, Kubernetes will add an external load balancer in front of the service so that the service will have an external IP address in addition to the internal IP address on the container network. The service endpoint can then be accessed with this external IP address. Kubernetes handles all the life cycle operations when pods are modified behind the service and when the service is deleted.
Refer to the Kubernetes External Load Balancer section for more details.
Ingress Controller
In addition to the LoadBalancer described above, Kubernetes can also be configured with an Ingress Controller. Ingress can provide load balancing, SSL termination and name-based virtual hosting.
Magnum allows selecting one of multiple controller options via the ‘ingress_controller’ label. Check the Kubernetes documentation to define your own Ingress resources.
Traefik: Traefik’s pods by default expose port 80 and 443 for http(s) traffic on the nodes they are running. In kubernetes cluster, these ports are closed by default. Cluster administrator needs to add a rule in the worker nodes security group. For example:
openstack security group rule create <SECURITY_GROUP> \
  --protocol tcp \
  --dst-port 80:80
openstack security group rule create <SECURITY_GROUP> \
  --protocol tcp \
  --dst-port 443:443
- ingress_controller
This label sets the Ingress Controller to be used. Currently ‘traefik’, ‘nginx’ and ‘octavia’ are supported. The default is ‘’, meaning no Ingress Controller is configured. For more details about octavia-ingress-controller please refer to cloud-provider-openstack document
- ingress_controller_role
This label defines the role nodes should have to run an instance of the Ingress Controller. This gives operators full control on which nodes should be running an instance of the controller, and should be set in multiple nodes for availability. Default is ‘ingress’. An example of setting this in a Kubernetes node would be:
kubectl label node <node-name> role=ingress
This label is not used for octavia-ingress-controller.
- octavia_ingress_controller_tag
The image tag for octavia-ingress-controller. Train-default: v1.15.0
- nginx_ingress_controller_tag
The image tag for nginx-ingress-controller. Stein-default: 0.23.0 Train-default: 0.26.1 Ussuru-default: 0.26.1 Victoria-default: 0.32.0
- nginx_ingress_controller_chart_tag
The chart version for nginx-ingress-controller. Train-default: v1.24.7 Ussuru-default: v1.24.7 Victoria-default: v1.36.3
- traefik_ingress_controller_tag
The image tag for traefik_ingress_controller_tag. Stein-default: v1.7.10
DNS
CoreDNS is a critical service in Kubernetes cluster for service discovery. To get high availability for CoreDNS pod for Kubernetes cluster, now Magnum supports the autoscaling of CoreDNS using cluster-proportional-autoscaler. With cluster-proportional-autoscaler, the replicas of CoreDNS pod will be autoscaled based on the nodes and cores in the clsuter to prevent single point failure.
The scaling parameters and data points are provided via a ConfigMap to the autoscaler and it refreshes its parameters table every poll interval to be up to date with the latest desired scaling parameters. Using ConfigMap means user can do on-the-fly changes(including control mode) without rebuilding or restarting the scaler containers/pods. Please refer Autoscale the DNS Service in a Cluster for more info.
Keystone authN and authZ
Now cloud-provider-openstack provides a good webhook between OpenStack Keystone and Kubernetes, so that user can do authorization and authentication with a Keystone user/role against the Kubernetes cluster. If label keystone-auth-enabled is set True, then user can use their OpenStack credentials and roles to access resources in Kubernetes.
Assume you have already got the configs with command eval $(openstack coe cluster config <cluster ID>), then to configure the kubectl client, the following commands are needed:
Run kubectl config set-credentials openstackuser –auth-provider=openstack
Run kubectl config set-context –cluster=<your cluster name> –user=openstackuser openstackuser@kubernetes
Run kubectl config use-context openstackuser@kubernetes to activate the context
NOTE: Please make sure the version of kubectl is 1.8+ and make sure OS_DOMAIN_NAME is included in the rc file.
Now try kubectl get pods, you should be able to see response from Kubernetes based on current user’s role.
Please refer the doc of k8s-keystone-auth in cloud-provider-openstack for more information.
Transport Layer Security
Magnum uses TLS to secure communication between a cluster’s services and the outside world. TLS is a complex subject, and many guides on it exist already. This guide will not attempt to fully describe TLS, but instead will only cover the necessary steps to get a client set up to talk to a cluster with TLS. A more in-depth guide on TLS can be found in the OpenSSL Cookbook by Ivan Ristić.
TLS is employed at 3 points in a cluster:
By Magnum to communicate with the cluster API endpoint
By the cluster worker nodes to communicate with the master nodes
By the end-user when they use the native client libraries to interact with the cluster. This applies to both a CLI or a program that uses a client for the particular cluster. Each client needs a valid certificate to authenticate and communicate with a cluster.
The first two cases are implemented internally by Magnum and are not exposed to the users, while the last case involves the users and is described in more details below.
Deploying a secure cluster
Current TLS support is summarized below:
COE |
TLS support |
|---|---|
Kubernetes |
yes |
For cluster type with TLS support, e.g. Kubernetes, TLS is enabled by default. To disable TLS in Magnum, you can specify the parameter ‘–tls-disabled’ in the ClusterTemplate. Please note it is not recommended to disable TLS due to security reasons.
In the following example, Kubernetes is used to illustrate a secure cluster, but the steps are similar for other cluster types that have TLS support.
First, create a ClusterTemplate; by default TLS is enabled in Magnum, therefore it does not need to be specified via a parameter:
openstack coe cluster template create secure-kubernetes \
                           --keypair default \
                           --external-network public \
                           --image fedora-coreos-latest \
                           --dns-nameserver 8.8.8.8 \
                           --flavor m1.small \
                           --docker-volume-size 3 \
                           --coe kubernetes \
                           --network-driver flannel

+-----------------------+--------------------------------------+
| Property              | Value                                |
+-----------------------+--------------------------------------+
| insecure_registry     | None                                 |
| http_proxy            | None                                 |
| updated_at            | None                                 |
| master_flavor_id      | None                                 |
| uuid                  | 5519b24a-621c-413c-832f-c30424528b31 |
| no_proxy              | None                                 |
| https_proxy           | None                                 |
| tls_disabled          | False                                |
| keypair_id            | time4funkey                          |
| public                | False                                |
| labels                | {}                                   |
| docker_volume_size    | 5                                    |
| server_type           | vm                                   |
| external_network_id   | public                               |
| cluster_distro        | fedora-coreos                        |
| image_id              | fedora-coreos-latest                 |
| volume_driver         | None                                 |
| registry_enabled      | False                                |
| docker_storage_driver | devicemapper                         |
| apiserver_port        | None                                 |
| name                  | secure-kubernetes                    |
| created_at            | 2016-07-25T23:09:50+00:00            |
| network_driver        | flannel                              |
| fixed_network         | None                                 |
| coe                   | kubernetes                           |
| flavor_id             | m1.small                             |
| dns_nameserver        | 8.8.8.8                              |
+-----------------------+--------------------------------------+
Now create a cluster. Use the ClusterTemplate name as a template for cluster creation:
openstack coe cluster create secure-k8s-cluster \
                      --cluster-template secure-kubernetes \
                      --node-count 1

+--------------------+------------------------------------------------------------+
| Property           | Value                                                      |
+--------------------+------------------------------------------------------------+
| status             | CREATE_IN_PROGRESS                                         |
| uuid               | 3968ffd5-678d-4555-9737-35f191340fda                       |
| stack_id           | c96b66dd-2109-4ae2-b510-b3428f1e8761                       |
| status_reason      | None                                                       |
| created_at         | 2016-07-25T23:14:06+00:00                                  |
| updated_at         | None                                                       |
| create_timeout     | 0                                                          |
| api_address        | None                                                       |
| coe_version        | -                                                          |
| cluster_template_id| 5519b24a-621c-413c-832f-c30424528b31                       |
| master_addresses   | None                                                       |
| node_count         | 1                                                          |
| node_addresses     | None                                                       |
| master_count       | 1                                                          |
| container_version  | -                                                          |
| discovery_url      | https://discovery.etcd.io/ba52a8178e7364d43a323ee4387cf28e |
| name               | secure-k8s-cluster                                          |
+--------------------+------------------------------------------------------------+
Now run cluster-show command to get the details of the cluster and verify that the api_address is ‘https’:
openstack coe cluster show secure-k8scluster
+--------------------+------------------------------------------------------------+
| Property           | Value                                                      |
+--------------------+------------------------------------------------------------+
| status             | CREATE_COMPLETE                                            |
| uuid               | 04952c60-a338-437f-a7e7-d016d1d00e65                       |
| stack_id           | b7bf72ce-b08e-4768-8201-e63a99346898                       |
| status_reason      | Stack CREATE completed successfully                        |
| created_at         | 2016-07-25T23:14:06+00:00                                  |
| updated_at         | 2016-07-25T23:14:10+00:00                                  |
| create_timeout     | 60                                                         |
| coe_version        | v1.2.0                                                     |
| api_address        | https://192.168.19.86:6443                                 |
| cluster_template_id| da2825a0-6d09-4208-b39e-b2db666f1118                       |
| master_addresses   | ['192.168.19.87']                                          |
| node_count         | 1                                                          |
| node_addresses     | ['192.168.19.88']                                          |
| master_count       | 1                                                          |
| container_version  | 1.9.1                                                      |
| discovery_url      | https://discovery.etcd.io/3b7fb09733429d16679484673ba3bfd5 |
| name               | secure-k8s-cluster                                          |
+--------------------+------------------------------------------------------------+
You can see the api_address contains https in the URL, showing that the Kubernetes services are configured securely with SSL certificates and now any communication to kube-apiserver will be over https.
Interfacing with a secure cluster
To communicate with the API endpoint of a secure cluster, you will need so supply 3 SSL artifacts:
Your client key
A certificate for your client key that has been signed by a Certificate Authority (CA)
The certificate of the CA
There are two ways to obtain these 3 artifacts.
Automated
Magnum provides the command ‘cluster-config’ to help the user in setting up the environment and artifacts for TLS, for example:
openstack coe cluster config kubernetes-cluster --dir myclusterconfig
This will display the necessary environment variables, which you can add to your environment:
export DOCKER_HOST=tcp://172.24.4.5:2376
export DOCKER_CERT_PATH=myclusterconfig
export DOCKER_TLS_VERIFY=True
And the artifacts are placed in the directory specified:
ca.pem
cert.pem
key.pem
You can now use the native client to interact with the COE. The variables and artifacts are unique to the cluster.
The parameters for ‘coe cluster config’ are as follows:
- –dir <dirname>
Directory to save the certificate and config files.
- --force
Overwrite existing files in the directory specified.
Manual
You can create the key and certificates manually using the following steps.
- Client Key
Your personal private key is essentially a cryptographically generated string of bytes. It should be protected in the same manner as a password. To generate an RSA key, you can use the ‘genrsa’ command of the ‘openssl’ tool:
openssl genrsa -out key.pem 4096
This command generates a 4096 byte RSA key at key.pem.
- Signed Certificate
To authenticate your key, you need to have it signed by a CA. First generate the Certificate Signing Request (CSR). The CSR will be used by Magnum to generate a signed certificate that you will use to communicate with the cluster. To generate a CSR, openssl requires a config file that specifies a few values. Using the example template below, you can fill in the ‘CN’ value with your name and save it as client.conf:
$ cat > client.conf << END
[req]
distinguished_name = req_distinguished_name
req_extensions     = req_ext
prompt = no
[req_distinguished_name]
CN = Your Name
[req_ext]
extendedKeyUsage = clientAuth
END
For RBAC enabled kubernetes clusters you need to use the name admin and system:masters as Organization (O=):
$ cat > client.conf << END
[req]
distinguished_name = req_distinguished_name
req_extensions     = req_ext
prompt = no
[req_distinguished_name]
CN = admin
O = system:masters
OU=OpenStack/Magnum
C=US
ST=TX
L=Austin
[req_ext]
extendedKeyUsage = clientAuth
END
Once you have client.conf, you can run the openssl ‘req’ command to generate the CSR:
openssl req -new -days 365 \
    -config client.conf \
    -key key.pem \
    -out client.csr
Now that you have your client CSR, you can use the Magnum CLI to send it off to Magnum to get it signed:
openstack coe ca sign secure-k8s-cluster client.csr > cert.pem
- Certificate Authority
The final artifact you need to retrieve is the CA certificate for the cluster. This is used by your native client to ensure you are only communicating with hosts that Magnum set up:
openstack coe ca show secure-k8s-cluster > ca.pem
- Rotate Certificate
To rotate the CA certificate for a cluster and invalidate all user certificates, you can use the following command:
openstack coe ca rotate secure-k8s-cluster
Please note that now the CA rotate function is only supported by Fedora CoreOS driver.
User Examples
Here are some examples for using the CLI on a secure Kubernetes cluster. You can perform all the TLS set up automatically by:
eval $(openstack coe cluster config <cluster-name>)
Or you can perform the manual steps as described above and specify the TLS options on the CLI. The SSL artifacts are assumed to be saved in local files as follows:
- key.pem: your SSL key
- cert.pem: signed certificate
- ca.pem: certificate for cluster CA
For Kubernetes, you need to get ‘kubectl’, a kubernetes CLI tool, to communicate with the cluster:
curl -O https://storage.googleapis.com/kubernetes-release/release/v1.2.0/bin/linux/amd64/kubectl
chmod +x kubectl
sudo mv kubectl /usr/local/bin/kubectl
Now let’s run some ‘kubectl’ commands to check the secure communication. If you used ‘cluster-config’, then you can simply run the ‘kubectl’ command without having to specify the TLS options since they have been defined in the environment:
kubectl version
Client Version: version.Info{Major:"1", Minor:"0", GitVersion:"v1.2.0", GitCommit:"cffae0523cfa80ddf917aba69f08508b91f603d5", GitTreeState:"clean"}
Server Version: version.Info{Major:"1", Minor:"0", GitVersion:"v1.2.0", GitCommit:"cffae0523cfa80ddf917aba69f08508b91f603d5", GitTreeState:"clean"}
You can specify the TLS options manually as follows:
KUBERNETES_URL=$(openstack coe cluster show secure-k8s-cluster |
                 awk '/ api_address /{print $4}')
kubectl version --certificate-authority=ca.pem \
                --client-key=key.pem \
                --client-certificate=cert.pem -s $KUBERNETES_URL

kubectl create -f redis-master.yaml --certificate-authority=ca.pem \
                                    --client-key=key.pem \
                                    --client-certificate=cert.pem -s $KUBERNETES_URL

pods/test2

kubectl get pods --certificate-authority=ca.pem \
                 --client-key=key.pem \
                 --client-certificate=cert.pem -s $KUBERNETES_URL
NAME           READY     STATUS    RESTARTS   AGE
redis-master   2/2       Running   0          1m
Beside using the environment variables, you can also configure ‘kubectl’ to remember the TLS options:
kubectl config set-cluster secure-k8s-cluster --server=${KUBERNETES_URL} \
    --certificate-authority=${PWD}/ca.pem
kubectl config set-credentials client --certificate-authority=${PWD}/ca.pem \
    --client-key=${PWD}/key.pem --client-certificate=${PWD}/cert.pem
kubectl config set-context secure-k8scluster --cluster=secure-k8scluster --user=client
kubectl config use-context secure-k8scluster
Then you can use ‘kubectl’ commands without the certificates:
kubectl get pods
NAME           READY     STATUS    RESTARTS   AGE
redis-master   2/2       Running   0          1m
Access to Kubernetes User Interface:
curl -L ${KUBERNETES_URL}/ui --cacert ca.pem --key key.pem \
    --cert cert.pem
You may also set up ‘kubectl’ proxy which will use your client certificates to allow you to browse to a local address to use the UI without installing a certificate in your browser:
kubectl proxy --api-prefix=/ --certificate-authority=ca.pem --client-key=key.pem \
              --client-certificate=cert.pem -s $KUBERNETES_URL
You can then open http://localhost:8001/ui in your browser.
The examples for Docker are similar. With ‘cluster-config’ set up, you can just run docker commands without TLS options. To specify the TLS options manually:
docker -H tcp://192.168.19.86:2376 --tlsverify \
       --tlscacert ca.pem \
       --tlskey key.pem \
       --tlscert cert.pem \
       info
Storing the certificates
Magnum generates and maintains a certificate for each cluster so that it can also communicate securely with the cluster. As a result, it is necessary to store the certificates in a secure manner. Magnum provides the following methods for storing the certificates and this is configured in /etc/magnum/magnum.conf in the section [certificates] with the parameter ‘cert_manager_type’.
Barbican: Barbican is a service in OpenStack for storing secrets. It is used by Magnum to store the certificates when cert_manager_type is configured as:
cert_manager_type = barbican
This is the recommended configuration for a production environment. Magnum will interface with Barbican to store and retrieve certificates, delegating the task of securing the certificates to Barbican.
Magnum database: In some cases, a user may want an alternative to storing the certificates that does not require Barbican. This can be a development environment, or a private cloud that has been secured by other means. Magnum can store the certificates in its own database; this is done with the configuration:
cert_manager_type = x509keypair
This storage mode is only as secure as the controller server that hosts the database for the OpenStack services.
Local store: As another alternative that does not require Barbican, Magnum can simply store the certificates on the local host filesystem where the conductor is running, using the configuration:
cert_manager_type = local
Note that this mode is only supported when there is a single Magnum conductor running since the certificates are stored locally. The ‘local’ mode is not recommended for a production environment.
For the nodes, the certificates for communicating with the masters are stored locally and the nodes are assumed to be secured.
Networking
There are two components that make up the networking in a cluster.
The Neutron infrastructure for the cluster: this includes the private network, subnet, ports, routers, load balancers, etc.
The networking model presented to the containers: this is what the containers see in communicating with each other and to the external world. Typically this consists of a driver deployed on each node.
The two components are deployed and managed separately. The Neutron infrastructure is the integration with OpenStack; therefore, it is stable and more or less similar across different COE types. The networking model, on the other hand, is specific to the COE type and is still under active development in the various COE communities, for example, Docker libnetwork and Kubernetes Container Networking. As a result, the implementation for the networking models is evolving and new models are likely to be introduced in the future.
For the Neutron infrastructure, the following configuration can be set in the ClusterTemplate:
- external-network
The external Neutron network ID to connect to this cluster. This is used to connect the cluster to the external internet, allowing the nodes in the cluster to access external URL for discovery, image download, etc. If not specified, the default value is “public” and this is valid for a typical devstack.
- fixed-network
The Neutron network to use as the private network for the cluster nodes. If not specified, a new Neutron private network will be created.
- dns-nameserver
The DNS nameserver to use for this cluster. This is an IP address for the server and it is used to configure the Neutron subnet of the cluster (dns_nameservers). If not specified, the default DNS is 8.8.8.8, the publicly available DNS.
- http-proxy, https-proxy, no-proxy
The proxy for the nodes in the cluster, to be used when the cluster is behind a firewall and containers cannot access URL’s on the external internet directly. For the parameter http-proxy and https-proxy, the value to provide is a URL and it will be set in the environment variable HTTP_PROXY and HTTPS_PROXY respectively in the nodes. For the parameter no-proxy, the value to provide is an IP or list of IP’s separated by comma. Likewise, the value will be set in the environment variable NO_PROXY in the nodes.
For the networking model to the container, the following configuration can be set in the ClusterTemplate:
- network-driver
The network driver name for instantiating container networks. Currently, the following network drivers are supported:
Driver
Kubernetes
Flannel
supported
Calico
supported
If not specified, the default driver is Flannel for Kubernetes.
Particular network driver may require its own set of parameters for configuration, and these parameters are specified through the labels in the ClusterTemplate. Labels are arbitrary key=value pairs.
When Flannel is specified as the network driver, the following optional labels can be added:
- flannel_network_cidr
IPv4 network in CIDR format to use for the entire Flannel network. If not specified, the default is 10.100.0.0/16.
- flannel_network_subnetlen
The size of the subnet allocated to each host. If not specified, the default is 24.
- flannel_backend
The type of backend for Flannel. Possible values are udp, vxlan, host-gw. If not specified, the default is vxlan. Selecting the best backend depends on your networking. Generally, udp is the most generally supported backend since there is little requirement on the network, but it typically offers the lowest performance. The vxlan backend performs better, but requires vxlan support in the kernel so the image used to provision the nodes needs to include this support. The host-gw backend offers the best performance since it does not actually encapsulate messages, but it requires all the nodes to be on the same L2 network. The private Neutron network that Magnum creates does meet this requirement; therefore if the parameter fixed_network is not specified in the ClusterTemplate, host-gw is the best choice for the Flannel backend.
When Calico is specified as the network driver, the following optional labels can be added:
- calico_ipv4pool
IPv4 network in CIDR format which is the IP pool, from which Pod IPs will be chosen. If not specified, the default is 10.100.0.0/16. Stein default: 192.168.0.0/16 Train default: 192.168.0.0/16 Ussuri default: 10.100.0.0/16
- calico_ipv4pool_ipip
IPIP Mode to use for the IPv4 POOL created at start up. Ussuri default: Off
- calico_tag
Tag of the calico containers used to provision the calico node Stein default: v2.6.7 Train default: v3.3.6 Ussuri default: v3.13.1 Victoria default: v3.13.1 Wallaby default: v3.13.1
Besides, the Calico network driver needs kube_tag with v1.9.3 or later, because Calico needs extra mounts for the kubelet container. See commit of atomic-system-containers for more information.
NOTE: We have seen some issues using systemd as cgroup-driver with Calico together, so we highly recommend to use cgroupfs as the cgroup-driver for Calico.
Network for VMs
Every cluster has its own private network which is created along with the cluster. All the cluster nodes also get a floating ip on the external network. This approach works by default, but can be expensive in terms of complexity and cost (public Ipv4). To reduce this expense, the following methods can be used:
Create private networks but do not assign floating IPs With this approach the cluster will be inaccessible from the outside. The user can add a floating ip to access it, but the certificates will not work.
Create a private network and a LoadBalancer for the master node(s) There are two type of loadbalancers in magnum, one for the api and one for the services running on the nodes. For kubernetes LoadBalancer service type see: Kubernetes External Load Balancer. Not recommended when using only a single master node as it will add 2 amphora vms: one for the kube API and another for etcd thus being more expensive.
All the above can also work by passing an existing private network instead of creating a new one using –fixed-network and –fixed-subnet.
- Flannel
When using flannel, the backend should be ‘host-gw’ if performance is a requirement, ‘udp’ is too slow and ‘vxlan’ creates one more overlay network on top of the existing neutron network. On the other hand, in a flat network one should use ‘vxlan’ for network isolation.
- Calico
Calico allows users to setup network policies in kubernetes policies for network isolation.
High Availability
Support for highly available clusters is a work in progress, the goal being to enable clusters spanning multiple availability zones.
As of today you can specify one single availability zone for you cluster.
- availability_zone
The availability zone where the cluster nodes should be deployed. If not specified, the default is None.
Scaling
Performance tuning for periodic task
Magnum’s periodic task performs a stack-get operation on the Heat stack underlying each of its clusters. If you have a large amount of clusters this can create considerable load on the Heat API. To reduce that load you can configure Magnum to perform one global stack-list per periodic task instead of one per cluster. This is disabled by default, both from the Heat and Magnum side since it causes a security issue, though: any user in any tenant holding the admin role can perform a global stack-list operation if Heat is configured to allow it for Magnum. If you want to enable it nonetheless, proceed as follows:
Set periodic_global_stack_list in magnum.conf to True (False by default).
Update heat policy to allow magnum list stacks. To this end, edit your heat policy file, usually etc/heat/policy.yaml``:
...
stacks:global_index: "rule:context_is_admin"
Now restart heat.
Containers and nodes
Scaling containers and nodes refers to increasing or decreasing allocated system resources. Scaling is a broad topic and involves many dimensions. In the context of Magnum in this guide, we consider the following issues:
Scaling containers and scaling cluster nodes (infrastructure)
Manual and automatic scaling
Since this is an active area of development, a complete solution covering all issues does not exist yet, but partial solutions are emerging.
Scaling containers involves managing the number of instances of the container by replicating or deleting instances. This can be used to respond to change in the workload being supported by the application; in this case, it is typically driven by certain metrics relevant to the application such as response time, etc. Other use cases include rolling upgrade, where a new version of a service can gradually be scaled up while the older version is gradually scaled down. Scaling containers is supported at the COE level and is specific to each COE as well as the version of the COE. You will need to refer to the documentation for the proper COE version for full details, but following are some pointers for reference.
For Kubernetes, pods are scaled manually by setting the count in the replication controller. Kubernetes version 1.3 and later also supports autoscaling.
Scaling the cluster nodes involves managing the number of nodes in the cluster by adding more nodes or removing nodes. There is no direct correlation between the number of nodes and the number of containers that can be hosted since the resources consumed (memory, CPU, etc) depend on the containers. However, if a certain resource is exhausted in the cluster, adding more nodes would add more resources for hosting more containers. As part of the infrastructure management, Magnum supports manual scaling through the attribute ‘node_count’ in the cluster, so you can scale the cluster simply by changing this attribute:
openstack coe cluster update mycluster replace node_count=2
Refer to the section Scale lifecycle operation for more details.
Adding nodes to a cluster is straightforward: Magnum deploys additional VMs or baremetal servers through the heat templates and invokes the COE-specific mechanism for registering the new nodes to update the available resources in the cluster. Afterward, it is up to the COE or user to re-balance the workload by launching new container instances or re-launching dead instances on the new nodes.
Removing nodes from a cluster requires some more care to ensure continuous operation of the containers since the nodes being removed may be actively hosting some containers. Magnum performs a simple heuristic that is specific to the COE to find the best node candidates for removal, as follows:
- Kubernetes
Magnum scans the pods in the namespace ‘Default’ to determine the nodes that are not hosting any (empty nodes). If the number of nodes to be removed is equal or less than the number of these empty nodes, these nodes will be removed from the cluster. If the number of nodes to be removed is larger than the number of empty nodes, a warning message will be sent to the Magnum log and the empty nodes along with additional nodes will be removed from the cluster. The additional nodes are selected randomly and the pods running on them will be deleted without warning. For this reason, a good practice is to manage the pods through the replication controller so that the deleted pods will be relaunched elsewhere in the cluster. Note also that even when only the empty nodes are removed, there is no guarantee that no pod will be deleted because there is no locking to ensure that Kubernetes will not launch new pods on these nodes after Magnum has scanned the pods.
Currently, scaling containers and scaling cluster nodes are handled separately, but in many use cases, there are interactions between the two operations. For instance, scaling up the containers may exhaust the available resources in the cluster, thereby requiring scaling up the cluster nodes as well. Many complex issues are involved in managing this interaction. A presentation at the OpenStack Tokyo Summit 2015 covered some of these issues along with some early proposals, Exploring Magnum and Senlin integration for autoscaling containers. This remains an active area of discussion and research.
Storage
Currently Cinder provides the block storage to the containers, and the storage is made available in two ways: as ephemeral storage and as persistent storage.
Ephemeral storage
The filesystem for the container consists of multiple layers from the image and a top layer that holds the modification made by the container. This top layer requires storage space and the storage is configured in the Docker daemon through a number of storage options. When the container is removed, the storage allocated to the particular container is also deleted.
Magnum can manage the containers’ filesystem in two ways, storing them on the local disk of the compute instances or in a separate Cinder block volume for each node in the cluster, mounts it to the node and configures it to be used as ephemeral storage. Users can specify the size of the Cinder volume with the ClusterTemplate attribute ‘docker-volume-size’. Currently the block size is fixed at cluster creation time, but future lifecycle operations may allow modifying the block size during the life of the cluster.
- docker_volume_type
For drivers that support additional volumes for container storage, a label named ‘docker_volume_type’ is exposed so that users can select different cinder volume types for their volumes. The default volume must be set in ‘default_docker_volume_type’ in the ‘cinder’ section of magnum.conf, an obvious value is the default volume type set in cinder.conf of your cinder deployment . Please note, that docker_volume_type refers to a cinder volume type and it is unrelated to docker or kubernetes volumes.
Both local disk and the Cinder block storage can be used with a number of Docker storage drivers available.
‘devicemapper’: When used with a dedicated Cinder volume it is configured using direct-lvm and offers very good performance. If it’s used with the compute instance’s local disk uses a loopback device offering poor performance and it’s not recommended for production environments. Using the ‘devicemapper’ driver does allow the use of SELinux.
‘overlay’ When used with a dedicated Cinder volume offers as good or better performance than devicemapper. If used on the local disk of the compute instance (especially with high IOPS drives) you can get significant performance gains. However, for kernel versions less than 4.9, SELinux must be disabled inside the containers resulting in worse container isolation, although it still runs in enforcing mode on the cluster compute instances.
‘overlay2’ is the preferred storage driver, for all currently supported Linux distributions, and requires no extra configuration. When possible, overlay2 is the recommended storage driver. When installing Docker for the first time, overlay2 is used by default.
Persistent storage
In some use cases, data read/written by a container needs to persist so that it can be accessed later. To persist the data, a Cinder volume with a filesystem on it can be mounted on a host and be made available to the container, then be unmounted when the container exits.
Kubernetes allows a previously created Cinder block to be mounted to a pod and this is done by specifying the block ID in the pod YAML file. When the pod is scheduled on a node, Kubernetes will interface with Cinder to request the volume to be mounted on this node, then Kubernetes will launch the Docker container with the proper options to make the filesystem on the Cinder volume accessible to the container in the pod. When the pod exits, Kubernetes will again send a request to Cinder to unmount the volume’s filesystem, making it available to be mounted on other nodes.
Magnum supports these features to use Cinder as persistent storage using the ClusterTemplate attribute ‘volume-driver’ and the support matrix for the COE types is summarized as follows:
Driver |
Kubernetes |
|---|---|
cinder |
supported |
Following are some examples for using Cinder as persistent storage.
Using Cinder in Kubernetes
NOTE: This feature requires Kubernetes version 1.5.0 or above. The public Fedora image from Atomic currently meets this requirement.
Create the ClusterTemplate.
Specify ‘cinder’ as the volume-driver for Kubernetes:
openstack coe cluster template create k8s-cluster-template \
                           --image fedora-23-atomic-7 \
                           --keypair testkey \
                           --external-network public \
                           --dns-nameserver 8.8.8.8 \
                           --flavor m1.small \
                           --docker-volume-size 5 \
                           --network-driver flannel \
                           --coe kubernetes \
                           --volume-driver cinder
Create the cluster:
openstack coe cluster create k8s-cluster \
                      --cluster-template k8s-cluster-template \
                      --node-count 1
Kubernetes is now ready to use Cinder for persistent storage. Following is an example illustrating how Cinder is used in a pod.
Create the cinder volume:
cinder create --display-name=test-repo 1

ID=$(cinder create --display-name=test-repo 1 | awk -F'|' '$2~/^[[:space:]]*id/ {print $3}')
The command will generate the volume with a ID. The volume ID will be specified in Step 2.
Create a pod in this cluster and mount this cinder volume to the pod. Create a file (e.g nginx-cinder.yaml) describing the pod:
cat > nginx-cinder.yaml << END
apiVersion: v1
kind: Pod
metadata:
  name: aws-web
spec:
  containers:
    - name: web
      image: nginx
      ports:
        - name: web
          containerPort: 80
          hostPort: 8081
          protocol: TCP
      volumeMounts:
        - name: html-volume
          mountPath: "/usr/share/nginx/html"
  volumes:
    - name: html-volume
      cinder:
        # Enter the volume ID below
        volumeID: $ID
        fsType: ext4
END
NOTE: The Cinder volume ID needs to be configured in the YAML file so the existing Cinder volume can be mounted in a pod by specifying the volume ID in the pod manifest as follows:
volumes:
- name: html-volume
  cinder:
    volumeID: $ID
    fsType: ext4
Create the pod by the normal Kubernetes interface:
kubectl create -f nginx-cinder.yaml
You can start a shell in the container to check that the mountPath exists, and on an OpenStack client you can run the command ‘cinder list’ to verify that the cinder volume status is ‘in-use’.
Image Management
When a COE is deployed, an image from Glance is used to boot the nodes in the cluster and then the software will be configured and started on the nodes to bring up the full cluster. An image is based on a particular distro such as Fedora, Ubuntu, etc, and is prebuilt with the software specific to the COE such as Kubernetes. The image is tightly coupled with the following in Magnum:
Heat templates to orchestrate the configuration.
Template definition to map ClusterTemplate parameters to Heat template parameters.
Set of scripts to configure software.
Collectively, they constitute the driver for a particular COE and a particular distro; therefore, developing a new image needs to be done in conjunction with developing these other components. Image can be built by various methods such as diskimagebuilder, or in some case, a distro image can be used directly. A number of drivers and the associated images is supported in Magnum as reference implementation. In this section, we focus mainly on the supported images.
All images must include support for cloud-init and the heat software configuration utility:
os-collect-config
os-refresh-config
os-apply-config
heat-config
heat-config-script
Additional software are described as follows.
Kubernetes on Fedora CoreOS
Fedoara CoreOS publishes a stock OpenStack image that is being used to deploy Kubernetes.
The following software are managed as systemd services:
kube-apiserver
kube-controller-manager
kube-scheduler
kube-proxy
kubelet
docker
etcd
The login user for this image is core.
Notification
Magnum provides notifications about usage data so that 3rd party applications can use the data for auditing, billing, monitoring, or quota purposes. This document describes the current inclusions and exclusions for Magnum notifications.
Magnum uses Cloud Auditing Data Federation (CADF) Notification as its notification format for better support of auditing, details about CADF are documented below.
Auditing with CADF
Magnum uses the PyCADF library to emit CADF notifications, these events adhere to the DMTF CADF specification. This standard provides auditing capabilities for compliance with security, operational, and business processes and supports normalized and categorized event data for federation and aggregation.
Below table describes the event model components and semantics for each component:
model component |
CADF Definition |
|---|---|
OBSERVER |
The RESOURCE that generates the CADF Event Record based on its observation (directly or indirectly) of the Actual Event. |
INITIATOR |
The RESOURCE that initiated, originated, or instigated the event’s ACTION, according to the OBSERVER. |
ACTION |
The operation or activity the INITIATOR has performed, has attempted to perform or has pending against the event’s TARGET, according to the OBSERVER. |
TARGET |
The RESOURCE against which the ACTION of a CADF Event Record was performed, attempted, or is pending, according to the OBSERVER. |
OUTCOME |
The result or status of the ACTION against the TARGET, according to the OBSERVER. |
The payload portion of a CADF Notification is a CADF event, which
is represented as a JSON dictionary. For example:
{
    "typeURI": "http://schemas.dmtf.org/cloud/audit/1.0/event",
    "initiator": {
        "typeURI": "service/security/account/user",
        "host": {
            "agent": "curl/7.22.0(x86_64-pc-linux-gnu)",
            "address": "127.0.0.1"
        },
        "id": "<initiator_id>"
    },
    "target": {
        "typeURI": "<target_uri>",
        "id": "openstack:1c2fc591-facb-4479-a327-520dade1ea15"
    },
    "observer": {
        "typeURI": "service/security",
        "id": "openstack:3d4a50a9-2b59-438b-bf19-c231f9c7625a"
    },
    "eventType": "activity",
    "eventTime": "2014-02-14T01:20:47.932842+00:00",
    "action": "<action>",
    "outcome": "success",
    "id": "openstack:f5352d7b-bee6-4c22-8213-450e7b646e9f",
}
Where the following are defined:
<initiator_id>: ID of the user that performed the operation<target_uri>: CADF specific target URI, (i.e.: data/security/project)<action>: The action being performed, typically:<operation>.<resource_type>
Additionally there may be extra keys present depending on the operation being performed, these will be discussed below.
Note, the eventType property of the CADF payload is different from the
event_type property of a notifications. The former (eventType) is a
CADF keyword which designates the type of event that is being measured, this
can be: activity, monitor or control. Whereas the latter
(event_type) is described in previous sections as:
magnum.<resource_type>.<operation>
Supported Events
The following table displays the corresponding relationship between resource types and operations.
resource type |
supported operations |
typeURI |
|---|---|---|
cluster |
create, update, delete |
service/magnum/cluster |
Example Notification - Cluster Create
The following is an example of a notification that is sent when a cluster is
created. This example can be applied for any create, update or
delete event that is seen in the table above. The <action> and
typeURI fields will be change.
{
    "event_type": "magnum.cluster.created",
    "message_id": "0156ee79-b35f-4cef-ac37-d4a85f231c69",
    "payload": {
        "typeURI": "http://schemas.dmtf.org/cloud/audit/1.0/event",
        "initiator": {
            "typeURI": "service/security/account/user",
            "id": "c9f76d3c31e142af9291de2935bde98a",
            "user_id": "0156ee79-b35f-4cef-ac37-d4a85f231c69",
            "project_id": "3d4a50a9-2b59-438b-bf19-c231f9c7625a"
        },
        "target": {
            "typeURI": "service/magnum/cluster",
            "id": "openstack:1c2fc591-facb-4479-a327-520dade1ea15"
        },
        "observer": {
            "typeURI": "service/magnum/cluster",
            "id": "openstack:3d4a50a9-2b59-438b-bf19-c231f9c7625a"
        },
        "eventType": "activity",
        "eventTime": "2015-05-20T01:20:47.932842+00:00",
        "action": "create",
        "outcome": "success",
        "id": "openstack:f5352d7b-bee6-4c22-8213-450e7b646e9f",
        "resource_info": "671da331c47d4e29bb6ea1d270154ec3"
    }
    "priority": "INFO",
    "publisher_id": "magnum.host1234",
    "timestamp": "2016-05-20 15:03:45.960280"
}
Container Monitoring
As of this moment, monitoring is only supported for Kubernetes clusters. For details, please refer to the Container Monitoring in Kubernetes document.
Kubernetes Post Install Manifest
A new config option post_install_manifest_url under [kubernetes] section has been added to support installing cloud provider/vendor specific manifest after provisioning the k8s cluster. It’s an URL pointing to the manifest file. For example, cloud admin can set their specific StorageClass into this file, then it will be automatically setup after the cluster is created by end user.
NOTE: The URL must be reachable from the master nodes when creating the cluster.
Kubernetes External Load Balancer
In a Kubernetes cluster, all masters and minions are connected to a private Neutron subnet, which in turn is connected by a router to the public network. This allows the nodes to access each other and the external internet.
All Kubernetes pods and services created in the cluster are connected to a private container network which by default is Flannel, an overlay network that runs on top of the Neutron private subnet. The pods and services are assigned IP addresses from this container network and they can access each other and the external internet. However, these IP addresses are not accessible from an external network.
To publish a service endpoint externally so that the service can be accessed from the external network, Kubernetes provides the external load balancer feature. This is done by simply specifying the attribute “type: LoadBalancer” in the service manifest. When the service is created, Kubernetes will add an external load balancer in front of the service so that the service will have an external IP address in addition to the internal IP address on the container network. The service endpoint can then be accessed with this external IP address. Refer to the Kubernetes service document for more details.
A Kubernetes cluster deployed by Magnum will have all the necessary configuration required for the external load balancer. This document describes how to use this feature.
Steps for the cluster administrator
Because the Kubernetes master needs to interface with OpenStack to create and manage the Neutron load balancer, we need to provide a credential for Kubernetes to use.
In the current implementation, the cluster administrator needs to manually perform this step. We are looking into several ways to let Magnum automate this step in a secure manner. This means that after the Kubernetes cluster is initially deployed, the load balancer support is disabled. If the administrator does not want to enable this feature, no further action is required. All the services will be created normally; services that specify the load balancer will also be created successfully, but a load balancer will not be created.
Note that different versions of Kubernetes require different versions of Neutron LBaaS plugin running on the OpenStack instance:
============================  ==============================
Kubernetes Version on Master  Neutron LBaaS Version Required
============================  ==============================
1.2                           LBaaS v1
1.3 or later                  LBaaS v2
============================  ==============================
Before enabling the Kubernetes load balancer feature, confirm that the OpenStack instance is running the required version of Neutron LBaaS plugin. To determine if your OpenStack instance is running LBaaS v1, try running the following command from your OpenStack control node:
neutron lb-pool-list
Or look for the following configuration in neutron.conf or neutron_lbaas.conf:
service_provider = LOADBALANCER:Haproxy:neutron_lbaas.services.loadbalancer.drivers.haproxy.plugin_driver.HaproxyOnHostPluginDriver:default
To determine if your OpenStack instance is running LBaaS v2, try running the following command from your OpenStack control node:
neutron lbaas-pool-list
Or look for the following configuration in neutron.conf or neutron_lbaas.conf:
service_plugins = neutron.plugins.services.agent_loadbalancer.plugin.LoadBalancerPluginv2
To configure LBaaS v1 or v2, refer to the Neutron documentation.
Before deleting the Kubernetes cluster, make sure to delete all the services that created load balancers. Because the Neutron objects created by Kubernetes are not managed by Heat, they will not be deleted by Heat and this will cause the cluster-delete operation to fail. If this occurs, delete the neutron objects manually (lb-pool, lb-vip, lb-member, lb-healthmonitor) and then run cluster-delete again.
Steps for the users
This feature requires the OpenStack cloud provider to be enabled. To do so, enable the cinder support (–volume-driver cinder).
For the user, publishing the service endpoint externally involves the following 2 steps:
Specify “type: LoadBalancer” in the service manifest
After the service is created, associate a floating IP with the VIP of the load balancer pool.
The following example illustrates how to create an external endpoint for a pod running nginx.
Create a file (e.g nginx.yaml) describing a pod running nginx:
apiVersion: v1
kind: Pod
metadata:
  name: nginx
  labels:
   app: nginx
spec:
  containers:
  - name: nginx
    image: nginx
    ports:
    - containerPort: 80
Create a file (e.g nginx-service.yaml) describing a service for the nginx pod:
apiVersion: v1
kind: Service
metadata:
  name: nginxservice
  labels:
    app: nginx
spec:
  ports:
  - port: 80
    targetPort: 80
    protocol: TCP
  selector:
    app: nginx
  type: LoadBalancer
Please refer to Developer Quick-Start on how to connect to Kubernetes running on the launched cluster. Assuming a Kubernetes cluster named k8sclusterv1 has been created, deploy the pod and service using following commands:
kubectl create -f nginx.yaml

kubectl create -f nginx-service.yaml
For more details on verifying the load balancer in OpenStack, refer to the following section on how it works.
Next, associate a floating IP to the load balancer. This can be done easily on Horizon by navigating to:
Compute -> Access & Security -> Floating IPs
Click on “Allocate IP To Project” and then on “Associate” for the new floating IP.
Alternatively, associating a floating IP can be done on the command line by allocating a floating IP, finding the port of the VIP, and associating the floating IP to the port. The commands shown below are for illustration purpose and assume that there is only one service with load balancer running in the cluster and no other load balancers exist except for those created for the cluster.
First create a floating IP on the public network:
neutron floatingip-create public

Created a new floatingip:

+---------------------+--------------------------------------+
| Field               | Value                                |
+---------------------+--------------------------------------+
| fixed_ip_address    |                                      |
| floating_ip_address | 172.24.4.78                          |
| floating_network_id | 4808eacb-e1a0-40aa-97b6-ecb745af2a4d |
| id                  | b170eb7a-41d0-4c00-9207-18ad1c30fecf |
| port_id             |                                      |
| router_id           |                                      |
| status              | DOWN                                 |
| tenant_id           | 012722667dc64de6bf161556f49b8a62     |
+---------------------+--------------------------------------+
Note the floating IP 172.24.4.78 that has been allocated. The ID for this floating IP is shown above, but it can also be queried by:
FLOATING_ID=$(neutron floatingip-list | grep "172.24.4.78" | awk '{print $2}')
Next find the VIP for the load balancer:
VIP_ID=$(neutron lb-vip-list | grep TCP | grep -v pool | awk '{print $2}')
Find the port for this VIP:
PORT_ID=$(neutron lb-vip-show $VIP_ID | grep port_id | awk '{print $4}')
Finally associate the floating IP with the port of the VIP:
neutron floatingip-associate $FLOATING_ID $PORT_ID
The endpoint for nginx can now be accessed on a browser at this floating IP:
http://172.24.4.78:80
Alternatively, you can check for the nginx ‘welcome’ message by:
curl http://172.24.4.78:80
NOTE: it is not necessary to indicate port :80 here but it is shown to correlate with the port that was specified in the service manifest.
How it works
Kubernetes is designed to work with different Clouds such as Google Compute Engine (GCE), Amazon Web Services (AWS), and OpenStack; therefore, different load balancers need to be created on the particular Cloud for the services. This is done through a plugin for each Cloud and the OpenStack plugin was developed by Angus Lees:
https://github.com/kubernetes/kubernetes/blob/release-1.0/pkg/cloudprovider/openstack/openstack.go
When the Kubernetes components kube-apiserver and kube-controller-manager start up, they will use the credential provided to authenticate a client to interface with OpenStack.
When a service with load balancer is created, the plugin code will interface with Neutron in this sequence:
Create lb-pool for the Kubernetes service
Create lb-member for the minions
Create lb-healthmonitor
Create lb-vip on the private network of the Kubernetes cluster
These Neutron objects can be verified as follows. For the load balancer pool:
neutron lb-pool-list
+--------------------------------------+--------------------------------------------------+----------+-------------+----------+----------------+--------+
| id                                   | name                                             | provider | lb_method   | protocol | admin_state_up | status |
+--------------------------------------+--------------------------------------------------+----------+-------------+----------+----------------+--------+
| 241357b3-2a8f-442e-b534-bde7cd6ba7e4 | a1f03e40f634011e59c9efa163eae8ab                 | haproxy  | ROUND_ROBIN | TCP      | True           | ACTIVE |
| 82b39251-1455-4eb6-a81e-802b54c2df29 | k8sclusterv1-iypacicrskib-api_pool-fydshw7uvr7h  | haproxy  | ROUND_ROBIN | HTTP     | True           | ACTIVE |
| e59ea983-c6e8-4cec-975d-89ade6b59e50 | k8sclusterv1-iypacicrskib-etcd_pool-qbpo43ew2m3x | haproxy  | ROUND_ROBIN | HTTP     | True           | ACTIVE |
+--------------------------------------+--------------------------------------------------+----------+-------------+----------+----------------+--------+
Note that 2 load balancers already exist to implement high availability for the cluster (api and ectd). The new load balancer for the Kubernetes service uses the TCP protocol and has a name assigned by Kubernetes.
For the members of the pool:
neutron lb-member-list
+--------------------------------------+----------+---------------+--------+----------------+--------+
| id                                   | address  | protocol_port | weight | admin_state_up | status |
+--------------------------------------+----------+---------------+--------+----------------+--------+
| 9ab7dcd7-6e10-4d9f-ba66-861f4d4d627c | 10.0.0.5 |          8080 |      1 | True           | ACTIVE |
| b179c1ad-456d-44b2-bf83-9cdc127c2b27 | 10.0.0.5 |          2379 |      1 | True           | ACTIVE |
| f222b60e-e4a9-4767-bc44-ffa66ec22afe | 10.0.0.6 |         31157 |      1 | True           | ACTIVE |
+--------------------------------------+----------+---------------+--------+----------------+--------+
Again, 2 members already exist for high availability and they serve the master node at 10.0.0.5. The new member serves the minion at 10.0.0.6, which hosts the Kubernetes service.
For the monitor of the pool:
neutron lb-healthmonitor-list
+--------------------------------------+------+----------------+
| id                                   | type | admin_state_up |
+--------------------------------------+------+----------------+
| 381d3d35-7912-40da-9dc9-b2322d5dda47 | TCP  | True           |
| 67f2ae8f-ffc6-4f86-ba5f-1a135f4af85c | TCP  | True           |
| d55ff0f3-9149-44e7-9b52-2e055c27d1d3 | TCP  | True           |
+--------------------------------------+------+----------------+
For the VIP of the pool:
neutron lb-vip-list
+--------------------------------------+----------------------------------+----------+----------+----------------+--------+
| id                                   | name                             | address  | protocol | admin_state_up | status |
+--------------------------------------+----------------------------------+----------+----------+----------------+--------+
| 9ae2ebfb-b409-4167-9583-4a3588d2ff42 | api_pool.vip                     | 10.0.0.3 | HTTP     | True           | ACTIVE |
| c318aec6-8b7b-485c-a419-1285a7561152 | a1f03e40f634011e59c9efa163eae8ab | 10.0.0.7 | TCP      | True           | ACTIVE |
| fc62cf40-46ad-47bd-aa1e-48339b95b011 | etcd_pool.vip                    | 10.0.0.4 | HTTP     | True           | ACTIVE |
+--------------------------------------+----------------------------------+----------+----------+----------------+--------+
Note that the VIP is created on the private network of the cluster; therefore it has an internal IP address of 10.0.0.7. This address is also associated as the “external address” of the Kubernetes service. You can verify this in Kubernetes by running following command:
kubectl get services
NAME           LABELS                                    SELECTOR    IP(S)            PORT(S)
kubernetes     component=apiserver,provider=kubernetes   <none>      10.254.0.1       443/TCP
nginxservice   app=nginx                                 app=nginx   10.254.122.191   80/TCP
                                                                     10.0.0.7
On GCE, the networking implementation gives the load balancer an external address automatically. On OpenStack, we need to take the additional step of associating a floating IP to the load balancer.
Node Groups
Node groups can be used to create heterogeneous clusters.
This functionality is only supported for Kubernetes clusters.
When a cluster is created it already has two node groups,
default-master and default-worker.
$ openstack coe cluster list
+--------------------------------------+------+-----------+------------+--------------+-----------------+---------------+
| uuid                                 | name | keypair   | node_count | master_count | status          | health_status |
+--------------------------------------+------+-----------+------------+--------------+-----------------+---------------+
| ef7011bb-d404-4198-a145-e8808204cde3 | kube | default   |          1 |            1 | CREATE_COMPLETE | HEALTHY       |
+--------------------------------------+------+-----------+------------+--------------+-----------------+---------------+

$ openstack coe nodegroup list kube
+--------------------------------------+----------------+-----------+----------------------------------------+------------+-----------------+--------+
| uuid                                 | name           | flavor_id | image_id                               | node_count | status          | role   |
+--------------------------------------+----------------+-----------+----------------------------------------+------------+-----------------+--------+
| adc3ecfa-d11e-4da7-8c44-4092ea9dddd9 | default-master | m1.small  | Fedora-AtomicHost-29-20190820.0.x86_64 |          1 | CREATE_COMPLETE | master |
| 186e131f-8103-4285-a900-eb0dcf18a670 | default-worker | m1.small  | Fedora-AtomicHost-29-20190820.0.x86_64 |          1 | CREATE_COMPLETE | worker |
+--------------------------------------+----------------+-----------+----------------------------------------+------------+-----------------+--------+
The default-worker node group cannot be removed or reconfigured, so
the initial cluster configuration should take this into account.
Create a new node group
To add a new node group, use openstack coe nodegroup create. The
only required parameters are the cluster ID and the name for the new
node group, but several extra options are available.
Roles
Roles can be used to show the purpose of a node group, and multiple node groups can be given the same role if they share a common purpose.
$ openstack coe nodegroup create kube test-ng --node-count 1 --role test
When listing node groups, the role may be used as a filter:
$ openstack coe nodegroup list kube --role test
+--------------------------------------+---------+-----------+----------------------------------------+------------+--------------------+------+
| uuid                                 | name    | flavor_id | image_id                               | node_count | status             | role |
+--------------------------------------+---------+-----------+----------------------------------------+------------+--------------------+------+
| b4ab1fcb-f23a-4d1f-b583-d699a2f1e2d7 | test-ng | m1.small  | Fedora-AtomicHost-29-20190820.0.x86_64 |          1 | CREATE_IN_PROGRESS | test |
+--------------------------------------+---------+-----------+----------------------------------------+------------+--------------------+------+
The node group role will default to “worker” if unset, and the only reserved role is “master”.
Role information is available within Kubernetes as labels on the nodes.
$ kubectl get nodes -L magnum.openstack.org/role
NAME                               STATUS   AGE    VERSION   ROLE
kube-r6cyw4bjb4lr-master-0         Ready    5d5h   v1.16.0   master
kube-r6cyw4bjb4lr-node-0           Ready    5d5h   v1.16.0   worker
kube-test-ng-lg7bkvjgus4y-node-0   Ready    61s    v1.16.0   test
This information can be used for scheduling, using a node selector.
nodeSelector:
  magnum.openstack.org/role: test
The label magnum.openstack.org/nodegroup is also available for
selecting a specific node group.
Flavor
The node group flavor will default to the minion flavor given when creating the cluster, but can be changed for each new node group.
$ openstack coe nodegroup create ef7011bb-d404-4198-a145-e8808204cde3 large-ng --flavor m2.large
This can be used if you require nodes of different sizes in the same cluster, or to switch from one flavor to another by creating a new node group and deleting the old one.
Availability zone
To create clusters which span more than one availability zone, multiple node groups must be used. The availability zone is passed as a label to the node group.
$ openstack coe nodegroup create kube zone-a --labels availability_zone=zone-a --labels ...
$ openstack coe nodegroup create kube zone-b --labels availability_zone=zone-b --labels ...
$ openstack coe nodegroup create kube zone-c --labels availability_zone=zone-c --labels ...
Where --labels ... are the rest of the labels that the cluster was
created with, which can be obtained from the cluster with this script:
$ openstack coe cluster show -f json <CLUSTER_ID> |
    jq --raw-output '.labels | to_entries |
    map("--labels \(.key)=\"\(.value)\"") | join(" ")'
Zone information is available within the cluster as the label
topology.kubernetes.io/zone on each node, or as the now deprecated
label failure-domain.beta.kubernetes.io/zone.
From Kubernetes 1.16 and onwards it is possible to balance the number of pods in a deployment across availability zones (or any other label).
Resize
Resizing a node group is done with the same API as resizing a cluster,
but the --nodegroup parameter must be used.
$ openstack coe cluster resize kube --nodegroup default-worker 2
Request to resize cluster ef7011bb-d404-4198-a145-e8808204cde3 has been accepted.
As usual the --nodes-to-remove parameter may be used to remove
specific nodes when decreasing the size of a node group.
Delete
Any node group except the default master and worker node groups can be deleted, by specifying the cluster and nodegroup name or ID.
$ openstack coe nodegroup delete ef7011bb-d404-4198-a145-e8808204cde3 test-ng
Kubernetes Health Monitoring
Currently Magnum can support health monitoring for Kubernetes cluster. There are two scenarios supported now: internal and external.
Internal Health Monitoring
Magnum has a periodic job to poll the k8s cluster if it is a reachable cluster. If the floating IP is enabled, or the master loadbalancer is enabled and the master loadbalancer has floating IP associated, then Magnum will take this cluster as reachable. Then Magnum will call the k8s API per 10 seconds to poll the health status of the cluster and then update the two attributes: health_status and health_status_reason.
External Health Montorning
Currently, only magnum-auto-healer is able to update cluster’s health_status and health_status_reason attributes. Both the label auto_healing_enabled=True and auto_healing_controller=magnum-auto-healer must be set, otherwise, the two attributes’ value will be overwritten with ‘UNKNOWN’ and ‘The cluster is not accessible’. The health_status attribute can either be in HEALTHY, UNHEALTHY or UNKNOWN and the health_status_reason is a dictionary of the hostnames and their current health statuses and the API health status.
