Contents
Networking with nova-network
Understanding the networking configuration options helps you design the best configuration for your Compute instances.
You can choose to either install and configure nova-network or use the OpenStack Networking service (neutron). This section contains a brief overview of nova-network. For more information about OpenStack Networking, see Networking.
Networking concepts
Compute assigns a private IP address to each VM instance. Compute makes a distinction between fixed IPs and floating IP. Fixed IPs are IP addresses that are assigned to an instance on creation and stay the same until the instance is explicitly terminated. Floating IPs are addresses that can be dynamically associated with an instance. A floating IP address can be disassociated and associated with another instance at any time. A user can reserve a floating IP for their project.
Note
Currently, Compute with nova-network only supports Linux bridge networking that allows virtual interfaces to connect to the outside network through the physical interface.
The network controller with nova-network provides virtual networks to enable compute servers to interact with each other and with the public network. Compute with nova-network supports the following network modes, which are implemented as Network Manager types:
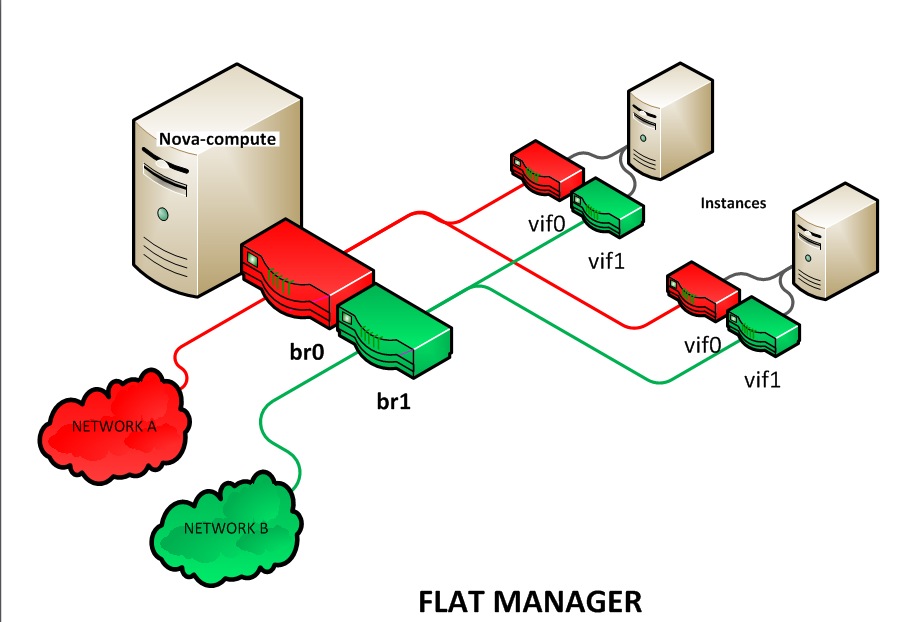
- Flat Network Manager
- In this mode, a network administrator specifies a subnet. IP addresses for VM instances are assigned from the subnet, and then injected into the image on launch. Each instance receives a fixed IP address from the pool of available addresses. A system administrator must create the Linux networking bridge (typically named br100, although this is configurable) on the systems running the nova-network service. All instances of the system are attached to the same bridge, which is configured manually by the network administrator.
Note
Configuration injection currently only works on Linux-style systems that keep networking configuration in /etc/network/interfaces.
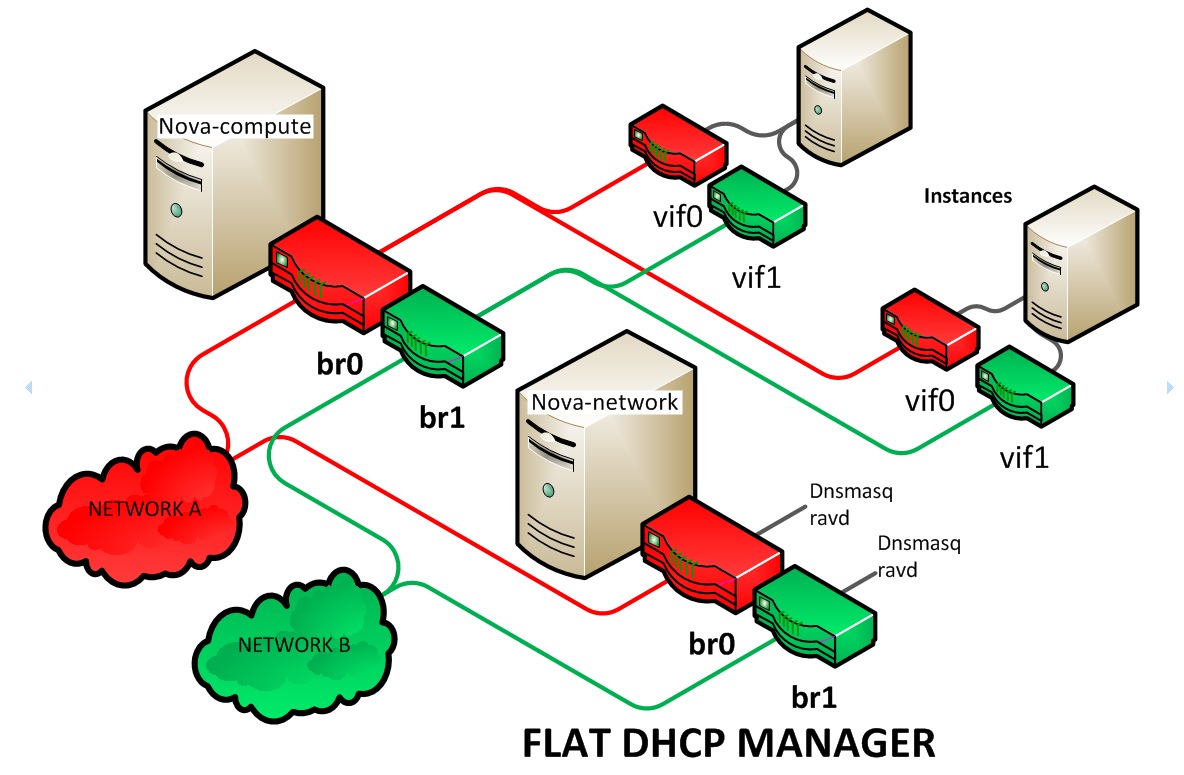
- Flat DHCP Network Manager
In this mode, OpenStack starts a DHCP server (dnsmasq) to allocate IP addresses to VM instances from the specified subnet, in addition to manually configuring the networking bridge. IP addresses for VM instances are assigned from a subnet specified by the network administrator.
Like flat mode, all instances are attached to a single bridge on the compute node. Additionally, a DHCP server configures instances depending on single-/multi-host mode, alongside each nova-network. In this mode, Compute does a bit more configuration. It attempts to bridge into an Ethernet device (flat_interface, eth0 by default). For every instance, Compute allocates a fixed IP address and configures dnsmasq with the MAC ID and IP address for the VM. Dnsmasq does not take part in the IP address allocation process, it only hands out IPs according to the mapping done by Compute. Instances receive their fixed IPs with the dhcpdiscover command. These IPs are not assigned to any of the host’s network interfaces, only to the guest-side interface for the VM.
In any setup with flat networking, the hosts providing the nova-network service are responsible for forwarding traffic from the private network. They also run and configure dnsmasq as a DHCP server listening on this bridge, usually on IP address 10.0.0.1 (see DHCP server: dnsmasq). Compute can determine the NAT entries for each network, although sometimes NAT is not used, such as when the network has been configured with all public IPs, or if a hardware router is used (which is a high availability option). In this case, hosts need to have br100 configured and physically connected to any other nodes that are hosting VMs. You must set the flat_network_bridge option or create networks with the bridge parameter in order to avoid raising an error. Compute nodes have iptables or ebtables entries created for each project and instance to protect against MAC ID or IP address spoofing and ARP poisoning.
Note
In single-host Flat DHCP mode you will be able to ping VMs through their fixed IP from the nova-network node, but you cannot ping them from the compute nodes. This is expected behavior.
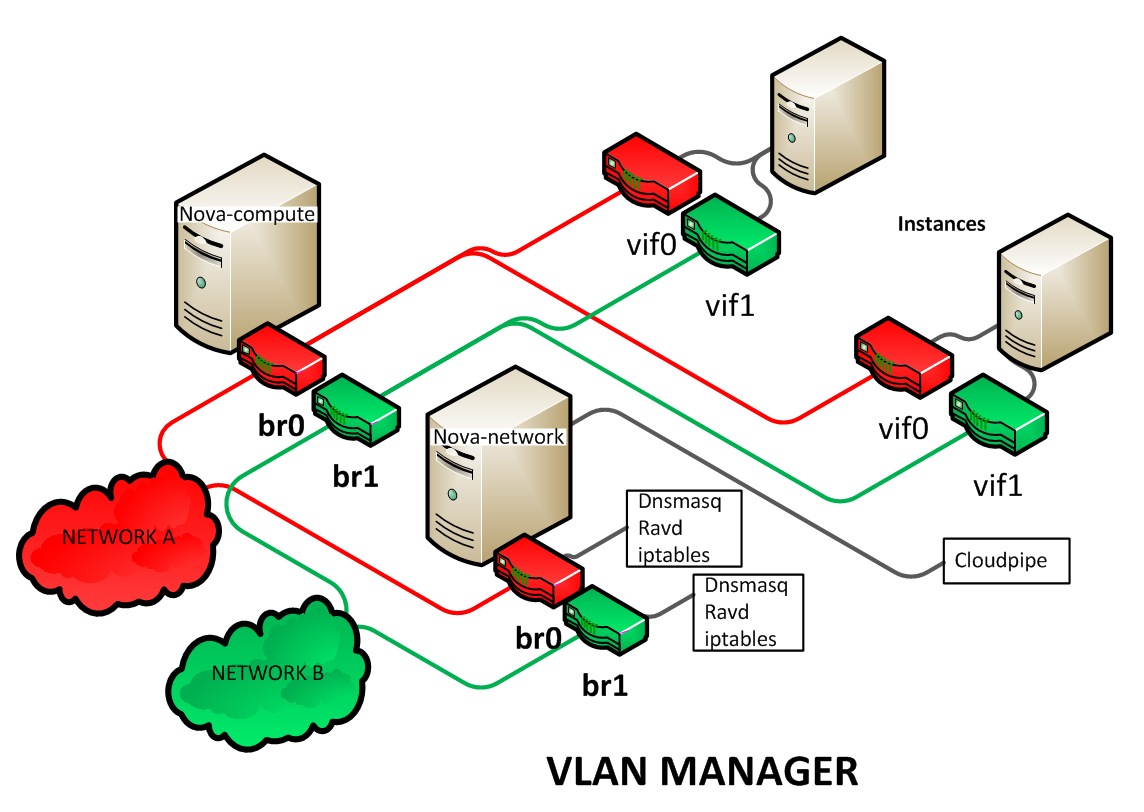
- VLAN Network Manager
This is the default mode for OpenStack Compute. In this mode, Compute creates a VLAN and bridge for each tenant. For multiple-machine installations, the VLAN Network Mode requires a switch that supports VLAN tagging (IEEE 802.1Q). The tenant gets a range of private IPs that are only accessible from inside the VLAN. In order for a user to access the instances in their tenant, a special VPN instance (code named cloudpipe) needs to be created. Compute generates a certificate and key for the user to access the VPN and starts the VPN automatically. It provides a private network segment for each tenant’s instances that can be accessed through a dedicated VPN connection from the internet. In this mode, each tenant gets its own VLAN, Linux networking bridge, and subnet.
The subnets are specified by the network administrator, and are assigned dynamically to a tenant when required. A DHCP server is started for each VLAN to pass out IP addresses to VM instances from the subnet assigned to the tenant. All instances belonging to one tenant are bridged into the same VLAN for that tenant. OpenStack Compute creates the Linux networking bridges and VLANs when required.
These network managers can co-exist in a cloud system. However, because you cannot select the type of network for a given tenant, you cannot configure multiple network types in a single Compute installation.
All network managers configure the network using network drivers. For example, the Linux L3 driver (l3.py and linux_net.py), which makes use of iptables, route and other network management facilities, and the libvirt network filtering facilities. The driver is not tied to any particular network manager; all network managers use the same driver. The driver usually initializes only when the first VM lands on this host node.
All network managers operate in either single-host or multi-host mode. This choice greatly influences the network configuration. In single-host mode, a single nova-network service provides a default gateway for VMs and hosts a single DHCP server (dnsmasq). In multi-host mode, each compute node runs its own nova-network service. In both cases, all traffic between VMs and the internet flows through nova-network. Each mode has benefits and drawbacks. For more on this, see the Network Topology section in the OpenStack Operations Guide.
All networking options require network connectivity to be already set up between OpenStack physical nodes. OpenStack does not configure any physical network interfaces. All network managers automatically create VM virtual interfaces. Some network managers can also create network bridges such as br100.
The internal network interface is used for communication with VMs. The interface should not have an IP address attached to it before OpenStack installation, it serves only as a fabric where the actual endpoints are VMs and dnsmasq. Additionally, the internal network interface must be in promiscuous mode, so that it can receive packets whose target MAC address is the guest VM, not the host.
All machines must have a public and internal network interface (controlled by these options: public_interface for the public interface, and flat_interface and vlan_interface for the internal interface with flat or VLAN managers). This guide refers to the public network as the external network and the private network as the internal or tenant network.
For flat and flat DHCP modes, use the nova network-create command to create a network:
$ nova network-create vmnet \
  --fixed-range-v4 10.0.0.0/16 --fixed-cidr 10.0.20.0/24 --bridge br100
- This example uses the following parameters:
--fixed-range-v4 specifies the network subnet. --fixed-cidr specifies a range of fixed IP addresses to allocate, and can be a subset of the --fixed-range-v4 argument. --bridge specifies the bridge device to which this network is connected on every compute node.
DHCP server: dnsmasq
The Compute service uses dnsmasq as the DHCP server when using either Flat DHCP Network Manager or VLAN Network Manager. For Compute to operate in IPv4/IPv6 dual-stack mode, use at least dnsmasq v2.63. The nova-network service is responsible for starting dnsmasq processes.
The behavior of dnsmasq can be customized by creating a dnsmasq configuration file. Specify the configuration file using the dnsmasq_config_file configuration option:
dnsmasq_config_file=/etc/dnsmasq-nova.conf
For more information about creating a dnsmasq configuration file, see the OpenStack Configuration Reference, and the dnsmasq documentation.
Dnsmasq also acts as a caching DNS server for instances. You can specify the DNS server that dnsmasq uses by setting the dns_server configuration option in /etc/nova/nova.conf. This example configures dnsmasq to use Google’s public DNS server:
dns_server=8.8.8.8
Dnsmasq logs to syslog (typically /var/log/syslog or /var/log/messages, depending on Linux distribution). Logs can be useful for troubleshooting, especially in a situation where VM instances boot successfully but are not reachable over the network.
Administrators can specify the starting point IP address to reserve with the DHCP server (in the format n.n.n.n) with this command:
$ nova-manage fixed reserve --address IP_ADDRESS
This reservation only affects which IP address the VMs start at, not the fixed IP addresses that nova-network places on the bridges.
Configure Compute to use IPv6 addresses
If you are using OpenStack Compute with nova-network, you can put Compute into dual-stack mode, so that it uses both IPv4 and IPv6 addresses for communication. In dual-stack mode, instances can acquire their IPv6 global unicast addresses by using a stateless address auto-configuration mechanism [RFC 4862/2462]. IPv4/IPv6 dual-stack mode works with both VlanManager and FlatDHCPManager networking modes.
In VlanManager networking mode, each project uses a different 64-bit global routing prefix. In FlatDHCPManager mode, all instances use one 64-bit global routing prefix.
This configuration was tested with virtual machine images that have an IPv6 stateless address auto-configuration capability. This capability is required for any VM to run with an IPv6 address. You must use an EUI-64 address for stateless address auto-configuration. Each node that executes a nova-* service must have python-netaddr and radvd installed.
Switch into IPv4/IPv6 dual-stack mode
For every node running a nova-* service, install python-netaddr:
# apt-get install python-netaddrFor every node running nova-network, install radvd and configure IPv6 networking:
# apt-get install radvd
# echo 1 > /proc/sys/net/ipv6/conf/all/forwarding
# echo 0 > /proc/sys/net/ipv6/conf/all/accept_ra
On all nodes, edit the nova.conf file and specify use_ipv6 = True.
Restart all nova-* services.
IPv6 configuration options
You can use the following options with the nova network-create command:
Add a fixed range for IPv6 addresses to the nova network-create command. Specify public or private after the network-create parameter.
$ nova network-create public --fixed-range-v4 FIXED_RANGE_V4 \
  --vlan VLAN_ID --vpn VPN_START --fixed-range-v6 FIXED_RANGE_V6
Set the IPv6 global routing prefix by using the --fixed_range_v6 parameter. The default value for the parameter is fd00::/48.
When you use FlatDHCPManager, the command uses the original --fixed_range_v6 value. For example:
$ nova network-create public  --fixed-range-v4 10.0.2.0/24 \
  --fixed-range-v6 fd00:1::/48
When you use VlanManager, the command increments the subnet ID to create subnet prefixes. Guest VMs use this prefix to generate their IPv6 global unicast addresses. For example:
$ nova network-create public --fixed-range-v4 10.0.1.0/24 --vlan 100 \
  --vpn 1000 --fixed-range-v6 fd00:1::/48
| Configuration option = Default value | Description |
|---|---|
| [DEFAULT] | |
| fixed_range_v6 = fd00::/48 | (StrOpt) Fixed IPv6 address block |
| gateway_v6 = None | (StrOpt) Default IPv6 gateway |
| ipv6_backend = rfc2462 | (StrOpt) Backend to use for IPv6 generation |
| use_ipv6 = False | (BoolOpt) Use IPv6 |
Metadata service
Compute uses a metadata service for virtual machine instances to retrieve instance-specific data. Instances access the metadata service at http://169.254.169.254. The metadata service supports two sets of APIs: an OpenStack metadata API and an EC2-compatible API. Both APIs are versioned by date.
To retrieve a list of supported versions for the OpenStack metadata API, make a GET request to http://169.254.169.254/openstack:
$ curl http://169.254.169.254/openstack
2012-08-10
2013-04-04
2013-10-17
latest
To list supported versions for the EC2-compatible metadata API, make a GET request to http://169.254.169.254:
$ curl http://169.254.169.254
1.0
2007-01-19
2007-03-01
2007-08-29
2007-10-10
2007-12-15
2008-02-01
2008-09-01
2009-04-04
latest
If you write a consumer for one of these APIs, always attempt to access the most recent API version supported by your consumer first, then fall back to an earlier version if the most recent one is not available.
Metadata from the OpenStack API is distributed in JSON format. To retrieve the metadata, make a GET request to http://169.254.169.254/openstack/2012-08-10/meta_data.json:
$ curl http://169.254.169.254/openstack/2012-08-10/meta_data.json
{
   "uuid": "d8e02d56-2648-49a3-bf97-6be8f1204f38",
   "availability_zone": "nova",
   "hostname": "test.novalocal",
   "launch_index": 0,
   "meta": {
      "priority": "low",
      "role": "webserver"
   },
   "project_id": "f7ac731cc11f40efbc03a9f9e1d1d21f",
   "public_keys": {
       "mykey": "ssh-rsa AAAAB3NzaC1yc2EAAAADAQABAAAAgQDYVEprvtYJXVOBN0XNKV\
                 VRNCRX6BlnNbI+USLGais1sUWPwtSg7z9K9vhbYAPUZcq8c/s5S9dg5vTH\
                 bsiyPCIDOKyeHba4MUJq8Oh5b2i71/3BISpyxTBH/uZDHdslW2a+SrPDCe\
                 uMMoss9NFhBdKtDkdG9zyi0ibmCP6yMdEX8Q== Generated by Nova\n"
   },
   "name": "test"
}
Instances also retrieve user data (passed as the user_data parameter in the API call or by the --user_data flag in the nova boot command) through the metadata service, by making a GET request to http://169.254.169.254/openstack/2012-08-10/user_data:
$ curl http://169.254.169.254/openstack/2012-08-10/user_data
#!/bin/bash
echo 'Extra user data here'
The metadata service has an API that is compatible with version 2009-04-04 of the Amazon EC2 metadata service. This means that virtual machine images designed for EC2 will work properly with OpenStack.
The EC2 API exposes a separate URL for each metadata element. Retrieve a listing of these elements by making a GET query to http://169.254.169.254/2009-04-04/meta-data/:
$ curl http://169.254.169.254/2009-04-04/meta-data/
ami-id
ami-launch-index
ami-manifest-path
block-device-mapping/
hostname
instance-action
instance-id
instance-type
kernel-id
local-hostname
local-ipv4
placement/
public-hostname
public-ipv4
public-keys/
ramdisk-id
reservation-id
security-groups
$ curl http://169.254.169.254/2009-04-04/meta-data/block-device-mapping/
ami
$ curl http://169.254.169.254/2009-04-04/meta-data/placement/
availability-zone
$ curl http://169.254.169.254/2009-04-04/meta-data/public-keys/
0=mykey
Instances can retrieve the public SSH key (identified by keypair name when a user requests a new instance) by making a GET request to http://169.254.169.254/2009-04-04/meta-data/public-keys/0/openssh-key:
$ curl http://169.254.169.254/2009-04-04/meta-data/public-keys/0/openssh-key
ssh-rsa AAAAB3NzaC1yc2EAAAADAQABAAAAgQDYVEprvtYJXVOBN0XNKVVRNCRX6BlnNbI+US\
LGais1sUWPwtSg7z9K9vhbYAPUZcq8c/s5S9dg5vTHbsiyPCIDOKyeHba4MUJq8Oh5b2i71/3B\
ISpyxTBH/uZDHdslW2a+SrPDCeuMMoss9NFhBdKtDkdG9zyi0ibmCP6yMdEX8Q== Generated\
by Nova
Instances can retrieve user data by making a GET request to http://169.254.169.254/2009-04-04/user-data:
$ curl http://169.254.169.254/2009-04-04/user-data
#!/bin/bash
echo 'Extra user data here'
The metadata service is implemented by either the nova-api service or the nova-api-metadata service. Note that the nova-api-metadata service is generally only used when running in multi-host mode, as it retrieves instance-specific metadata. If you are running the nova-api service, you must have metadata as one of the elements listed in the enabled_apis configuration option in /etc/nova/nova.conf. The default enabled_apis configuration setting includes the metadata service, so you do not need to modify it.
Hosts access the service at 169.254.169.254:80, and this is translated to metadata_host:metadata_port by an iptables rule established by the nova-network service. In multi-host mode, you can set metadata_host to 127.0.0.1.
For instances to reach the metadata service, the nova-network service must configure iptables to NAT port 80 of the 169.254.169.254 address to the IP address specified in metadata_host (this defaults to $my_ip, which is the IP address of the nova-network service) and port specified in metadata_port (which defaults to 8775) in /etc/nova/nova.conf.
Note
The metadata_host configuration option must be an IP address, not a host name.
The default Compute service settings assume that nova-network and nova-api are running on the same host. If this is not the case, in the /etc/nova/nova.conf file on the host running nova-network, set the metadata_host configuration option to the IP address of the host where nova-api is running.
| Configuration option = Default value | Description |
|---|---|
| [DEFAULT] | |
| metadata_cache_expiration = 15 | (IntOpt) Time in seconds to cache metadata; 0 to disable metadata caching entirely (not recommended). Increasing this should improve response times of the metadata API when under heavy load. Higher values may increase memory usage and result in longer times for host metadata changes to take effect. |
| metadata_host = $my_ip | (StrOpt) The IP address for the metadata API server |
| metadata_listen = 0.0.0.0 | (StrOpt) The IP address on which the metadata API will listen. |
| metadata_listen_port = 8775 | (IntOpt) The port on which the metadata API will listen. |
| metadata_manager = nova.api.manager.MetadataManager | (StrOpt) OpenStack metadata service manager |
| metadata_port = 8775 | (IntOpt) The port for the metadata API port |
| metadata_workers = None | (IntOpt) Number of workers for metadata service. The default will be the number of CPUs available. |
| vendordata_driver = nova.api.metadata.vendordata_json.JsonFileVendorData | (StrOpt) Driver to use for vendor data |
| vendordata_jsonfile_path = None | (StrOpt) File to load JSON formatted vendor data from |
Enable ping and SSH on VMs
You need to enable ping and ssh on your VMs for network access. This can be done with either the nova or euca2ools commands.
Note
Run these commands as root only if the credentials used to interact with nova-api are in /root/.bashrc. If the EC2 credentials in the .bashrc file are for an unprivileged user, you must run these commands as that user instead.
Enable ping and SSH with nova commands:
$ nova secgroup-add-rule default icmp -1 -1 0.0.0.0/0
$ nova secgroup-add-rule default tcp 22 22 0.0.0.0/0
Enable ping and SSH with euca2ools:
$ euca-authorize -P icmp -t -1:-1 -s 0.0.0.0/0 default
$ euca-authorize -P tcp -p 22 -s 0.0.0.0/0 default
If you have run these commands and still cannot ping or SSH your instances, check the number of running dnsmasq processes, there should be two. If not, kill the processes and restart the service with these commands:
# killall dnsmasq
# service nova-network restart
Configure public (floating) IP addresses
This section describes how to configure floating IP addresses with nova-network. For information about doing this with OpenStack Networking, see L3 routing and NAT.
Private and public IP addresses
In this section, the term floating IP address is used to refer to an IP address, usually public, that you can dynamically add to a running virtual instance.
Every virtual instance is automatically assigned a private IP address. You can choose to assign a public (or floating) IP address instead. OpenStack Compute uses network address translation (NAT) to assign floating IPs to virtual instances.
To be able to assign a floating IP address, edit the /etc/nova/nova.conf file to specify which interface the nova-network service should bind public IP addresses to:
public_interface=VLAN100
If you make changes to the /etc/nova/nova.conf file while the nova-network service is running, you will need to restart the service to pick up the changes.
Note
Floating IPs are implemented by using a source NAT (SNAT rule in iptables), so security groups can sometimes display inconsistent behavior if VMs use their floating IP to communicate with other VMs, particularly on the same physical host. Traffic from VM to VM across the fixed network does not have this issue, and so this is the recommended setup. To ensure that traffic does not get SNATed to the floating range, explicitly set:
dmz_cidr=x.x.x.x/y
The x.x.x.x/y value specifies the range of floating IPs for each pool of floating IPs that you define. This configuration is also required if the VMs in the source group have floating IPs.
Enable IP forwarding
IP forwarding is disabled by default on most Linux distributions. You will need to enable it in order to use floating IPs.
Note
IP forwarding only needs to be enabled on the nodes that run nova-network. However, you will need to enable it on all compute nodes if you use multi_host mode.
To check if IP forwarding is enabled, run:
$ cat /proc/sys/net/ipv4/ip_forward
0
Alternatively, run:
$ sysctl net.ipv4.ip_forward
net.ipv4.ip_forward = 0
In these examples, IP forwarding is disabled.
To enable IP forwarding dynamically, run:
# sysctl -w net.ipv4.ip_forward=1
Alternatively, run:
# echo 1 > /proc/sys/net/ipv4/ip_forward
To make the changes permanent, edit the /etc/sysctl.conf file and update the IP forwarding setting:
net.ipv4.ip_forward = 1
Save the file and run this command to apply the changes:
# sysctl -p
You can also apply the changes by restarting the network service:
on Ubuntu, Debian:
# /etc/init.d/networking restarton RHEL, Fedora, CentOS, openSUSE and SLES:
# service network restart
Create a list of available floating IP addresses
Compute maintains a list of floating IP addresses that are available for assigning to instances. Use the nova-manage floating commands to perform floating IP operations:
Add entries to the list:
# nova-manage floating create --pool nova --ip_range 68.99.26.170/31
List the floating IP addresses in the pool:
# nova-manage floating listCreate specific floating IPs for either a single address or a subnet:
# nova-manage floating create --pool POOL_NAME --ip_range CIDRRemove floating IP addresses using the same parameters as the create command:
# nova-manage floating delete CIDR
For more information about how administrators can associate floating IPs with instances, see Manage IP addresses in the OpenStack Administrator Guide.
Automatically add floating IPs
You can configure nova-network to automatically allocate and assign a floating IP address to virtual instances when they are launched. Add this line to the /etc/nova/nova.conf file:
auto_assign_floating_ip=True
Save the file, and restart nova-network
Note
If this option is enabled, but all floating IP addresses have already been allocated, the nova boot command will fail.
Remove a network from a project
You cannot delete a network that has been associated to a project. This section describes the procedure for dissociating it so that it can be deleted.
In order to disassociate the network, you will need the ID of the project it has been associated to. To get the project ID, you will need to be an administrator.
Disassociate the network from the project using the scrub command, with the project ID as the final parameter:
# nova-manage project scrub --project ID
Multiple interfaces for instances (multinic)
The multinic feature allows you to use more than one interface with your instances. This is useful in several scenarios:
- SSL Configurations (VIPs)
- Services failover/HA
- Bandwidth Allocation
- Administrative/Public access to your instances
Each VIP represents a separate network with its own IP block. Every network mode has its own set of changes regarding multinic usage:
Using multinic
In order to use multinic, create two networks, and attach them to the tenant (named project on the command line):
$ nova network-create first-net --fixed-range-v4 20.20.0.0/24 --project-id $your-project
$ nova network-create second-net --fixed-range-v4 20.20.10.0/24 --project-id $your-project
Each new instance will now receive two IP addresses from their respective DHCP servers:
$ nova list

  +-----+------------+--------+----------------------------------------+
  |  ID |    Name    | Status |                Networks                |
  +-----+------------+--------+----------------------------------------+
  | 124 | Server 124 | ACTIVE | network2=20.20.0.3; private=20.20.10.14|
  +-----+------------+--------+----------------------------------------+
Note
Make sure you start the second interface on the instance, or it won’t be reachable through the second IP.
This example demonstrates how to set up the interfaces within the instance. This is the configuration that needs to be applied inside the image.
Edit the /etc/network/interfaces file:
# The loopback network interface
auto lo
iface lo inet loopback

auto eth0
iface eth0 inet dhcp

auto eth1
iface eth1 inet dhcp
If the Virtual Network Service Neutron is installed, you can specify the networks to attach to the interfaces by using the --nic flag with the nova command:
$ nova boot --image ed8b2a37-5535-4a5f-a615-443513036d71 --flavor 1 --nic net-id=NETWORK1_ID --nic net-id=NETWORK2_ID test-vm1
Troubleshooting Networking
Cannot reach floating IPs
Problem
You cannot reach your instances through the floating IP address.
Solution
Check that the default security group allows ICMP (ping) and SSH (port 22), so that you can reach the instances:
$ nova secgroup-list-rules default
+-------------+-----------+---------+-----------+--------------+
| IP Protocol | From Port | To Port |  IP Range | Source Group |
+-------------+-----------+---------+-----------+--------------+
| icmp        | -1        | -1      | 0.0.0.0/0 |              |
| tcp         | 22        | 22      | 0.0.0.0/0 |              |
+-------------+-----------+---------+-----------+--------------+
Check the NAT rules have been added to iptables on the node that is running nova-network:
# iptables -L -nv -t nat
-A nova-network-PREROUTING -d 68.99.26.170/32 -j DNAT --to-destination 10.0.0.3
-A nova-network-floating-snat -s 10.0.0.3/32 -j SNAT --to-source 68.99.26.170
Check that the public address (68.99.26.170 in this example), has been added to your public interface. You should see the address in the listing when you use the ip addr command:
$ ip addr
2: eth0: <BROADCAST,MULTICAST,UP,LOWER_UP> mtu 1500 qdisc mq state UP qlen 1000
link/ether xx:xx:xx:17:4b:c2 brd ff:ff:ff:ff:ff:ff
inet 13.22.194.80/24 brd 13.22.194.255 scope global eth0
inet 68.99.26.170/32 scope global eth0
inet6 fe80::82b:2bf:fe1:4b2/64 scope link
valid_lft forever preferred_lft forever
Note
You cannot use SSH to access an instance with a public IP from within the same server because the routing configuration does not allow it.
Use tcpdump to identify if packets are being routed to the inbound interface on the compute host. If the packets are reaching the compute hosts but the connection is failing, the issue may be that the packet is being dropped by reverse path filtering. Try disabling reverse-path filtering on the inbound interface. For example, if the inbound interface is eth2, run:
# sysctl -w net.ipv4.conf.ETH2.rp_filter=0
If this solves the problem, add the following line to /etc/sysctl.conf so that the reverse-path filter is persistent:
net.ipv4.conf.rp_filter=0
Temporarily disable firewall
Problem
Networking issues prevent administrators accessing or reaching VM’s through various pathways.
Solution
You can disable the firewall by setting this option in /etc/nova/nova.conf:
firewall_driver=nova.virt.firewall.NoopFirewallDriver
Packet loss from instances to nova-network server (VLANManager mode)
Problem
If you can access your instances with SSH but the network to your instance is slow, or if you find that running certain operations are slower than they should be (for example, sudo), packet loss could be occurring on the connection to the instance.
Packet loss can be caused by Linux networking configuration settings related to bridges. Certain settings can cause packets to be dropped between the VLAN interface (for example, vlan100) and the associated bridge interface (for example, br100) on the host running nova-network.
Solution
One way to check whether this is the problem is to open three terminals and run the following commands:
In the first terminal, on the host running nova-network, use tcpdump on the VLAN interface to monitor DNS-related traffic (UDP, port 53). As root, run:
# tcpdump -K -p -i vlan100 -v -vv udp port 53
In the second terminal, also on the host running nova-network, use tcpdump to monitor DNS-related traffic on the bridge interface. As root, run:
# tcpdump -K -p -i br100 -v -vv udp port 53
In the third terminal, use SSH to access the instance and generate DNS requests by using the nslookup command:
$ nslookup www.google.comThe symptoms may be intermittent, so try running nslookup multiple times. If the network configuration is correct, the command should return immediately each time. If it is not correct, the command hangs for several seconds before returning.
If the nslookup command sometimes hangs, and there are packets that appear in the first terminal but not the second, then the problem may be due to filtering done on the bridges. Try disabling filtering, and running these commands as root:
# sysctl -w net.bridge.bridge-nf-call-arptables=0
# sysctl -w net.bridge.bridge-nf-call-iptables=0
# sysctl -w net.bridge.bridge-nf-call-ip6tables=0
If this solves your issue, add the following line to /etc/sysctl.conf so that the changes are persistent:
net.bridge.bridge-nf-call-arptables=0
net.bridge.bridge-nf-call-iptables=0
net.bridge.bridge-nf-call-ip6tables=0
KVM: Network connectivity works initially, then fails
Problem
With KVM hypervisors, instances running Ubuntu 12.04 sometimes lose network connectivity after functioning properly for a period of time.
Solution
Try loading the vhost_net kernel module as a workaround for this issue (see bug #997978) . This kernel module may also improve network performance on KVM. To load the kernel module:
# modprobe vhost_net
Note
Loading the module has no effect on running instances.

Except where otherwise noted, this document is licensed under Creative Commons Attribution 3.0 License. See all OpenStack Legal Documents.