Part 3: Creating a Plone CMS application package
If you’ve completed “Hello, World” scenarios in the previous parts and are ready for some serious tasks, we’ve got a good example here.
Let’s automate the deployment of some real application. We’ve chosen a “Plone CMS” for this purpose. Plone is a simple, but powerful and flexible Content Management System which can efficiently run on cloud. Its deployment scenario can be very simple for demo cases and can become really complicated for production-grade usage. So it’s a good playground: in this part we’ll create a Murano application to address the simplest scenario, then we will gradually add more features of production-grade deployments.
Note
To learn more about Plone, its features, capabilities and deployment scenarios you may visit the Official website of Plone Foundation.
The goal
Simplest deployment of Plone CMS requires a single server, or, in the case of OpenStack, a Virtual Machine, to run on. Then a software should be downloaded and configured to run on that server.
So, as a bare minimum our Plone application package for Murano should automate the following steps:
Provision a virtual machine in OpenStack (VM);
Configure ths VM’s network connectivity and security;
Download a distribution of Plone from Internet to the virtual machine;
Install the distribution and configure some of its parameters with user input.
Preparation
First let’s revisit what we’ve learned in previous parts and create a new application package with its manifest and create a class file to contain the logic of your app.
Create a new directory for a package, call it PloneApp. Create a
manifest.yaml file as described in part 1 of this tutorial in the root of
the package and fill it with data: name your package com.yourdomain.Plone,
set its type to Application, give it a display name of “Plone CMS” and put
your name as the author of the package:
1FullName: com.yourdomain.Plone
2Name: Plone CMS
3Description: Simple Plone Deployment
4Type: Application
5Author: John Doe
Then create a Classes sub directory inside your package directory and
create a plone.yaml there. This will be your application class.
At the top of this file declare a Namespace section: this will simplify the
code and save time on typing long class names. Make your namespace
(com.yourdomain) a default namespace of the file, also include the standard
namespace for Murano applications - io.murano, alias it as std.
Don’t forget to include the Name of your class. Since you’ve declared a
default namespace for a file you can name your class without a need to type its
long part, just using the shortname.
Also include the Extends section: same as in our “Hello, World” example
this application will inherit the io.murano.Application class, but since
we’ve aliased this namespace as well, it may be shortened to
std:Application
By now your class file should look like this:
Namespaces:
  =: com.yourdomain
  std: io.murano

Name:  Plone

Extends: std:Application
We’ll add the actual logic in the next section. Now, save the file and include
it into the Classes section of your manifest.yaml, which should now look
like this:
1FullName: com.yourdomain.Plone
2Name: Plone CMS
3Description: Simple Plone Deployment
4Type: Application
5Author: John Doe
6Classes:
7  com.yourdomain.Plone: plone.yaml
You are all set and ready to go. Let’s add the actual deployment logic.
Library classes
Murano comes bundled with a so-called “Murano Core Library” - a Murano Package
containing the classes to automate different scenarios of interaction with
other entities such as OpenStack services or virtual machines. They follow
object-oriented design: for example, there is a Murano class called
Instance which represents an OpenStack virtual machine: if you create an
object of this class and execute a method called deploy for it Murano will
do all the needed system calls to OpenStack Services to orchestrate the
provisioning of a virtual machine and its networking configuration. Then this
object will contain information about the state and configuration of the VM,
such as its hostname, ip addresses etc. After the VM is provisioned you can use
its object to send the configuration scripts to the VM to install and configure
software for your application.
Other OpenStack resources such as Volumes, Networks, Ports, Routers etc also have their corresponding classes in the core library.
Provisioning a VM
When creating your application package you can compose your application out
of the components of core library. For example for an application which
should run on a VM you can define an input property called instance and
restrict the value type of this property to the aforementioned Instance
class with a contract.
Let’s do that in the plone.yaml class file you’ve created.
First, add a new namespace alias to your Namespaces section:
shorten io.murano.resources as res. This namespace of the core
library contains all the resource classes, including the
io.murano.resources.Instance which we need to define the virtual machine:
Namespaces:
  =: com.yourdomain
  std: io.murano
  res: io.murano.resources
Now, let’s add an input property to your class:
1Properties:
2  instance:
3    Usage: In
4    Contract: $.class(res:Instance)
Notice the contract at line 4: it limits the values of this property to the
objects of class io.murano.resources.Instance or its subclasses.
This defines that your application needs a virtual machine. Now let’s ensure
that it is provisioned - or provision it otherwise. Add a deploy method to
your application class and call instance’s deploy method from it:
1Methods:
2  deploy:
3    Body:
4      - $this.instance.deploy()
That’s very simple: you just access the instance property of your current
object and run a method deploy for it. The core library defines this method
of the Instance class in an idempotent manner: you may call it as many
times as you want: the first call will actually provision the virtual machine
in the cloud, while all the subsequent calls will no nothing, thus you may
always call this method to ensure that the VM was properly provisioned. It’s
important since we define it as an input property: theoretically a user can
pass an already-provisioned VM object as input, but you need to be sure.
Always calling the deploy method is the best practice to follow.
Running a command on the VM
Once the VM has been provisioned you may execute various kinds of software configuration scenarios on it to install and configure the actual application on the VM. Murano supports different types of software configuration tools to be run on a VM, but the simplest and the most common type is just a shell script.
To run a shell script on a virtual machine you may use a static method
runCommand of class io.murano.configuration.Linux. Since this method is
static you do not need to create any objects of its class: you can just do
something like:
- type('io.murano.configuration.Linux').runCommand($server.agent, 'sudo apt-get update')
or, if we declare another namespace prefix
Namespaces:
  ...
  conf: io.murano.configuration
this may be shortened to
- conf:Linux.runCommand($server.agent, 'sudo apt-get update')
In this case $server should be a variable containing an object of
io.murano.resources.Instance class, everything you pass as a second
argument (apt get update in the example above) is the shell command to be
executed on a VM. You may pass not just a single line, but a multi-line text:
it will be treated as a shell script.
Note
The shell scripts and commands you send to a VM are executed by a special software component running on the VM - a murano agent. For the most popular distributions of Linux (Debian, Ubuntu, Centos, Fedora, etc.) it automatically gets installed on the VM once it is provisioned, but for other distribution and non-Linux OSes it has to be manually pre-installed in the image. See Building Murano Image for details.
Loading a script from a resource file
Passing strings as a second argument of a runCommand method is convenient
for short commands like the apt-get update shown in an example above.
However for larger scripts it is not that useful. Instead it is preferable
to load a script text from a file and run it. You can do that in Murano.
For example, let’s make a script which downloads, unpacks, installs and
configures Plone CMS on our VM. First, create a directory called Resources
inside your package directory. Then, create a file named install-plone.sh
and put the following script there:
#!/bin/bash

#input parameters

PL_PATH="$1"
PL_PASS="$2"
PL_PORT="$3"


# Write log. Redirect stdout & stderr into log file:
exec &> /var/log/runPloneDeploy.log
# echo "Update all packages."
sudo apt-get update

# Install the operating system software and libraries needed to run Plone:
sudo apt-get install python-setuptools python-dev build-essential libssl-dev libxml2-dev libxslt1-dev libbz2-dev libjpeg62-dev

# Install optional system packages for the handling of PDF and Office files. Can be omitted:
sudo apt-get install libreadline-dev wv poppler-utils

# Download the latest Plone unified installer:
wget --no-check-certificate https://launchpad.net/plone/5.0/5.0.4/+download/Plone-5.0.4-UnifiedInstaller.tgz

# Unzip the latest Plone unified installer:
tar -xvf Plone-5.0.4-UnifiedInstaller.tgz
cd Plone-5.0.4-UnifiedInstaller

# Set the port that Plone will listen to on available network interfaces. Editing "http-address" param in buildout.cfg file:
sed -i "s/^http-address = [0-9]*$/http-address = ${PL_PORT}/" buildout_templates/buildout.cfg

# Run the Plone installer in standalone mode
./install.sh --password="${PL_PASS}" --target="${PL_PATH}" standalone

# Start Plone
cd "${PL_PATH}/zinstance"
bin/plonectl start
Note
As you can see, this script uses apt to install the prerequisite software packages, so it expects a Debian-compatible Linux distro as the VM operating system. This particular script was tested on Ubuntu 14.04. Other distros may have a different set of preinstalled software and thus require different additional prerequisites.
The comments in the script give the needed explanation: the script installs all
the prerequisites, downloads a targz archive with a distribution of Plone,
unpacks it, edits the buildout.cfg file to specify the port Plone will
listen at, then runs the installation script which is included in the
distribution. When that script is finished, the Plone daemon is started.
Save the file as Resources/install-plone.sh. Now you may load its contents
into a string variable in your class file. To do that, you need to use another
static method: a string() method of a io.murano.system.Resources class:
- $script: type('io.murano.system.Resources').string('install-plone.sh')
or, with the introduction of another namespace prefix
- $script: sys:Resources.string('install-plone.sh')
But before sending this script to a VM, it needs to be parametrized: as you
can see in the script snippet above, it declares three variables which are
used to set the installation path in the VM’s filesystem, a default
administrator’s password and a listening port. In the script these values are
initialized with stubs $1, $2 and $3, now we need to replace these
stubs with the actual user input. To do that our class needs to define the
appropriate input properties and then do string replacement.
First, let’s define the appropriate input properties in the Properties
block of the class, right after the instance property:
 1Properties:
 2  instance:
 3    Usage: In
 4    Contract: $.class(res:Instance)
 5
 6  installationPath:
 7    Usage: In
 8    Contract: $.string().notNull()
 9    Default: '/opt/plone'
10
11  defaultPassword:
12    Usage: In
13    Contract: $.string().notNull()
14
15  listeningPort:
16    Usage: In
17    Contract: $.int().notNull()
18    Default: 8080
Now, let’s replace the stub values in that script value we’ve loaded into the
$script variable. This may be done using a replace function:
- $script: $script.replace({"$1" => $this.installationPath,
     "$2" => $this.defaultPassword,
     "$3" => $this.listeningPort})
Finally, the resulting $script variable may be passed as a second argument
of a runCommand method, while the first one should be the instance
property, containing our VM-object:
- conf:Linux.runCommand($this.instance.agent, $script)
Configuring OpenStack Security
By now we’ve got code which provisions a VM and a script which deploys and configures Plone on it. However, in most OpenStack clouds this is not enough: usually all incoming traffic to all the VMs is blocked by default, so we need to configure security group of OpenStack to allow the incoming http calls to our VM on the port our Plone server listens at.
To do that we need to use a securityGroupManager property of the
Environment class which owns our application. That property contains an
object of type io.murano.system.SecurityGroupManager, which defines a
addGroupIngress method. This method allows us to add a security group rule
to allow incoming traffic of some type through a specific port within a port
range. It accepts a list of YAML objects, each having four keys: FromPort
and ToPort to define the boundaries of the port range, IpProtocol to
define the type of the protocol and External boolean flag to indicate if
the incoming traffic should be be allowed to originate from outside of the
environment (if this flag is false, the traffic will be accepted only from the
VMs deployed by the application in the same Murano environment).
Let’s do this in code:
1- $environment: $this.find(std:Environment)
2- $manager: $environment.securityGroupManager
3- $rules:
4   - FromPort: $this.listeningPort
5     ToPort: $this.listeningPort
6     IpProtocol: tcp
7     External: true
8- $manager.addGroupIngress($rules)
9- $environment.stack.push()
It’s quite straightforward, just notice the last line. It is required, because
current implementation of SecurityGroupManager relies on Heat underneath -
it modifies the Heat Stack associated with our environment, but does not
apply the changes to the actual cloud. To apply them the stack needs to be
pushed, i.e. submitted to Heat Orchestration service. The last line does
exactly that.
Notifying end-user on Plone location
When the deployment is completed and our instance of Plone server starts listening on a provisioned virtual machine, the end user has one last question to solve: to find out where it is. Of course, the user may use OpenStack Dashboard to list all the provisioned VMs, find the one which has just been created and look for its IP address. But that’s inconvenient. It would be much better if Murano notified the end-user on where to find Plone once it is ready.
We may utilize the same approach we used in the previous parts to say “Hello,
World” - call a report method of reporter attribute of the
Environment class. The tricky part is getting the IP address.
Class io.murano.resources.Instance has an output property called
ipAddresses. Unlike input properties the output ones are not provided by
users but are set by objects themselves while their methods are executed. The
ipAddresses is assigned during the execution of deploy method of the
VM. The value is the list of ip addresses assigned to different interfaces of
the machine. Also, if the assignFloatingIp input property is set to
true, another output property will be set during the execution of
deploy - a floatingIpAddress will contain the floating ip attached to
the VM.
Let’s use this knowledge and build a proper report message:
1- $message: 'Plone is up and running at '
2- If: $this.instance.assignFloatingIp
3  Then:
4    - $message: $message + $this.instance.floatingIpAddress
5  Else:
6    - $message: $message + $this.instance.ipAddresses.first()
7- $message: $message + ":" + str($this.listeningPort)
8- $environment.reporter.report($this, $message)
Note the usage of If expression: it is similar to other programming
languages, just uses YAML keys to define the “if” and “else” blocks.
This code creates a string variable called $message, initializes it with
the beginning of the message string, then appends either a floating ip address
of the VM (if it’s set) or the first of the regular ips otherwise. Then it
appends a listening port after a colon character - and reports the resulting
message to the user.
Completing the Plone class
We’ve got all the pieces to deploy our Plone application, now let’s combine them together. Our final class file should look like this:
Namespaces:
  =: com.yourdomain
  std: io.murano
  res: io.murano.resources
  sys: io.murano.system

Name: Plone

Extends: std:Application

Properties:
  instance:
    Usage: In
    Contract: $.class(res:Instance)

  installationPath:
    Usage: In
    Contract: $.string().notNull()
    Default: '/opt/plone'

  defaultPassword:
    Usage: In
    Contract: $.string().notNull()

  listeningPort:
    Usage: In
    Contract: $.int().notNull()
    Default: 8080

Methods:
  deploy:
    Body:
      - $this.instance.deploy()
      - $script: sys:Resources.string('install-plone.sh')
      - $script: $script.replace({
          "$1" => $this.installationPath,
          "$2" => $this.defaultPassword,
          "$3" => $this.listeningPort
         })
      - type('io.murano.configuration.Linux').runCommand($this.instance.agent, $script)
      - $environment: $this.find(std:Environment)
      - $manager: $environment.securityGroupManager
      - $rules:
        - FromPort: $this.listeningPort
          ToPort: $this.listeningPort
          IpProtocol: tcp
          External: true
      - $manager.addGroupIngress($rules)
      - $environment.stack.push()
      - $formatString: 'Plone is up and running at {0}:{1}'
      - If: $this.instance.assignFloatingIp
        Then:
          - $address: $this.instance.floatingIpAddress
        Else:
          - $address: $this.instance.ipAddresses.first()
      - $message: format($formatString, $address, $this.listeningPort)
      - $environment.reporter.report($this, $message)
That’s all, our class is ready.
Providing a UI definition
Last but not least, we need to add a UI definition file to define a template for the user input and create wizard steps.
This time both are a bit more complicated than they were for the “Hello, World” app.
First, let’s create the wizard steps. It’s better to decompose the UI into two steps: the first one will define the properties of a Virtual Machine, and the second one the configuration properties of the Plone application itself.
 1Forms:
 2  - instanceConfiguration:
 3      fields:
 4        - name: hostname
 5          type: string
 6          required: true
 7        - name: image
 8          type: image
 9          imageType: linux
10        - name: flavor
11          type: flavor
12        - name: assignFloatingIp
13          type: boolean
14  - ploneConfiguration:
15      fields:
16        - name: installationPath
17          type: string
18        - name: defaultPassword
19          type: password
20          required: true
21        - name: listeningPort
22          type: integer
This is familiar to what we had on the previous step, however there are several
new types of fields: while the types integer and boolean are quite
obvious - they will render a numeric up-and-down textbox and checkbox controls
respectively - other field types are more specific.
Field of type image will render a drop-down list allowing you to choose an
image for your VM, and the list of images will contain only the ones having
appropriate metadata associated (the type of metadata is defined by the
imageType attribute: this particular example requires it to be tagged as
“Generic Linux”).
Field of type flavor will render a drop-down list allowing you to choose a
flavor for your VM among the ones registered in Nova.
Field of type password will render a pair of text-boxes in a password
input mode (i.e. hiding all the input with ‘*’-characters). The rendered field
will have appropriate validation: it will ensure that the values entered in
both fields are identical (thus providing a “repeat password” functionality)
and will also enforce password complexity check.
This defines the basic UI, but it is not particularly user friendly: when MuranoDashboard renders the wizard it will label appropriate controls with the names of the fields, but they usually don’t look informative and pretty.
So, to improve the user experience you may add additional attributes to field
descriptors here. label attribute allows you to define a custom label to be
rendered next to appropriate control, description allows you to provide a
longer text to be displayed on the form as a description of the control, and,
finally, an initial attribute allows you define the default value to be
entered into the control when it is shown to the end-user.
Modify the Forms section to use these attributes:
 1Forms:
 2  - instanceConfiguration:
 3      fields:
 4        - name: hostname
 5          type: string
 6          label: Host Name
 7          description: >-
 8            Enter a hostname for a virtual machine to be created
 9          initial: plone-vm
10          required: true
11        - name: image
12          type: image
13          imageType: linux
14          label: Instance image
15          description: >-
16            Select valid image for the application. Image should already be prepared and
17            registered in glance.
18        - name: flavor
19          type: flavor
20          label: Instance flavor
21          description: >-
22            Select registered in Openstack flavor. Consider that application performance
23            depends on this parameter.
24        - name: assignFloatingIp
25          type: boolean
26          label: Assign Floating IP
27          description: >-
28             Check to assign floating IP automatically
29  - ploneConfiguration:
30      fields:
31        - name: installationPath
32          type: string
33          label: Installation Path
34          initial: '/opt/plone'
35          description: >-
36            Enter the path on the VM filesystem to deploy Plone into
37        - name: defaultPassword
38          label: Admin password
39          description: Default administrator's password
40          type: password
41          required: true
42        - name: listeningPort
43          type: integer
44          label: Listening Port
45          description: Port to listen at
46          initial: 8080
Now, let’s add an Application section to provide templated input for our
app:
 1Application:
 2  ?:
 3    type: com.yourdomain.Plone
 4  instance:
 5    ?:
 6      type: io.murano.resources.LinuxMuranoInstance
 7    name: $.instanceConfiguration.hostname
 8    image: $.instanceConfiguration.image
 9    flavor: $.instanceConfiguration.flavor
10    assignFloatingIp: $.instanceConfiguration.assignFloatingIp
11  installationPath: $.ploneConfiguration.installationPath
12  defaultPassword: $.ploneConfiguration.defaultPassword
13  listeningPort: $.ploneConfiguration.listeningPort
Note the instance part here: since our instance input property is not
a scalar value but rather an object, we are placing another object template
inside the appropriate section. Note that the type of this object is not
io.murano.resources.Instance as you could expect based on the property
contract, but a more specific class: LinuxMuranoInstance in the same
namespace. Since this class inherits the former, it matches the contract, but
it provides a more appropriate implementation than the base one.
Let’s combine the two snippets together, we’ll get the final UI definition of our app:
 1Application:
 2  ?:
 3    type: com.yourdomain.Plone
 4  instance:
 5    ?:
 6      type: io.murano.resources.LinuxMuranoInstance
 7    name: $.instanceConfiguration.hostname
 8    image: $.instanceConfiguration.image
 9    flavor: $.instanceConfiguration.flavor
10    assignFloatingIp: $.instanceConfiguration.assignFloatingIp
11  installationPath: $.ploneConfiguration.installationPath
12  defaultPassword: $.ploneConfiguration.defaultPassword
13  listeningPort: $.ploneConfiguration.listeningPort
14Forms:
15   - instanceConfiguration:
16       fields:
17         - name: hostname
18           type: string
19           label: Host Name
20           description: >-
21             Enter a hostname for a virtual machine to be created
22           initial: 'plone-vm'
23           required: true
24         - name: image
25           type: image
26           imageType: linux
27           label: Instance image
28           description: >-
29             Select valid image for the application. Image should already be prepared and
30             registered in glance.
31         - name: flavor
32           type: flavor
33           label: Instance flavor
34           description: >-
35             Select registered in Openstack flavor. Consider that application performance
36             depends on this parameter.
37         - name: assignFloatingIp
38           type: boolean
39           label: Assign Floating IP
40           description: >-
41             Check to assign floating IP automatically
42   - ploneConfiguration:
43       fields:
44         - name: installationPath
45           type: string
46           label: Installation Path
47           initial: '/opt/plone'
48           description: >-
49             Enter the path on the VM filesystem to deploy Plone into
50         - name: defaultPassword
51           label: Admin password
52           description: Default administrator's password
53           type: password
54           required: true
55         - name: listeningPort
56           type: integer
57           label: Listening Port
58           description: Port to listen at
59           initial: 8080
Save this file as a ui.yaml in a UI folder of your package. As a final
touch add a logo to the package - save the image below to the root directory of
your package as logo.png:
The package is ready. Zip it and import to Murano catalog. We are ready to try it.
Deploying the package
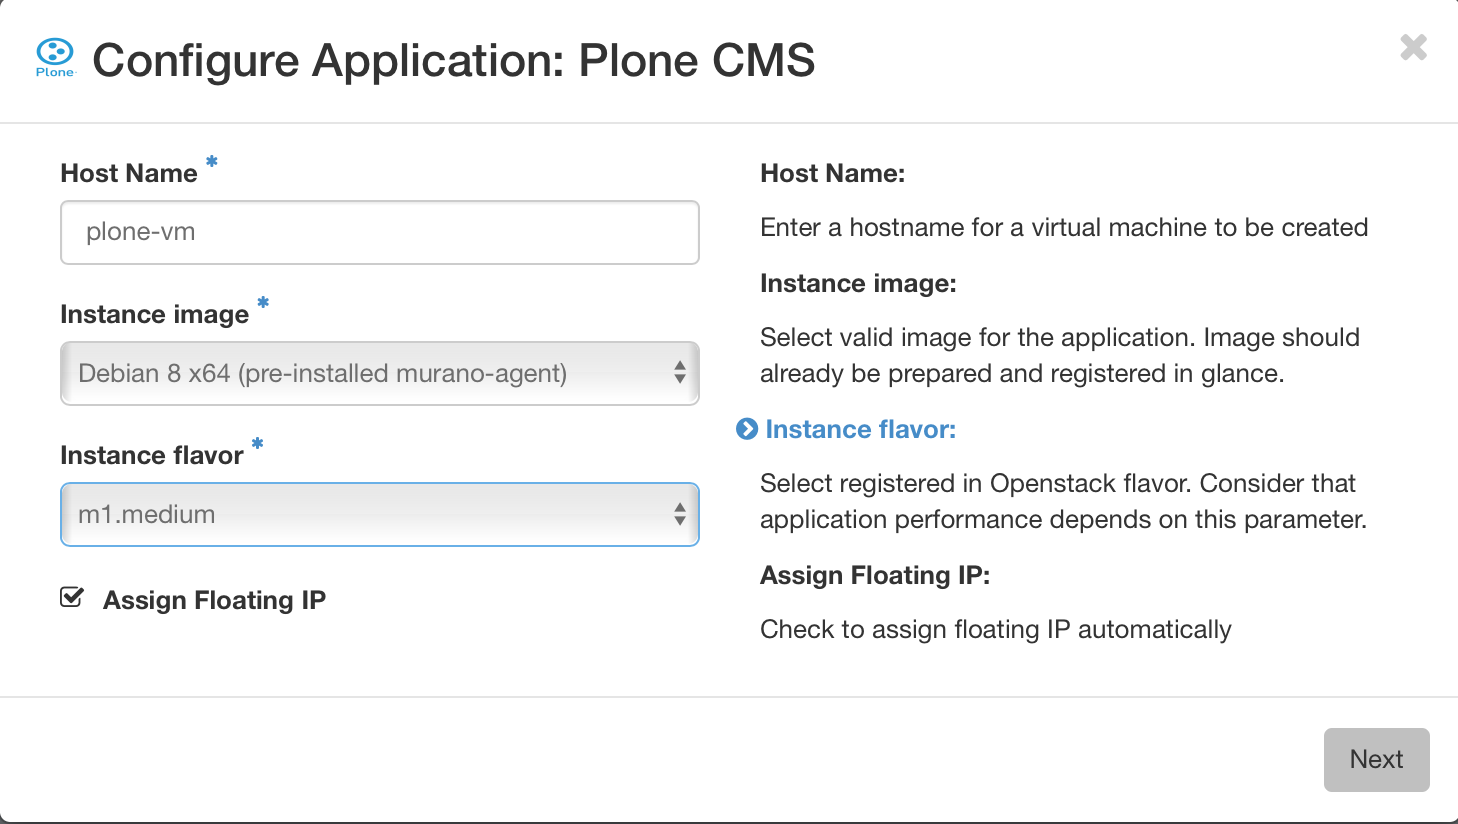
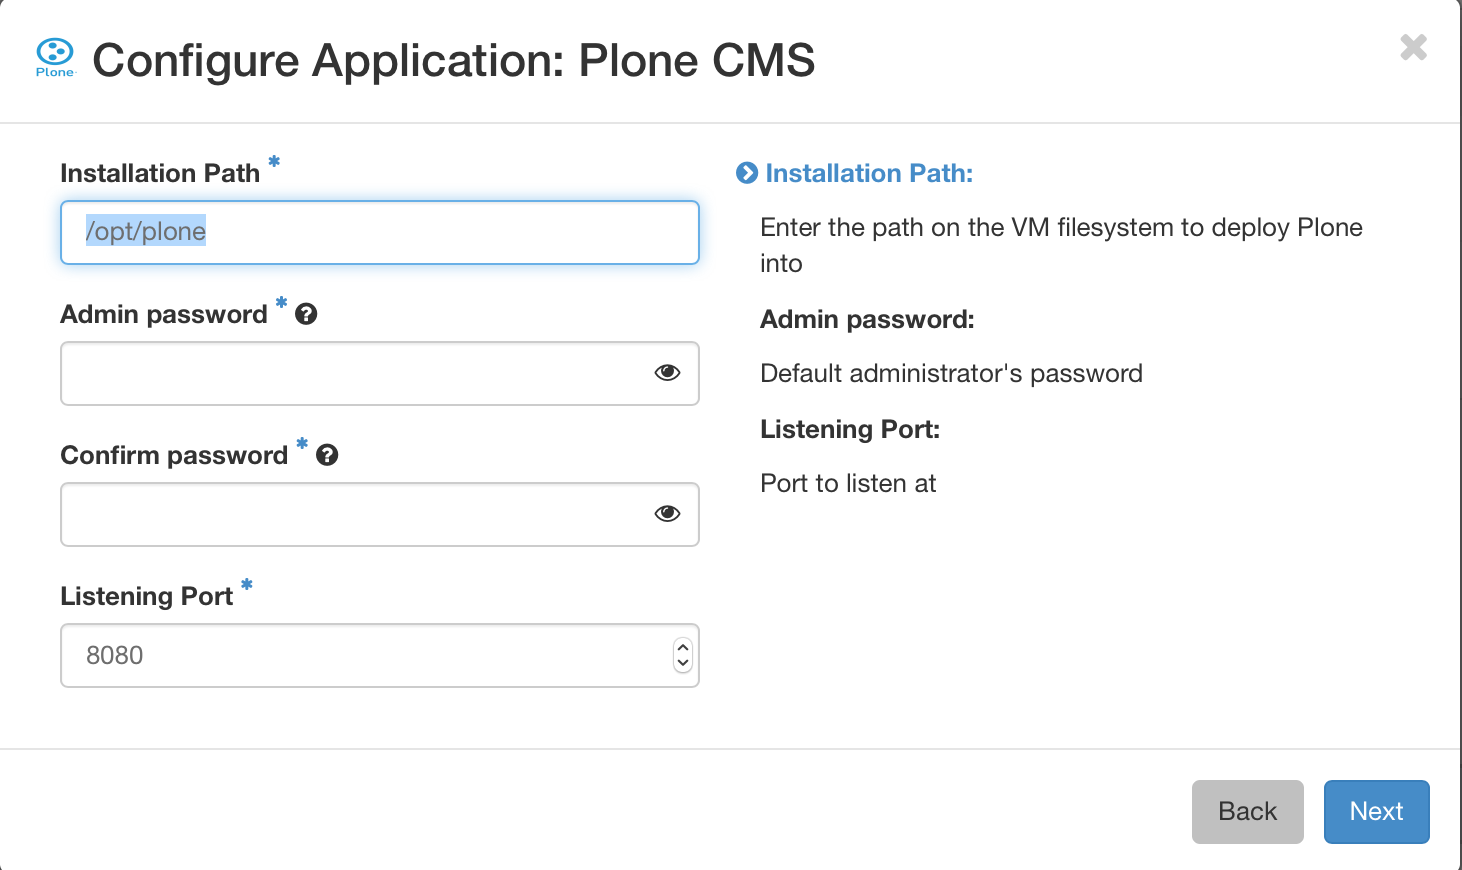
Go to Murano Dashboard, create an environment and add a “Plone CMS” application to it. You’ll see the nice wizard with all the field labels and descriptions you’ve added to the ui definition file:
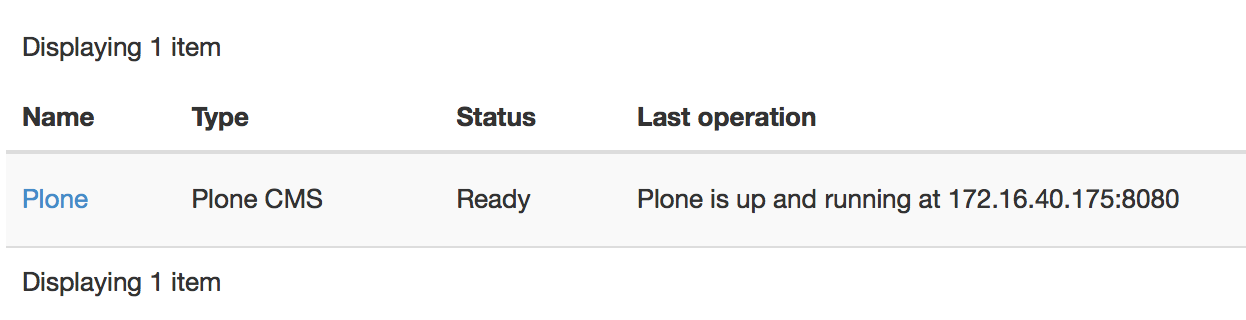
After the app is added to the environment, click the “Deploy this environment” button. The deployment will take about 10 minutes, depending on the speed of the VM’s internet connection and the amount of packages to be updated. When it is over, check the “Last operation” column in the environment’s list of components near the Plone component. It should contain a message “Plone is up and running at …” followed by ip address and port:
Enter this address to the address bar of your browser. You’ll see the default management interface of Plone:
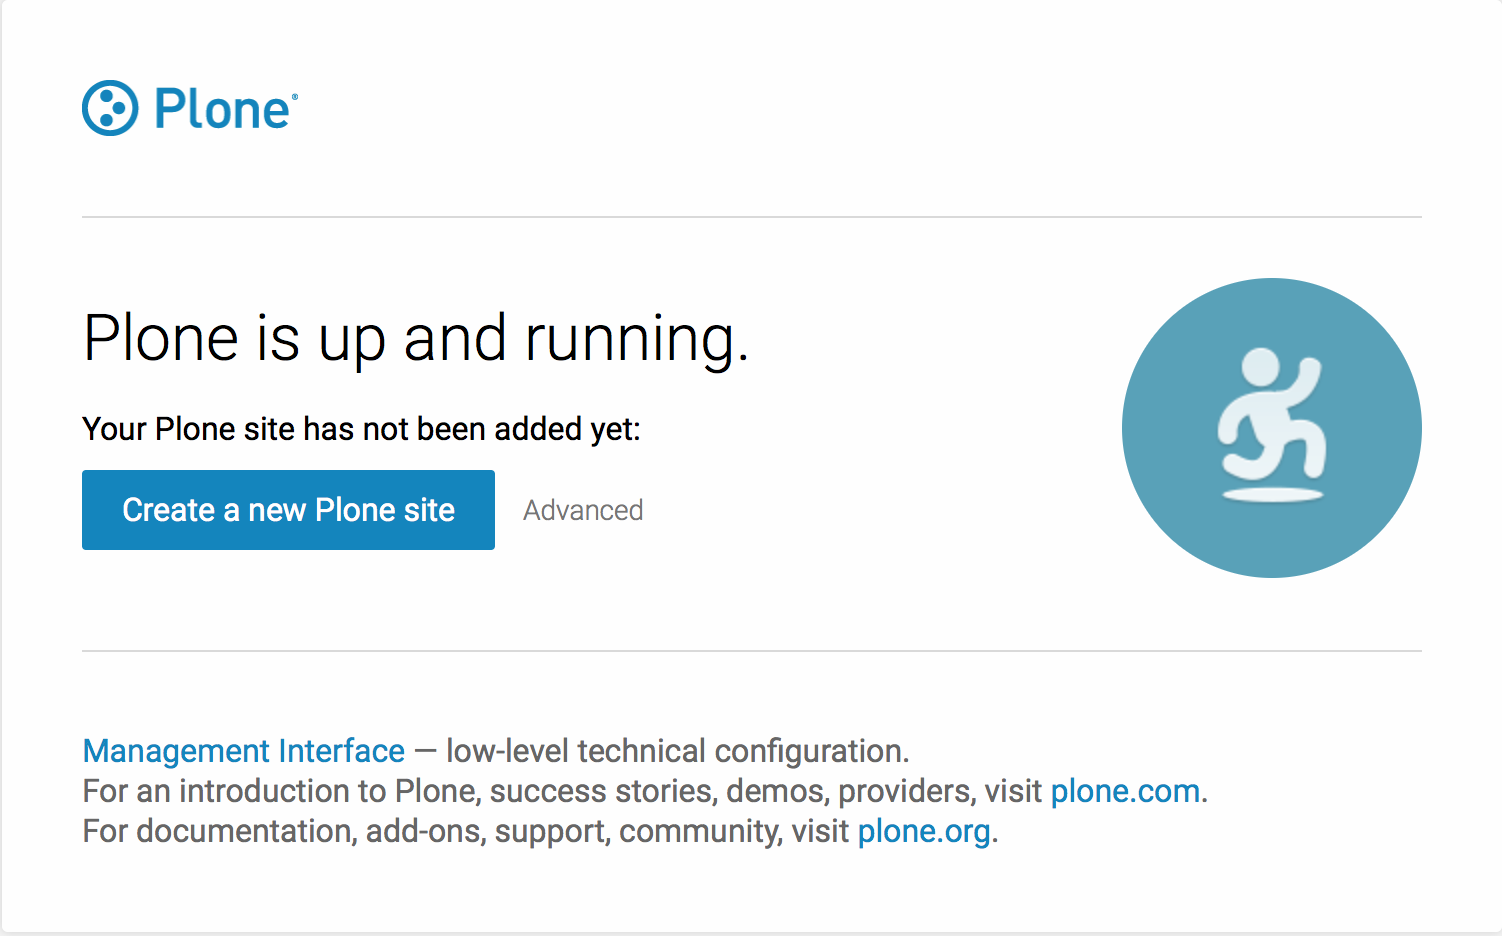
If you click a “Create a new Plone site” button you’ll be prompted for username
and password. Use admin username and the password which you entered in the
Wizard. See Plone Documentation for details on how
to operate Plone.
This concludes this part of the course. The application package we created demonstrates the basic capabilities of Murano for the deployments of real-world applications. However, the deployed configuration of Plone is not of production-grade service: it is just a single VM with all-in-one service topology, which is not a scalable or fault-tolerant solution. In the next part we will learn some advanced features which may help to bring more production-grade capabilities to our package.
