XenServer (and other XAPI based Xen variants)
This section describes XAPI managed hypervisors, and how to use them with OpenStack.
Terminology
Xen
A hypervisor that provides the fundamental isolation between virtual machines. Xen is open source (GPLv2) and is managed by XenProject.org, a cross-industry organization and a Linux Foundation Collaborative project.
Xen is a component of many different products and projects. The hypervisor itself is very similar across all these projects, but the way that it is managed can be different, which can cause confusion if you're not clear which toolstack you are using. Make sure you know what toolstack you want before you get started. If you want to use Xen with libvirt in OpenStack Compute refer to Xen via libvirt.
XAPI
XAPI is one of the toolstacks that could control a Xen based hypervisor. XAPI's role is similar to libvirt's in the KVM world. The API provided by XAPI is called XenAPI. To learn more about the provided interface, look at XenAPI Object Model Overview for definitions of XAPI specific terms such as SR, VDI, VIF and PIF.
OpenStack has a compute driver which talks to XAPI, therefore all XAPI managed servers could be used with OpenStack.
XenAPI
XenAPI is the API provided by XAPI. This name is also used by the python library that is a client for XAPI. A set of packages to use XenAPI on existing distributions can be built using the xenserver/buildroot project.
XenServer
An Open Source virtualization platform that delivers all features needed for any server and datacenter implementation including the Xen hypervisor and XAPI for the management. For more information and product downloads, visit xenserver.org.
XCP
XCP is not supported anymore. XCP project recommends all XCP users to upgrade to the latest version of XenServer by visiting xenserver.org.
Privileged and unprivileged domains
A Xen host runs a number of virtual machines, VMs, or domains (the terms are
synonymous on Xen). One of these is in charge of running the rest of the
system, and is known as domain 0, or dom0. It is the first domain to boot after
Xen, and owns the storage and networking hardware, the device drivers, and the
primary control software. Any other VM is unprivileged, and is known as a domU
or guest. All customer VMs are unprivileged, but you should note that on
XenServer (and other XenAPI using hypervisors), the OpenStack Compute service
(nova-compute) also runs in a domU. This gives a level of security
isolation between the privileged system software and the OpenStack software
(much of which is customer-facing). This architecture is described in more
detail later.
Paravirtualized versus hardware virtualized domains
A Xen virtual machine can be paravirtualized (PV) or hardware virtualized (HVM). This refers to the interaction between Xen, domain 0, and the guest VM's kernel. PV guests are aware of the fact that they are virtualized and will co-operate with Xen and domain 0; this gives them better performance characteristics. HVM guests are not aware of their environment, and the hardware has to pretend that they are running on an unvirtualized machine. HVM guests do not need to modify the guest operating system, which is essential when running Windows.
In OpenStack, customer VMs may run in either PV or HVM mode. However, the
OpenStack domU (that's the one running nova-compute) must be running in PV
mode.
XenAPI deployment architecture
A basic OpenStack deployment on a XAPI-managed server, assuming that the network provider is neutron network, looks like this:
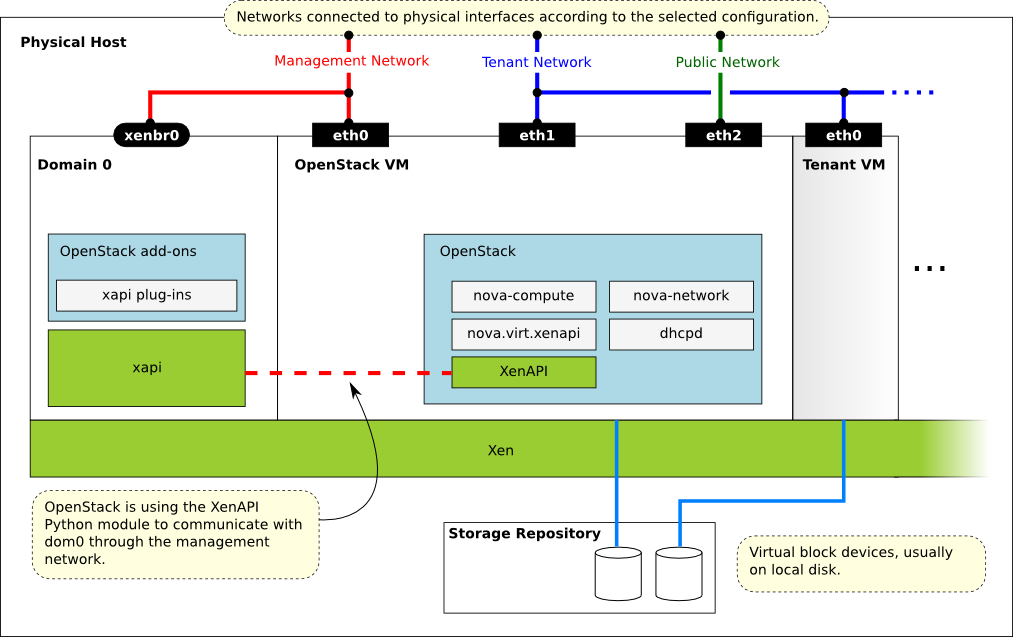
Key things to note:
- The hypervisor: Xen
- Domain 0: runs XAPI and some small pieces from OpenStack, the XAPI plug-ins.
- OpenStack VM: The
Computeservice runs in a paravirtualized virtual machine, on the host under management. Each host runs a local instance ofCompute. It is also running neutron plugin-agent (neutron-openvswitch-agent) to perform local vSwitch configuration. - OpenStack Compute uses the XenAPI Python library to talk to XAPI, and it uses the Management Network to reach from the OpenStack VM to Domain 0.
Some notes on the networking:
- The above diagram assumes DHCP networking.
- There are three main OpenStack networks:
- Management network: RabbitMQ, MySQL, inter-host communication, and compute-XAPI communication. Please note that the VM images are downloaded by the XenAPI plug-ins, so make sure that the OpenStack Image service is accessible through this network. It usually means binding those services to the management interface.
- Tenant network: controlled by neutron, this is used for tenant traffic.
- Public network: floating IPs, public API endpoints.
- The networks shown here must be connected to the corresponding physical networks within the data center. In the simplest case, three individual physical network cards could be used. It is also possible to use VLANs to separate these networks. Please note, that the selected configuration must be in line with the networking model selected for the cloud. (In case of VLAN networking, the physical channels have to be able to forward the tagged traffic.)
- With the Networking service, you should enable Linux bridge in
Dom0which is used for Compute service.nova-computewill create Linux bridges for security group andneutron-openvswitch-agentin Compute node will apply security group rules on these Linux bridges. To implement this, you need to remove/etc/modprobe.d/blacklist-bridge*inDom0.
Further reading
Here are some of the resources available to learn more about Xen:
Install XenServer
Before you can run OpenStack with XenServer, you must install the hypervisor on an appropriate server.
Note
Xen is a type 1 hypervisor: When your server starts, Xen is the first
software that runs. Consequently, you must install XenServer before you
install the operating system where you want to run OpenStack code. You then
install nova-compute into a dedicated virtual machine on the host.
Use the following link to download XenServer's installation media:
When you install many servers, you might find it easier to perform PXE boot installations. You can also package any post-installation changes that you want to make to your XenServer by following the instructions of creating your own XenServer supplemental pack.
Important
Make sure you use the EXT type of storage repository (SR). Features that require access to VHD files (such as copy on write, snapshot and migration) do not work when you use the LVM SR. Storage repository (SR) is a XAPI-specific term relating to the physical storage where virtual disks are stored.
On the XenServer installation screen, choose the XenDesktop
Optimized option. If you use an answer file, make sure you use
srtype="ext" in the installation tag of the answer file.
Post-installation steps
The following steps need to be completed after the hypervisor's installation:
- For resize and migrate functionality, enable password-less SSH
authentication and set up the
/imagesdirectory on dom0. - Install the XAPI plug-ins.
- To support AMI type images, you must set up
/boot/guestsymlink/directory in dom0. - Create a paravirtualized virtual machine that can run
nova-compute. - Install and configure
nova-computein the above virtual machine.
Install XAPI plug-ins
When you use a XAPI managed hypervisor, you can install a Python script (or any executable) on the host side, and execute that through XenAPI. These scripts are called plug-ins. The OpenStack related XAPI plug-ins live in OpenStack os-xenapi code repository. These plug-ins have to be copied to dom0's filesystem, to the appropriate directory, where XAPI can find them. It is important to ensure that the version of the plug-ins are in line with the OpenStack Compute installation you are using.
The plugins should typically be copied from the Nova installation running in
the Compute's DomU (pip show os-xenapi to find its location), but if you
want to download the latest version the following procedure can be used.
Manually installing the plug-ins
Create temporary files/directories:
$ OS_XENAPI_TARBALL=$(mktemp)
$ OS_XENAPI_SOURCES=$(mktemp -d)
Get the source from the openstack.org archives. The example assumes the latest release is used, and the XenServer host is accessible as xenserver. Match those parameters to your setup.
$ OS_XENAPI_URL=https://tarballs.openstack.org/os-xenapi/os-xenapi-0.1.1.tar.gz
$ wget -qO "$OS_XENAPI_TARBALL" "$OS_XENAPI_URL"
$ tar xvf "$OS_XENAPI_TARBALL" -d "$OS_XENAPI_SOURCES"
Copy the plug-ins to the hypervisor:
$ PLUGINPATH=$(find $OS_XENAPI_SOURCES -path '*/xapi.d/plugins' -type d -print)
$ tar -czf - -C "$PLUGINPATH" ./ |
> ssh root@xenserver tar -xozf - -C /etc/xapi.d/plugins
Remove temporary files/directories:</para>
$ rm "$OS_XENAPI_TARBALL"
$ rm -rf "$OS_XENAPI_SOURCES"
Prepare for AMI type images
To support AMI type images in your OpenStack installation, you must create the
/boot/guest directory on dom0. One of the OpenStack XAPI plugins will
extract the kernel and ramdisk from AKI and ARI images and put them to that
directory.
OpenStack maintains the contents of this directory and its size should not increase during normal operation. However, in case of power failures or accidental shutdowns, some files might be left over. To prevent these files from filling up dom0's filesystem, set up this directory as a symlink that points to a subdirectory of the local SR.
Run these commands in dom0 to achieve this setup:
# LOCAL_SR=$(xe sr-list name-label="Local storage" --minimal)
# LOCALPATH="/var/run/sr-mount/$LOCAL_SR/os-guest-kernels"
# mkdir -p "$LOCALPATH"
# ln -s "$LOCALPATH" /boot/guest
Modify dom0 for resize/migration support
To resize servers with XenServer you must:
Establish a root trust between all hypervisor nodes of your deployment:
To do so, generate an ssh key-pair with the ssh-keygen command. Ensure that each of your dom0's
authorized_keysfile (located in/root/.ssh/authorized_keys) contains the public key fingerprint (located in/root/.ssh/id_rsa.pub).Provide a
/imagesmount point to the dom0 for your hypervisor:dom0 space is at a premium so creating a directory in dom0 is potentially dangerous and likely to fail especially when you resize large servers. The least you can do is to symlink
/imagesto your local storage SR. The following instructions work for an English-based installation of XenServer and in the case of ext3-based SR (with which the resize functionality is known to work correctly).# LOCAL_SR=$(xe sr-list name-label="Local storage" --minimal) # IMG_DIR="/var/run/sr-mount/$LOCAL_SR/images" # mkdir -p "$IMG_DIR" # ln -s "$IMG_DIR" /images
XenAPI configuration reference
The following section discusses some commonly changed options when using the XenAPI driver. The table below provides a complete reference of all configuration options available for configuring XAPI with OpenStack.
The recommended way to use XAPI with OpenStack is through the XenAPI driver.
To enable the XenAPI driver, add the following configuration options to
/etc/nova/nova.conf and restart OpenStack Compute:
compute_driver = xenapi.XenAPIDriver
[xenserver]
connection_url = http://your_xenapi_management_ip_address
connection_username = root
connection_password = your_password
ovs_integration_bridge = br-int
vif_driver = nova.virt.xenapi.vif.XenAPIOpenVswitchDriver
These connection details are used by OpenStack Compute service to contact your hypervisor and are the same details you use to connect XenCenter, the XenServer management console, to your XenServer node.
Note
The connection_url is generally the management network IP
address of the XenServer.
Networking configuration
The Networking service in the Compute node is running
neutron-openvswitch-agent, this manages dom0's OVS. You can refer
Networking openvswitch_agent.ini sample for details,
however there are several specific items to look out for.
[agent]
minimize_polling = False
root_helper_daemon = xenapi_root_helper

[ovs]
of_listen_address = management_ip_address
ovsdb_connection = tcp:your_xenapi_management_ip_address:6640
bridge_mappings = <physical_network>:<physical_bridge>, ...
integration_bridge = br-int

[xenapi]
connection_url = http://your_xenapi_management_ip_address
connection_username = root
connection_password = your_pass_word
Note
The ovsdb_connection is the connection string for the native OVSDB
backend, you need to enable port 6640 in dom0.
Agent
The agent is a piece of software that runs on the instances, and communicates with OpenStack. In case of the XenAPI driver, the agent communicates with OpenStack through XenStore (see the Xen Project Wiki for more information on XenStore).
If you don't have the guest agent on your VMs, it takes a long time for
OpenStack Compute to detect that the VM has successfully started. Generally a
large timeout is required for Windows instances, but you may want to adjust:
agent_version_timeout within the [xenserver] section.
VNC proxy address
Assuming you are talking to XAPI through a management network, and XenServer is
on the address: 10.10.1.34 specify the same address for the vnc proxy address:
vncserver_proxyclient_address=10.10.1.34
Storage
You can specify which Storage Repository to use with nova by editing the following flag. To use the local-storage setup by the default installer:
sr_matching_filter = "other-config:i18n-key=local-storage"
Another alternative is to use the "default" storage (for example if you have attached NFS or any other shared storage):
sr_matching_filter = "default-sr:true"
Image upload in TGZ compressed format
To start uploading tgz compressed raw disk images to the Image service,
configure xenapi_image_upload_handler by replacing GlanceStore with
VdiThroughDevStore.
xenapi_image_upload_handler=nova.virt.xenapi.image.vdi_through_dev.VdiThroughDevStore
As opposed to:
xenapi_image_upload_handler=nova.virt.xenapi.image.glance.GlanceStore

Except where otherwise noted, this document is licensed under Creative Commons Attribution 3.0 License. See all OpenStack Legal Documents.