Install OpenStack
Now that we’ve installed and configured MAAS and successfully deployed a Juju controller, it’s time to do some real work; use Juju to deploy OpenStack, the leading open cloud platform.
We have two options when installing OpenStack.
- Install and configure each OpenStack component separately. Adding Ceph, Compute, Swift, RabbitMQ, Keystone and Neutron in this way allows you to see exactly what Juju and MAAS are doing, and consequently, gives you a better understanding of the underlying OpenStack deployment.
- Use a bundle to deploy OpenStack with a single command. A bundle is an encapsulation of a working deployment, including all configuration, resources and references. It allows you to effortlessly recreate a deployment with a single command or share that deployment with other Juju users.
If this is your first foray into MAAS, Juju and OpenStack territory, we’d recommend starting with the first option. This will give you a stronger foundation for maintaining and expanding the default deployment. Our instructions for this option continue below.
Alternatively, jump to Deploying OpenStack as a bundle to learn about deploying as a bundle.
Deploy the Juju controller
Previously, we tested our MAAS and Juju configuration
by deploying a new Juju controller called maas-controller. You can check
this controller is still operational by typing juju status. With the Juju
controller running, the output will look similar to the following:
Model    Controller           Cloud/Region  Version
default  maas-controller-two  mymaas        2.2.1

App  Version  Status  Scale  Charm  Store  Rev  OS  Notes

Unit  Workload  Agent  Machine  Public address  Ports  Message

Machine  State  DNS  Inst id  Series  AZ
If you need to remove and redeploy the controller, use the following two commands:
juju kill-controller maas-controller
juju bootstrap --constraints tags=juju mymaas maas-controller
During the bootstrap process, Juju will create a model called default, as
shown in the output from juju status above.
Models act as containers for
applications, and Juju’s default model is great for experimentation.
We’re going to create a new model called uos to hold our OpenStack
deployment exclusively, making the entire deployment easier to manage and
maintain.
To create a model called uos (and switch to it), simply type the following:
juju add-model uos
Deploy OpenStack
We’re now going to step through adding each of the various OpenStack components
to the new model. Each application will be installed from the Charm
store. We’ll be providing the configuration for many
of the charms as a yaml file which we include as we deploy them.
Ceph OSD
We’re starting with the Ceph object storage daemon and we want to configure
Ceph to use the second drive of a cloud node, /dev/sdb. Change this to
match your own configuration if the device name on your system is different.
The configuration is held in the file called ceph-osd.yaml:
ceph-osd:
  osd-devices: /dev/sdb
  osd-reformat: "yes"
We’re going to deploy Ceph-OSD to each of the four cloud nodes we’ve already
tagged with compute. The following command will import the settings above
and deploy Ceph-OSD to each of the four nodes:
juju deploy --constraints tags=compute --config ceph-osd.yaml -n 4 ceph-osd
In the background, Juju will ask MAAS to commission the nodes, powering them on and installing Ubuntu. Juju then takes over and installs the necessary packages for the required application.
Remember, you can check on the status of a deployment using the juju status
command. To see the status of a single charm of application, append the charm
name:
juju status ceph-osd
In this early stage of deployment, the output will look similar to the following:
Model  Controller       Cloud/Region  Version
uoa    maas-controller  mymaas        2.2-beta1

App       Version  Status   Scale  Charm     Store       Rev  OS      Notes
ceph-osd  10.2.6   blocked      4  ceph-osd  jujucharms  241  ubuntu

Unit         Workload  Agent  Machine  Public address   Ports  Message
ceph-osd/0   blocked   idle   0        192.168.100.113         Missing relation: monitor
ceph-osd/1*  blocked   idle   1        192.168.100.114         Missing relation: monitor
ceph-osd/2   blocked   idle   2        192.168.100.115         Missing relation: monitor
ceph-osd/3   blocked   idle   3        192.168.100.112         Missing relation: monitor

Machine  State    DNS              Inst id  Series  AZ       Message
0        started  192.168.100.113  fr36gt   xenial  default  Deployed
1        started  192.168.100.114  nnpab4   xenial  default  Deployed
2        started  192.168.100.115  a83gcy   xenial  default  Deployed
3        started  192.168.100.112  7gan3t   xenial  default  Deployed
Don’t worry about the ‘Missing relation’ messages. We’ll add the required relations in a later step. You also don’t have to wait for a deployment to finish before adding further applications to Juju. Errors will resolve themselves as applications are deployed and dependencies are met.
Nova Compute
We’re going use three machines to host the OpenStack Nova Compute application.
The first will use the following configuration file, compute.yaml, while
we’ll use the second and third to scale-out the same application to two other
machines.
nova-compute:
  enable-live-migration: True
  enable-resize: True
  migration-auth-type: ssh
  virt-type: qemu
Type the following to deploy nova-compute to machine number 1:
juju deploy --to 1 --config compute.yaml nova-compute
And use the following commands to scale-out Nova Compute to machines 2 and 3:
juju add-unit --to 2 nova-compute
juju add-unit --to 3 nova-compute
As before, it’s worth checking juju status nova-compute output to make sure
nova-compute has been deployed to three machines. Look for lines similar to
these:
Machine  State    DNS              Inst id  Series  AZ       Message
1        started  192.168.100.117  7gan3t   xenial  default  Deployed
2        started  192.168.100.118  fr36gt   xenial  default  Deployed
3        started  192.168.100.119  nnpab4   xenial  default  Deployed
Swift storage
The Swift-storage application is going to be deployed to the first machine
(machine 0), and scaled across the other three with the following
configuration file:
swift-storage:
  block-device: sdc
  overwrite: "true"
Here are the four deploy commands for the four machines:
juju deploy --to 0 --config swift-storage.yaml swift-storage
juju add-unit --to 1 swift-storage
juju add-unit --to 2 swift-storage
juju add-unit --to 3 swift-storage
Neutron networking
Next comes Neutron for OpenStack networking. We have just a couple of
configuration options than need to be placed within neutron.yaml and we’re
going to use this for two applications, neutron-gateway and neutron-api:
neutron-gateway:
  ext-port: 'eth1'
neutron-api:
  neutron-security-groups: True
First, deploy the gateway:
juju deploy --to 0 --config neutron.yaml neutron-gateway
We’re going to colocate the Neutron API on machine 1 by using an LXD container. This is a great solution for both local deployment and for managing cloud instances.
We’ll also deploy Neutron OpenvSwitch:
juju deploy --to lxd:1 --config neutron.yaml neutron-api
juju deploy neutron-openvswitch
We’ve got to a stage where we can start to connect applications together. Juju’s ability to add these links, known as a relation in Juju, is one of its best features.
See Managing relationships in the Juju documentation for more information on relations.
Add the network relations with the following commands:
juju add-relation neutron-api neutron-gateway
juju add-relation neutron-api neutron-openvswitch
juju add-relation neutron-openvswitch nova-compute
There are still ‘Missing relations’ messages in the status output, leading to
the status of some applications to be blocked. This is because there are
many more relations to be added but they’ll resolve themselves automatically as
we add them.
Percona cluster
The Percona XtraDB cluster application comes next, and like Neutron API above, we’re going to use LXD.
The following mysql.yaml is the only configuration we need:
mysql:
  max-connections: 20000
To deploy Percona alongside MySQL:
juju deploy --to lxd:0 --config mysql.yaml percona-cluster mysql
And there’s just a single new relation to add:
juju add-relation neutron-api mysql
Keystone
As Keystone handles OpenStack identity management and access, we’re going to use
the following contents of keystone.yaml to set an admin password for
OpenStack:
keystone:
  admin-password: openstack
We’ll use an LXD container on machine 3 to help balance the load a little. To deploy the application, use the following command:
juju deploy --to lxd:3 --config keystone.yaml keystone
Then add these relations:
juju add-relation keystone mysql
juju add-relation neutron-api keystone
RabbitMQ
We’re using RabbitMQ as the messaging server. Deployment requires no further configuration than running the following command:
juju deploy --to lxd:0 rabbitmq-server
This brings along four new connections that need to be made:
juju add-relation neutron-api rabbitmq-server
juju add-relation neutron-openvswitch rabbitmq-server
juju add-relation nova-compute:amqp rabbitmq-server
juju add-relation neutron-gateway:amqp rabbitmq-server:amqp
Nova Cloud Controller
This is the controller service for OpenStack, and includes the nova-scheduler, nova-api and nova-conductor services.
The following simple controller.yaml configuration file will be used:
nova-cloud-controller:
  network-manager: "Neutron"
To add the controller to your deployment, enter the following:
juju deploy --to lxd:2 --config controller.yaml nova-cloud-controller
Followed by these add-relation connections:
juju add-relation nova-cloud-controller mysql
juju add-relation nova-cloud-controller keystone
juju add-relation nova-cloud-controller rabbitmq-server
juju add-relation nova-cloud-controller neutron-gateway
juju add-relation neutron-api nova-cloud-controller
juju add-relation nova-compute nova-cloud-controller
OpenStack Dashboard
We’ll deploy the dashboard to another LXD container with a single command:
juju deploy --to lxd:3 openstack-dashboard
And a single relation:
juju add-relation openstack-dashboard keystone
Glance
For the Glance image service, deploy as follows:
juju deploy --to lxd:2 glance
Relations:
juju add-relation nova-cloud-controller glance
juju add-relation nova-compute glance
juju add-relation glance mysql
juju add-relation glance keystone
juju add-relation glance rabbitmq-server
Ceph monitor
For Ceph monitors (which monitor the topology of the Ceph deployment and manage the CRUSH map which is used by clients to read and write data) no additional configuration over the defaults provided is required, so deploy three units with this:
juju deploy --to lxd:1 ceph-mon
juju add-unit --to lxd:2 ceph-mon
juju add-unit --to lxd:3 ceph-mon
With these additional relations:
juju add-relation ceph-osd ceph-mon
juju add-relation nova-compute ceph-mon
juju add-relation glance ceph-mon
Cinder
For Cinder block storage, use the following cinder.yaml file:
cinder:
  glance-api-version: 2
  block-device: None
And deploy with this:
juju deploy --to lxd:1 --config cinder.yaml cinder
Relations:
juju add-relation nova-cloud-controller cinder
juju add-relation cinder mysql
juju add-relation cinder keystone
juju add-relation cinder rabbitmq-server
juju add-relation cinder:image-service glance:image-service
juju add-relation cinder ceph-mon
Swift proxy
Swift also needs a unique identifier, best generated with the uuid command.
The uuid command on Ubuntu is in the uuid package (sudo apt-get
install uuid) and it is best to produce a version 4 uuid, which is based on
random numbers, rather than a version 1 which is based on the MAC address of a
network card and a timer.
Generate the uuid by running:
uuid -v 4
The output UUID is used for the swift-hash value in the
swift-proxy.yaml configuration file:
swift-proxy:
  zone-assignment: auto
  swift-hash: "a1ee9afe-194c-11e7-bf0f-53d662bc4339"
Use the following command to deploy:
juju deploy --to lxd:0 --config swift-proxy.yaml swift-proxy
These are its two relations:
juju add-relation swift-proxy swift-storage
juju add-relation swift-proxy keystone
NTP
The final component we need to deploy is a Network Time Protocol client, to keep everything in time. This is added with the following simple command:
juju deploy ntp
These last few add-relation commands finish all the connections we need to
make:
juju add-relation neutron-gateway ntp
juju add-relation ceph-osd ntp
All that’s now left to do is wait on the output from juju status to show
when everything is ready (everything turns green, if your terminal support
colour).
Test OpenStack
After everything has deployed and the output of juju status settles, you can
check to make sure OpenStack is working by logging into the Horizon dashboard.
The quickest way to get the IP address for the dashboard is with the following command:
juju status --format=yaml openstack-dashboard | grep public-address | awk '{print $2}'
The URL will be http://<IP ADDRESS>/horizon. When you enter this into your
browser you can login with admin and openstack, unless you changed the
password in the configuration file.
If everything works, you will see something similar to the following:
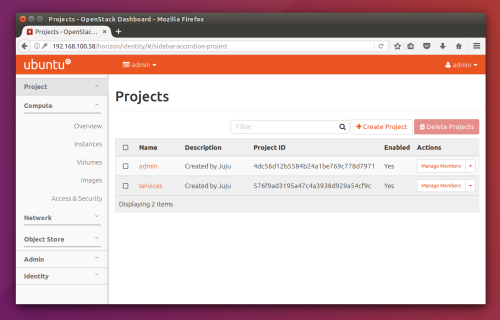
Horizon dashboard
Next steps
Congratulations, you’ve successfully deployed a working OpenStack environment using both Juju and MAAS. The next step is to configure OpenStack for use within a production environment.

Except where otherwise noted, this document is licensed under Creative Commons Attribution 3.0 License. See all OpenStack Legal Documents.