Configure OpenStack
Now we’ve used Juju and MAAS to deploy OpenStack, it’s time to configure OpenStack for use within a typical production environment.
We’ll cover first principles; setting up the environment variables, adding a project, virtual network access and Ubuntu cloud image deployment to create a strong OpenStack foundation that can easily be expanded upon.
Environment variables
When accessing OpenStack from the command line, specific environment variables
need to be set. We’ve put these in a file called openrc which easily be
sourced (made active) whenever needed.
The file contains among other things the following:
export OS_AUTH_URL=http://192.168.100.95:5000/v3
export OS_USER_DOMAIN_NAME=admin_domain
export OS_USERNAME=admin
export OS_PROJECT_DOMAIN_NAME=admin_domain
export OS_PROJECT_NAME=admin
The OS_AUTH_URL is the address of the OpenStack
Keystone node for authentication. This
can be retrieved by Juju with the following command:
juju status --format=yaml keystone/0 | grep public-address | awk '{print $2}'
The environment variables can be enabled/sourced with the following command:
source openrc
For our project, download the OpenStack and source the environment variables using the above command.
You can check the variables have been set correctly by seeing if your OpenStack
endpoints are visible with the openstack endpoint list command. The output
will look something like this:
+----------------------------------+-----------+--------------+--------------+
| ID                               | Region    | Service Name | Service Type |
+----------------------------------+-----------+--------------+--------------+
| 060d704e582b4f9cb432e9ecbf3f679e | RegionOne | cinderv2     | volumev2     |
| 269fe0ad800741c8b229a0b305d3ee23 | RegionOne | neutron      | network      |
| 3ee5114e04bb45d99f512216f15f9454 | RegionOne | swift        | object-store |
| 68bc78eb83a94ac48e5b79893d0d8870 | RegionOne | nova         | compute      |
| 59c83d8484d54b358f3e4f75a21dda01 | RegionOne | s3           | s3           |
| bebd70c3f4e84d439aa05600b539095e | RegionOne | keystone     | identity     |
| 1eb95d4141c6416c8e0d9d7a2eed534f | RegionOne | glance       | image        |
| 8bd7f4472ced40b39a5b0ecce29df3a0 | RegionOne | cinder       | volume       |
+----------------------------------+-----------+--------------+--------------+
If the endpoints aren’t visible, it’s likely your environment variables aren’t configured correctly.
As with both MAAS and Juju, most OpenStack operations can be accomplished using either the command line or a web UI. In the following examples, we’ll use the command line for brevity. But keep in mind that the web UI is a always potential alternative and a good way of seeing immediate feedback from any changes you apply.
Define an external network
We’ll start by defining a network called Pub_Net that will use a subnet
within the range of addresses we put aside in MAAS and Juju:
openstack network create Pub_Net --share --external
The output from this, as with the output from many OpenStack commands, will show
the various fields and values for the chosen configuration option. Typing
openstack network list will show the new network ID alongside its name:
+--------------------------------------+---------+---------+
| ID                                   | Name    | Subnets |
+--------------------------------------+---------+---------+
| fc171d22-d1b0-467d-b6fa-109dfb77787b | Pub_Net |         |
+--------------------------------------+---------+---------+
We now need a subnet for the network. The following command will create this
subnet using the various addresses from our MAAS and Juju configuration
(192.168.100.3 is the IP address of the MAAS server):
openstack subnet create Pub_Subnet --allocation-pool \
start=192.168.100.150,end=192.168.100.199 --subnet-range 192.168.100.0/24 \
--no-dhcp --gateway 192.168.100.1 --dns-nameserver 192.168.100.3 \
--dns-nameserver 8.8.8.8 --network Pub_Net
The output from the previous command provides a comprehensive overview of the new subnet’s configuration:
+-------------------------+--------------------------------------+
| Field                   | Value                                |
+-------------------------+--------------------------------------+
| allocation_pools        | 192.168.100.150-192.168.100.199      |
| cidr                    | 192.168.100.0/24                     |
| created_at              | 2017-04-21T13:43:48                  |
| description             |                                      |
| dns_nameservers         | 192.168.100.3, 8.8.8.8               |
| enable_dhcp             | False                                |
| gateway_ip              | 192.168.100.1                        |
| host_routes             |                                      |
| id                      | 563ecd06-bbc3-4c98-b93e              |
| ip_version              | 4                                    |
| ipv6_address_mode       | None                                 |
| ipv6_ra_mode            | None                                 |
| name                    | Pub_Subnet                           |
| network_id              | fc171d22-d1b0-467d-b6fa-109dfb77787b |
| project_id              | 4068710688184af997c1907137d67c76     |
| revision_number         | None                                 |
| segment_id              | None                                 |
| service_types           | None                                 |
| subnetpool_id           | None                                 |
| updated_at              | 2017-04-21T13:43:48                  |
| use_default_subnet_pool | None                                 |
+-------------------------+--------------------------------------+
Note
OpenStack has deprecated
the use of the neutron command for network configuration, migrating
most of its functionality into the Python OpenStack client. Version
2.4.0 or later of this client is needed for the subnet create
command.
Cloud images
To add an Ubuntu image to Glance, we need to first download an image locally. Canonical’s Ubuntu cloud images can be found here:
https://cloud-images.ubuntu.com
You could use wget to download the image of Ubuntu 18.04 LTS (Bionic):
wget https://cloud-images.ubuntu.com/bionic/current/bionic-server-cloudimg-amd64.img
The following command will add this image to Glance:
openstack image create --public --min-disk 3 --container-format bare \
--disk-format qcow2 --property architecture=x86_64 \
--property hw_disk_bus=virtio --property hw_vif_model=virtio \
--file bionic-server-cloudimg-amd64.img \
"bionic x86_64"
To make sure the image was successfully imported, type openstack image list.
This will output the following:
+--------------------------------------+---------------+--------+
| ID                                   | Name          | Status |
+--------------------------------------+---------------+--------+
| d4244007-5864-4a2d-9cfd-f008ade72df4 | bionic x86_64 | active |
+--------------------------------------+---------------+--------+
The ‘Compute>Images’ page of OpenStack’s Horizon web UI lists many more details about imported images. In particular, note their size as this will limit the minimum root storage size of any OpenStack flavours used to deploy them.
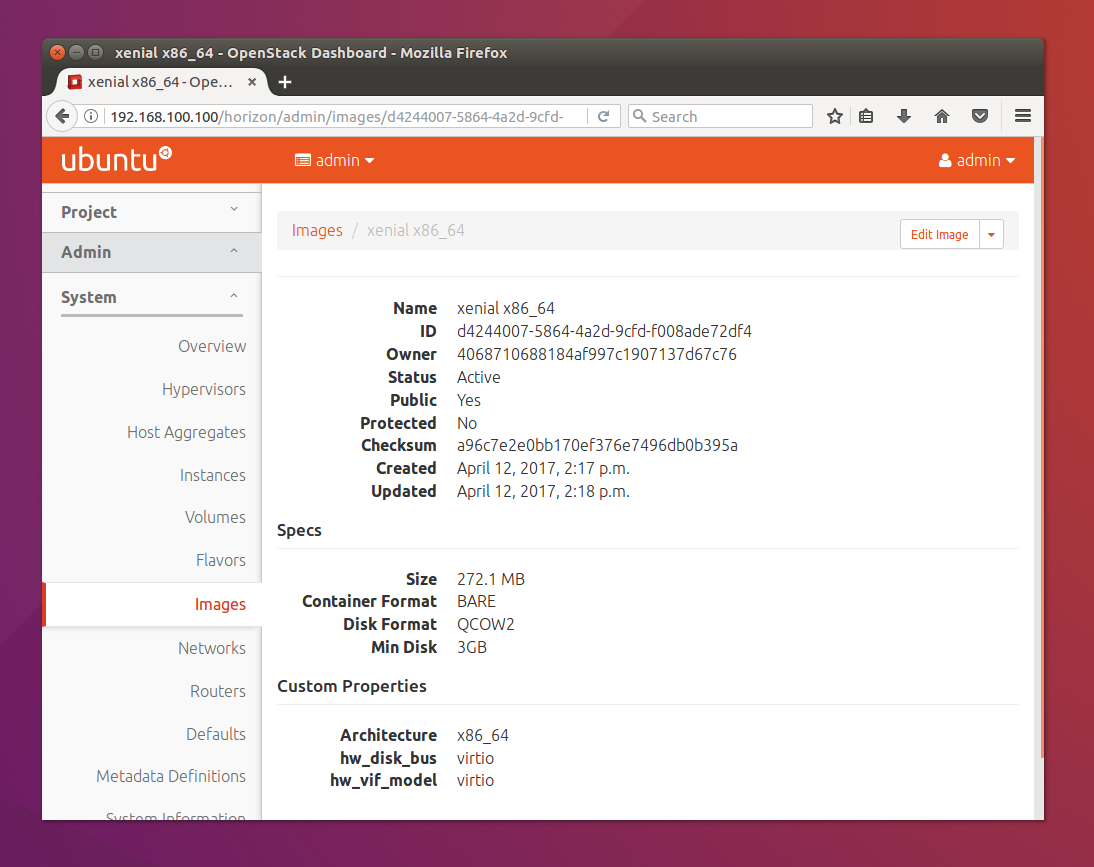
Horizon image details
Working with domains and projects
Domains, projects, users and roles are a vital part of OpenStack operations. We’ll create a single domain with a single project and single user for our new deployment, starting with the domain:
openstack domain create MyDomain
To add a project to the domain:
openstack project create --domain MyDomain \
    --description 'First Project' MyProject
To add a user and assign that user to the project:
openstack user create --domain MyDomain \
    --project-domain MyDomain --project MyProject \
    --password-prompt MyUser
The output to the previous command will be similar to the following:
+---------------------+----------------------------------+
| Field               | Value                            |
+---------------------+----------------------------------+
| default_project_id  | 914e59223944433dbf12417ac4cd4031 |
| domain_id           | 7993528e51344814be2fd53f1f8f82f9 |
| enabled             | True                             |
| id                  | e980be28b20b4a2190c41ae478942ab1 |
| name                | MyUser                           |
| options             | {}                               |
| password_expires_at | None                             |
+---------------------+----------------------------------+
In the same way we used openrc to hold the OpenStack environment variables
for the admin account, we can create a similar file to hold the details on
the new project and user:
Create the following myprojectrc file:
export OS_AUTH_URL=http://192.168.100.95:5000/v3
export OS_USER_DOMAIN_NAME=MyDomain
export OS_USERNAME=MyUser
export OS_PROJECT_DOMAIN_NAME=MyDomain
export OS_PROJECT_NAME=MyProject
Source this file’s contents to effectively switch users:
source myprojectrc
Every subsequent action will now be performed by MyUser user within the
new MyProject project.
Create a virtual network
We need a fixed IP address to access any instances we deploy from OpenStack. In
order to assign a fixed IP, we need a project-specific network with a private
subnet, and a router to link this network to the Pub_Net we created earlier.
To create the new network, enter the following:
openstack network create MyNetwork
Create a private subnet with the following parameters:
openstack subnet create MySubnet --allocation-pool \
start=10.0.0.10,end=10.0.0.99 --subnet-range 10.0.0.0/24 \
--gateway 10.0.0.1 --dns-nameserver 192.168.100.3 \
--dns-nameserver 8.8.8.8 --network MyNetwork
You’ll see verbose output similar to the following:
+-------------------------+--------------------------------------+
| Field                   | Value                                |
+-------------------------+--------------------------------------+
| allocation_pools        | 10.0.0.10-10.0.0.99                  |
| cidr                    | 10.0.0.0/24                          |
| created_at              | 2017-04-21T16:46:35                  |
| description             |                                      |
| dns_nameservers         | 192.168.100.3, 8.8.8.8               |
| enable_dhcp             | True                                 |
| gateway_ip              | 10.0.0.1                             |
| host_routes             |                                      |
| id                      | a91a604a-70d6-4688-915e-ed14c7db7ebd |
| ip_version              | 4                                    |
| ipv6_address_mode       | None                                 |
| ipv6_ra_mode            | None                                 |
| name                    | MySubnet                             |
| network_id              | 8b0baa43-cb25-4a70-bf41-d4136cbfe16e |
| project_id              | 1992e606b51b404c9151f8cb464aa420     |
| revision_number         | None                                 |
| segment_id              | None                                 |
| service_types           | None                                 |
| subnetpool_id           | None                                 |
| updated_at              | 2017-04-21T16:46:35                  |
| use_default_subnet_pool | None                                 |
+-------------------------+--------------------------------------+
The following commands will add the router, connecting this new network to the Pub_Net:
openstack router create MyRouter
openstack router set MyRouter --external-gateway Pub_Net
openstack router add subnet MyRouter MySubnet
Use openstack router show MyRouter to verify all parameters have
been set correctly.
Finally, we can add a floating IP address to our project’s new network:
openstack floating ip create Pub_Net
Details on the address will be shown in the output:
+---------------------+--------------------------------------+
| Field               | Value                                |
+---------------------+--------------------------------------+
| created_at          | None                                 |
| description         |                                      |
| fixed_ip_address    | None                                 |
| floating_ip_address | 192.168.100.152                      |
| floating_network_id | fc171d22-d1b0-467d-b6fa-109dfb77787b |
| id                  | f9b4193d-4385-4b25-83ed-89ed3358668e |
| name                | 192.168.100.152                      |
| port_id             | None                                 |
| project_id          | 1992e606b51b404c9151f8cb464aa420     |
| revision_number     | None                                 |
| router_id           | None                                 |
| status              | DOWN                                 |
| updated_at          | None                                 |
+---------------------+--------------------------------------+
This address will be added to the pool of available floating IP addresses that can be assigned to any new instances we deploy.
SSH access
To create an OpenStack SSH keypair for accessing deployments with SSH, use the following command:
openstack keypair create NewKeypair > ~/.ssh/newkeypair.pem
With SSH, it’s imperative that the file has the correct permissions:
chmod 600 ~/.ssh/newkeypair.pem
Alternatively, you can import your pre-existing keypair with the following command:
openstack keypair create --public-key ~/.ssh/id_rsa.pub MyKeypair
You can view which keypairs have been added to OpenStack using the
openstack keypair list command, which generates output similar to the
following:
+-------------------+-------------------------------------------------+
| Name              | Fingerprint                                     |
+-------------------+-------------------------------------------------+
| MyKeypair         | 1d:35:52:08:55:d5:54:04:a3:e0:23:f0:20:c4:b0:eb |
| NewKeypair        | 1f:1a:74:a5:cb:87:e1:f3:2e:08:9e:40:dd:dd:7c:c4 |
+-------------------+-------------------------------------------------+
To permit SSH traffic access to our deployments, we need to define a security group and a corresponding network rule:
openstack security group create --description 'Allow SSH' Allow_SSH
The following rule will open TCP port 22 and apply it to the above security group:
openstack security group rule create --proto tcp --dst-port 22 Allow_SSH
Create a cloud instance
Before launching our first cloud instance, we’ll need the network ID for the
MyNetwork. This can be retrieved from the first column of output from the
openstack network list command:
+--------------------------------------+-------------+------------------------+
| ID                                   | Name        | Subnets                |
+--------------------------------------+-------------+------------------------+
| fc171d22-d1b0-467d-b6fa-109dfb77787b | Pub_Net     |563ecd06-bbc3-4c98-b93e |
| 8b0baa43-cb25-4a70-bf41-d4136cbfe16e | MyNetwork   |a91a604a-70d6-4688-915e |
+--------------------------------------+-------------+------------------------+
Use the network ID to replace the example in the following server create
command to deploy a new instance:
openstack server create Ubuntu --availability-zone nova \
--image 'bionic x86_64' --flavor m1.small \
--key-name NewKeypair --security-group \
Allow_SSH --nic net-id=8b0baa43-cb25-4a70-bf41-d4136cbfe16e
You can monitor progress with the openstack server list command by waiting
for the server to show a status of ACTIVE:
+--------------------+-----------+--------+--------- ------------+---------------+
| ID                 | Name      | Status | Networks             | Image Name    |
+--------------------+-----------+--------+----------------------+---------------+
| 4a61f2ad-5d89-43a6 | Ubuntu    | ACTIVE | MyNetwork=10.0.0.11  | bionic x86_64 |
+--------------------+-----------+--------+----------------------+---------------+
All that’s left to do is assign a floating IP to the new server and connect with SSH.
Typing openstack floating ip list will show the floating IP address we
liberated from Pub_Net earlier.
+----------+---------------------+------------------+------+--------------------+---------+
| ID       | Floating IP Address | Fixed IP Address | Port | Floating Network   | Project |
+----------+---------------------+------------------+------+--------------------+---------+
| f9b4193d | 192.168.100.152     | None             | None | fc171d22-d1b0-467d | 1992e65 |
+----------+---------------------+------------------+------+--------------------+---------+
The above output shows that the floating IP address is yet to be assigned. Use the following command to assign the IP address to our new instance:
openstack server add floating ip Ubuntu 192.168.100.152
You will now be able to connect to your new cloud server using SSH:
ssh -i ~/.ssh/newkeypair.pem 192.168.100.152
Next Steps
Congratulations! You have now built and successfully deployed a new cloud instance running on OpenStack, taking full advantage of both Juju and MAAS.
This is a strong foundation to build upon. You could use Juju on top of OpenStack, for example, giving your OpenStack deployment the same powerful application modelling capabilities we used to deploy OpenStack.
Whatever you choose to do, MAAS and Juju will scale to manage your needs, while making your deployments easier to design, maintain and manage.

Except where otherwise noted, this document is licensed under Creative Commons Attribution 3.0 License. See all OpenStack Legal Documents.