公共网络
在你启动实例前,你必须创建必要的虚拟网络设施。对网络选择1,实例通过layer-2(桥接/交换)使用连接到物理网络设施的公共提供虚拟网络。这个网络包括一个为实例提供IP地址的DHCP服务。
``admin``或者其他权限用户必须创建这个网络,因为它直接连接到物理网络设施。
注解
下面的说明和框图使用示例IP 地址范围。你必须依据你的实际环境修改它们。
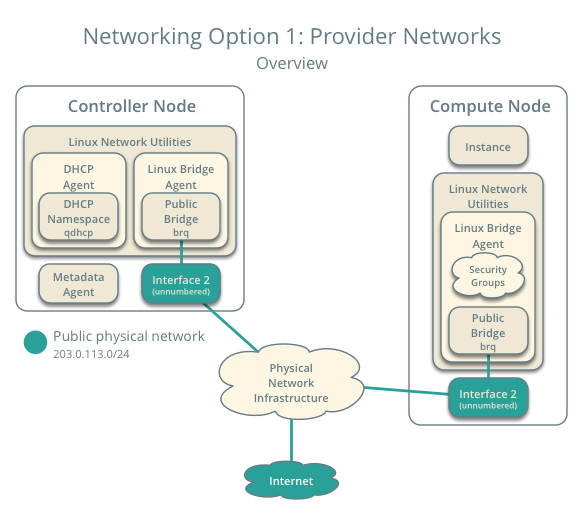
网络选项1:提供者网络-概述
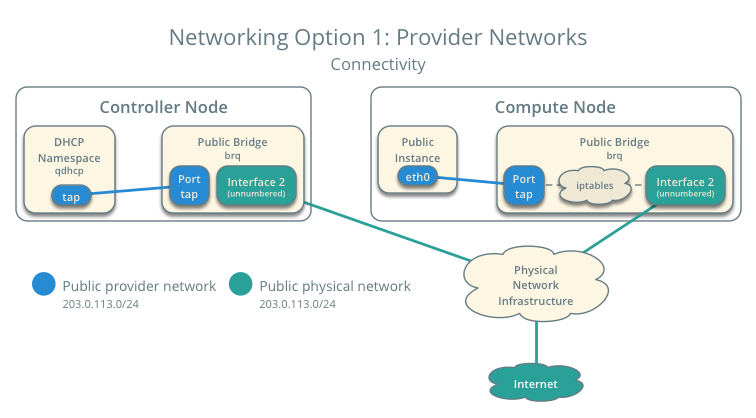
网络选项1: 提供者网络-连接性
创建公共网络
在控制节点上,加载 admin 凭证来获取管理员能执行的命令访问权限:
$ source admin-openrc.sh
创建网络:
$ neutron net-create public --shared --provider:physical_network public \
  --provider:network_type flat
Created a new network:
+---------------------------+--------------------------------------+
| Field                     | Value                                |
+---------------------------+--------------------------------------+
| admin_state_up            | True                                 |
| id                        | 0e62efcd-8cee-46c7-b163-d8df05c3c5ad |
| mtu                       | 0                                    |
| name                      | public                               |
| port_security_enabled     | True                                 |
| provider:network_type     | flat                                 |
| provider:physical_network | public                               |
| provider:segmentation_id  |                                      |
| router:external           | False                                |
| shared                    | True                                 |
| status                    | ACTIVE                               |
| subnets                   |                                      |
| tenant_id                 | d84313397390425c8ed50b2f6e18d092     |
+---------------------------+--------------------------------------+
``–shared``选项允许所有项目使用虚拟网络。
The --provider:physical_network public and --provider:network_type flat options connect the flat virtual network to the flat (native/untagged) public physical network on the eth1 interface on the host using information from the following files:
ml2_conf.ini:
[ml2_type_flat]
flat_networks = public
linuxbridge_agent.ini:
[linux_bridge]
physical_interface_mappings = public:eth1
在网络上创建一个子网:
$ neutron subnet-create public PUBLIC_NETWORK_CIDR --name public \
  --allocation-pool start=START_IP_ADDRESS,end=END_IP_ADDRESS\
  --dns-nameserver DNS_RESOLVER --gateway PUBLIC_NETWORK_GATEWAY
将``PUBLIC_NETWORK_CIDR``替换为公共物理网络的子网CIDR标记。
将``START_IP_ADDRESS``和``END_IP_ADDRESS``使用你想分配给实例的子网网段的第一个和最后一个IP地址。这个范围不能包括任何已经使用的IP地址。
将 DNS_RESOLVER 替换为DNS解析服务的IP地址。在大多数情况下,你可以从主机``/etc/resolv.conf`` 文件选择一个使用。
将``PUBLIC_NETWORK_GATEWAY`` 替换为你想在公共网络中使用的网关,一般是 ”.1” IP地址。
例子
公共网络使用203.0.113.0/24网关203.0.113.1。DHCP服务负责为每个实例从203.0.113.101 到 203.0.113.200中分配IP地址。所有实例使用8.8.4.4作DNS。
$ neutron subnet-create public 203.0.113.0/24 --name public \
  --allocation-pool start=203.0.113.101,end=203.0.113.200 \
  --dns-nameserver 8.8.4.4 --gateway 203.0.113.1
Created a new subnet:
+-------------------+----------------------------------------------------+
| Field             | Value                                              |
+-------------------+----------------------------------------------------+
| allocation_pools  | {"start": "203.0.113.101", "end": "203.0.113.200"} |
| cidr              | 203.0.113.0/24                                     |
| dns_nameservers   | 8.8.4.4                                            |
| enable_dhcp       | True                                               |
| gateway_ip        | 203.0.113.1                                        |
| host_routes       |                                                    |
| id                | 5cc70da8-4ee7-4565-be53-b9c011fca011               |
| ip_version        | 4                                                  |
| ipv6_address_mode |                                                    |
| ipv6_ra_mode      |                                                    |
| name              | public                                             |
| network_id        | 0e62efcd-8cee-46c7-b163-d8df05c3c5ad               |
| subnetpool_id     |                                                    |
| tenant_id         | d84313397390425c8ed50b2f6e18d092                   |
+-------------------+----------------------------------------------------+

Except where otherwise noted, this document is licensed under Creative Commons Attribution 3.0 License. See all OpenStack Legal Documents.