Contents
VMware vSphere
Introduction
OpenStack Compute supports the VMware vSphere product family and enables access to advanced features such as vMotion, High Availability, and Dynamic Resource Scheduling (DRS).
This section describes how to configure VMware-based virtual machine images for launch. The VMware driver supports vCenter version 5.1.0 and later.
The VMware vCenter driver enables the nova-compute service to communicate with a VMware vCenter server that manages one or more ESX host clusters. The driver aggregates the ESX hosts in each cluster to present one large hypervisor entity for each cluster to the Compute scheduler. Because individual ESX hosts are not exposed to the scheduler, Compute schedules to the granularity of clusters and vCenter uses DRS to select the actual ESX host within the cluster. When a virtual machine makes its way into a vCenter cluster, it can use all vSphere features.
The following sections describe how to configure the VMware vCenter driver.
High-level architecture
The following diagram shows a high-level view of the VMware driver architecture:
VMware driver architecture
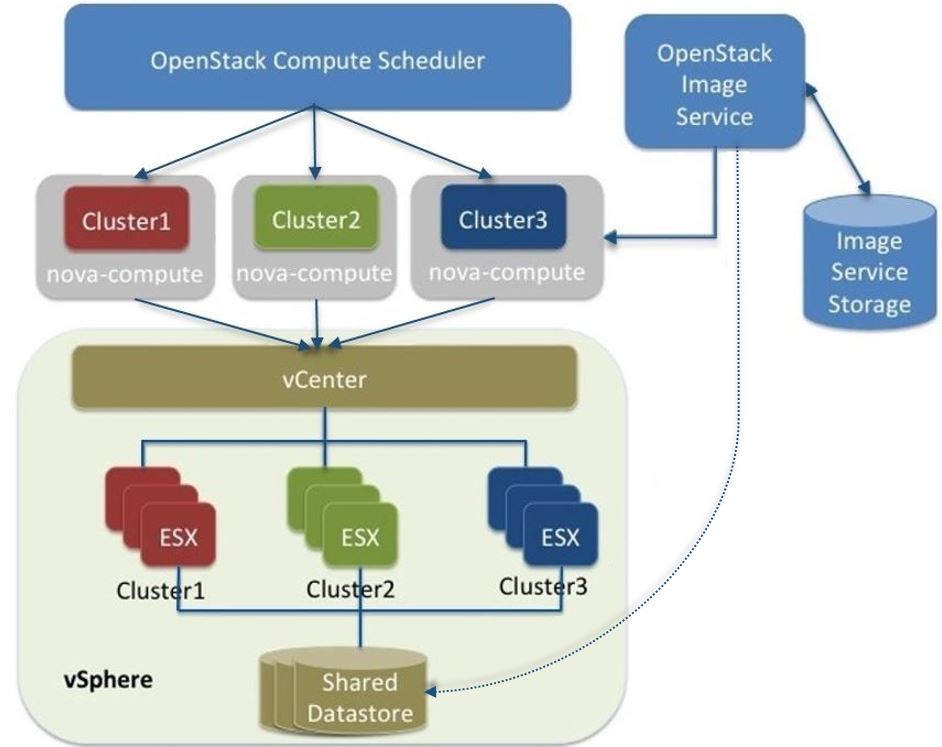
As the figure shows, the OpenStack Compute Scheduler sees three hypervisors that each correspond to a cluster in vCenter. nova-compute contains the VMware driver. You can run with multiple nova-compute services. While Compute schedules at the granularity of a cluster, the VMware driver inside nova-compute interacts with the vCenter APIs to select an appropriate ESX host within the cluster. Internally, vCenter uses DRS for placement.
The VMware vCenter driver also interacts with the Image service to copy VMDK images from the Image service back-end store. The dotted line in the figure represents VMDK images being copied from the OpenStack Image service to the vSphere data store. VMDK images are cached in the data store so the copy operation is only required the first time that the VMDK image is used.
After OpenStack boots a VM into a vSphere cluster, the VM becomes visible in vCenter and can access vSphere advanced features. At the same time, the VM is visible in the OpenStack dashboard and you can manage it as you would any other OpenStack VM. You can perform advanced vSphere operations in vCenter while you configure OpenStack resources such as VMs through the OpenStack dashboard.
The figure does not show how networking fits into the architecture. Both nova-network and the OpenStack Networking Service are supported. For details, see Networking with VMware vSphere.
Configuration overview
To get started with the VMware vCenter driver, complete the following high-level steps:
- Configure vCenter. See Prerequisites and limitations.
- Configure the VMware vCenter driver in the nova.conf file. See VMware vCenter driver.
- Load desired VMDK images into the Image service. See Images with VMware vSphere.
- Configure networking with either nova-network or the Networking service. See Networking with VMware vSphere.
Prerequisites and limitations
Use the following list to prepare a vSphere environment that runs with the VMware vCenter driver:
- Copying VMDK files
- In vSphere 5.1, copying large image files (for example, 12 GB and greater) from the Image service can take a long time. To improve performance, VMware recommends that you upgrade to VMware vCenter Server 5.1 Update 1 or later. For more information, see the Release Notes.
- DRS
- For any cluster that contains multiple ESX hosts, enable DRS and enable fully automated placement.
- Shared storage
- Only shared storage is supported and data stores must be shared among all hosts in a cluster. It is recommended to remove data stores not intended for OpenStack from clusters being configured for OpenStack.
- Clusters and data stores
- Do not use OpenStack clusters and data stores for other purposes. If you do, OpenStack displays incorrect usage information.
- Networking
- The networking configuration depends on the desired networking model. See Networking with VMware vSphere.
- Security groups
If you use the VMware driver with OpenStack Networking and the NSX plug-in, security groups are supported. If you use nova-network, security groups are not supported.
Note
The NSX plug-in is the only plug-in that is validated for vSphere.
- VNC
The port range 5900 - 6105 (inclusive) is automatically enabled for VNC connections on every ESX host in all clusters under OpenStack control.
Note
In addition to the default VNC port numbers (5900 to 6000) specified in the above document, the following ports are also used: 6101, 6102, and 6105.
You must modify the ESXi firewall configuration to allow the VNC ports. Additionally, for the firewall modifications to persist after a reboot, you must create a custom vSphere Installation Bundle (VIB) which is then installed onto the running ESXi host or added to a custom image profile used to install ESXi hosts. For details about how to create a VIB for persisting the firewall configuration modifications, see http://kb.vmware.com/selfservice/microsites/search.do?language=en_US&cmd=displayKC&externalId=2007381.
Note
The VIB can be downloaded from https://github.com/openstack-vmwareapi-team/Tools.
To use multiple vCenter installations with OpenStack, each vCenter must be assigned to a separate availability zone. This is required as the OpenStack Block Storage VMDK driver does not currently work across multiple vCenter installations.
VMware vCenter service account
OpenStack integration requires a vCenter service account with the following minimum permissions. Apply the permissions to the Datacenter root object, and select the Propagate to Child Objects option.
| All Privileges | |||
|---|---|---|---|
| Datastore | |||
| Allocate space | |||
| Browse datastore | |||
| Low level file operation | |||
| Remove file | |||
| Extension | |||
| Register extension | |||
| Folder | |||
| Create folder | |||
| Host | |||
| Configuration | |||
| Maintenance | |||
| Network configuration | |||
| Storage partition configuration | |||
| Network | |||
| Assign network | |||
| Resource | |||
| Assign virtual machine to resource pool | |||
| Migrate powered off virtual machine | |||
| Migrate powered on virtual machine | |||
| Virtual Machine | |||
| Configuration | |||
| Add existing disk | |||
| Add new disk | |||
| Add or remove device | |||
| Advanced | |||
| CPU count | |||
| Disk change tracking | |||
| Host USB device | |||
| Memory | |||
| Raw device | |||
| Remove disk | |||
| Rename | |||
| Set annotation | |||
| Swapfile placement | |||
| Interaction | |||
| Configure CD media | |||
| Power Off | |||
| Power On | |||
| Reset | |||
| Suspend | |||
| Inventory | |||
| Create from existing | |||
| Create new | |||
| Move | |||
| Remove | |||
| Unregister | |||
| Provisioning | |||
| Clone virtual machine | |||
| Customize | |||
| Sessions | |||
| Validate session | |||
| View and stop sessions | |||
| Snapshot management | |||
| Create snapshot | |||
| Remove snapshot | |||
| vApp | |||
| Export | |||
| Import |
VMware vCenter driver
Use the VMware vCenter driver (VMwareVCDriver) to connect OpenStack Compute with vCenter. This recommended configuration enables access through vCenter to advanced vSphere features like vMotion, High Availability, and Dynamic Resource Scheduling (DRS).
VMwareVCDriver configuration options
When you use the VMwareVCDriver (vCenter versions 5.1 and later) with OpenStack Compute, add the following VMware-specific configuration options to the nova.conf file:
[DEFAULT]
compute_driver = vmwareapi.VMwareVCDriver

[vmware]
host_ip = <vCenter host IP>
host_username = <vCenter username>
host_password = <vCenter password>
cluster_name = <vCenter cluster name>
datastore_regex = <optional datastore regex>
Note
- Clusters: The vCenter driver can support only a single cluster. Clusters and data stores used by the vCenter driver should not contain any VMs other than those created by the driver.
- Data stores: The datastore_regex setting specifies the data stores to use with Compute. For example, datastore_regex="nas.*" selects all the data stores that have a name starting with “nas”. If this line is omitted, Compute uses the first data store returned by the vSphere API. It is recommended not to use this field and instead remove data stores that are not intended for OpenStack.
- Reserved host memory: The reserved_host_memory_mb option value is 512 MB by default. However, VMware recommends that you set this option to 0 MB because the vCenter driver reports the effective memory available to the virtual machines.
- The vCenter driver generates instance name by instance ID. Instance name template is ignored.
- The minimum supported vCenter version is 5.1.0. Starting in the OpenStack Liberty release this will be logged as a warning. In the OpenStack Newton release this will be enforced.
A nova-compute service can control one or more clusters containing multiple ESXi hosts, making nova-compute a critical service from a high availability perspective. Because the host that runs nova-compute can fail while the vCenter and ESX still run, you must protect the nova-compute service against host failures.
Note
Many nova.conf options are relevant to libvirt but do not apply to this driver.
Images with VMware vSphere
The vCenter driver supports images in the VMDK format. Disks in this format can be obtained from VMware Fusion or from an ESX environment. It is also possible to convert other formats, such as qcow2, to the VMDK format using the qemu-img utility. After a VMDK disk is available, load it into the Image service. Then, you can use it with the VMware vCenter driver. The following sections provide additional details on the supported disks and the commands used for conversion and upload.
Supported image types
Upload images to the OpenStack Image service in VMDK format. The following VMDK disk types are supported:
- VMFS Flat Disks (includes thin, thick, zeroedthick, and eagerzeroedthick). Note that once a VMFS thin disk is exported from VMFS to a non-VMFS location, like the OpenStack Image service, it becomes a preallocated flat disk. This impacts the transfer time from the Image service to the data store when the full preallocated flat disk, rather than the thin disk, must be transferred.
- Monolithic Sparse disks. Sparse disks get imported from the Image service into ESXi as thin provisioned disks. Monolithic Sparse disks can be obtained from VMware Fusion or can be created by converting from other virtual disk formats using the qemu-img utility.
- Stream-optimized disks. Stream-optimized disks are compressed sparse disks. They can be obtained from VMware vCenter/ESXi when exporting vm to ovf/ova template.
The following table shows the vmware_disktype property that applies to each of the supported VMDK disk types:
| vmware_disktype property | VMDK disk type |
|---|---|
| sparse | Monolithic Sparse |
| thin | VMFS flat, thin provisioned |
| preallocated (default) | VMFS flat, thick/zeroedthick/eagerzeroedthick |
| streamOptimized | Compressed Sparse |
The vmware_disktype property is set when an image is loaded into the Image service. For example, the following command creates a Monolithic Sparse image by setting vmware_disktype to sparse:
$ openstack image create \
  --disk-format vmdk \
  --container-format bare \
  --property vmware_disktype="sparse" \
  --property vmware_ostype="ubuntu64Guest" \
  ubuntu-sparse < ubuntuLTS-sparse.vmdk
Note
Specifying thin does not provide any advantage over preallocated with the current version of the driver. Future versions might restore the thin properties of the disk after it is downloaded to a vSphere data store.
The following table shows the vmware_ostype property that applies to each of the supported guest OS:
| vmware_ostype property | Retail Name |
|---|---|
| asianux3_64Guest | Asianux Server 3 (64 bit) |
| asianux3Guest | Asianux Server 3 |
| asianux4_64Guest | Asianux Server 4 (64 bit) |
| asianux4Guest | Asianux Server 4 |
| darwin64Guest | Darwin 64 bit |
| darwinGuest | Darwin |
| debian4_64Guest | Debian GNU/Linux 4 (64 bit) |
| debian4Guest | Debian GNU/Linux 4 |
| debian5_64Guest | Debian GNU/Linux 5 (64 bit) |
| debian5Guest | Debian GNU/Linux 5 |
| dosGuest | MS-DOS |
| freebsd64Guest | FreeBSD x64 |
| freebsdGuest | FreeBSD |
| mandrivaGuest | Mandriva Linux |
| netware4Guest | Novell NetWare 4 |
| netware5Guest | Novell NetWare 5.1 |
| netware6Guest | Novell NetWare 6.x |
| nld9Guest | Novell Linux Desktop 9 |
| oesGuest | Open Enterprise Server |
| openServer5Guest | SCO OpenServer 5 |
| openServer6Guest | SCO OpenServer 6 |
| opensuse64Guest | openSUSE (64 bit) |
| opensuseGuest | openSUSE |
| os2Guest | OS/2 |
| other24xLinux64Guest | Linux 2.4x Kernel (64 bit) (experimental) |
| other24xLinuxGuest | Linux 2.4x Kernel |
| other26xLinux64Guest | Linux 2.6x Kernel (64 bit) (experimental) |
| other26xLinuxGuest | Linux 2.6x Kernel (experimental) |
| otherGuest | Other Operating System |
| otherGuest64 | Other Operating System (64 bit) (experimental) |
| otherLinux64Guest | Linux (64 bit) (experimental) |
| otherLinuxGuest | Other Linux |
| redhatGuest | Red Hat Linux 2.1 |
| rhel2Guest | Red Hat Enterprise Linux 2 |
| rhel3_64Guest | Red Hat Enterprise Linux 3 (64 bit) |
| rhel3Guest | Red Hat Enterprise Linux 3 |
| rhel4_64Guest | Red Hat Enterprise Linux 4 (64 bit) |
| rhel4Guest | Red Hat Enterprise Linux 4 |
| rhel5_64Guest | Red Hat Enterprise Linux 5 (64 bit) (experimental) |
| rhel5Guest | Red Hat Enterprise Linux 5 |
| rhel6_64Guest | Red Hat Enterprise Linux 6 (64 bit) |
| rhel6Guest | Red Hat Enterprise Linux 6 |
| sjdsGuest | Sun Java Desktop System |
| sles10_64Guest | SUSE Linux Enterprise Server 10 (64 bit) (experimental) |
| sles10Guest | SUSE Linux Enterprise Server 10 |
| sles11_64Guest | SUSE Linux Enterprise Server 11 (64 bit) |
| sles11Guest | SUSE Linux Enterprise Server 11 |
| sles64Guest | SUSE Linux Enterprise Server 9 (64 bit) |
| slesGuest | SUSE Linux Enterprise Server 9 |
| solaris10_64Guest | Solaris 10 (64 bit) (experimental) |
| solaris10Guest | Solaris 10 (32 bit) (experimental) |
| solaris6Guest | Solaris 6 |
| solaris7Guest | Solaris 7 |
| solaris8Guest | Solaris 8 |
| solaris9Guest | Solaris 9 |
| suse64Guest | SUSE Linux (64 bit) |
| suseGuest | SUSE Linux |
| turboLinux64Guest | Turbolinux (64 bit) |
| turboLinuxGuest | Turbolinux |
| ubuntu64Guest | Ubuntu Linux (64 bit) |
| ubuntuGuest | Ubuntu Linux |
| unixWare7Guest | SCO UnixWare 7 |
| win2000AdvServGuest | Windows 2000 Advanced Server |
| win2000ProGuest | Windows 2000 Professional |
| win2000ServGuest | Windows 2000 Server |
| win31Guest | Windows 3.1 |
| win95Guest | Windows 95 |
| win98Guest | Windows 98 |
| windows7_64Guest | Windows 7 (64 bit) |
| windows7Guest | Windows 7 |
| windows7Server64Guest | Windows Server 2008 R2 (64 bit) |
| winLonghorn64Guest | Windows Longhorn (64 bit) (experimental) |
| winLonghornGuest | Windows Longhorn (experimental) |
| winMeGuest | Windows Millennium Edition |
| winNetBusinessGuest | Windows Small Business Server 2003 |
| winNetDatacenter64Guest | Windows Server 2003, Datacenter Edition (64 bit) (experimental) |
| winNetDatacenterGuest | Windows Server 2003, Datacenter Edition |
| winNetEnterprise64Guest | Windows Server 2003, Enterprise Edition (64 bit) |
| winNetEnterpriseGuest | Windows Server 2003, Enterprise Edition |
| winNetStandard64Guest | Windows Server 2003, Standard Edition (64 bit) |
| winNetEnterpriseGuest | Windows Server 2003, Enterprise Edition |
| winNetStandard64Guest | Windows Server 2003, Standard Edition (64 bit) |
| winNetStandardGuest | Windows Server 2003, Standard Edition |
| winNetWebGuest | Windows Server 2003, Web Edition |
| winNTGuest | Windows NT 4 |
| winVista64Guest | Windows Vista (64 bit) |
| winVistaGuest | Windows Vista |
| winXPHomeGuest | Windows XP Home Edition |
| winXPPro64Guest | Windows XP Professional Edition (64 bit) |
| winXPProGuest | Windows XP Professional |
Convert and load images
Using the qemu-img utility, disk images in several formats (such as, qcow2) can be converted to the VMDK format.
For example, the following command can be used to convert a qcow2 Ubuntu Trusty cloud image:
$ qemu-img convert -f qcow2 ~/Downloads/trusty-server-cloudimg-amd64-disk1.img \
  -O vmdk trusty-server-cloudimg-amd64-disk1.vmdk
VMDK disks converted through qemu-img are always monolithic sparse VMDK disks with an IDE adapter type. Using the previous example of the Ubuntu Trusty image after the qemu-img conversion, the command to upload the VMDK disk should be something like:
$ openstack image create \
  --container-format bare --disk-format vmdk \
  --property vmware_disktype="sparse" \
  --property vmware_adaptertype="ide" \
  trusty-cloud < trusty-server-cloudimg-amd64-disk1.vmdk
Note that the vmware_disktype is set to sparse and the vmware_adaptertype is set to ide in the previous command.
If the image did not come from the qemu-img utility, the vmware_disktype and vmware_adaptertype might be different. To determine the image adapter type from an image file, use the following command and look for the ddb.adapterType= line:
$ head -20 <vmdk file name>
Assuming a preallocated disk type and an iSCSI lsiLogic adapter type, the following command uploads the VMDK disk:
$ openstack image create \
  --disk-format vmdk \
  --container-format bare \
  --property vmware_adaptertype="lsiLogic" \
  --property vmware_disktype="preallocated" \
  --property vmware_ostype="ubuntu64Guest" \
  ubuntu-thick-scsi < ubuntuLTS-flat.vmdk
Currently, OS boot VMDK disks with an IDE adapter type cannot be attached to a virtual SCSI controller and likewise disks with one of the SCSI adapter types (such as, busLogic, lsiLogic, lsiLogicsas, paraVirtual) cannot be attached to the IDE controller. Therefore, as the previous examples show, it is important to set the vmware_adaptertype property correctly. The default adapter type is lsiLogic, which is SCSI, so you can omit the vmware_adaptertype property if you are certain that the image adapter type is lsiLogic.
Tag VMware images
In a mixed hypervisor environment, OpenStack Compute uses the hypervisor_type tag to match images to the correct hypervisor type. For VMware images, set the hypervisor type to vmware. Other valid hypervisor types include: hyperv, ironic, lxc, qemu, uml, and xen. Note that qemu is used for both QEMU and KVM hypervisor types.
$ openstack image create \
  --disk-format vmdk \
  --container-format bare \
  --property vmware_adaptertype="lsiLogic" \
  --property vmware_disktype="preallocated" \
  --property hypervisor_type="vmware" \
  --property vmware_ostype="ubuntu64Guest" \
  ubuntu-thick-scsi < ubuntuLTS-flat.vmdk
Optimize images
Monolithic Sparse disks are considerably faster to download but have the overhead of an additional conversion step. When imported into ESX, sparse disks get converted to VMFS flat thin provisioned disks. The download and conversion steps only affect the first launched instance that uses the sparse disk image. The converted disk image is cached, so subsequent instances that use this disk image can simply use the cached version.
To avoid the conversion step (at the cost of longer download times) consider converting sparse disks to thin provisioned or preallocated disks before loading them into the Image service.
Use one of the following tools to pre-convert sparse disks.
- vSphere CLI tools
Sometimes called the remote CLI or rCLI.
Assuming that the sparse disk is made available on a data store accessible by an ESX host, the following command converts it to preallocated format:
vmkfstools --server=ip_of_some_ESX_host -i \
  /vmfs/volumes/datastore1/sparse.vmdk \
  /vmfs/volumes/datastore1/converted.vmdk
Note that the vifs tool from the same CLI package can be used to upload the disk to be converted. The vifs tool can also be used to download the converted disk if necessary.
- vmkfstools directly on the ESX host
If the SSH service is enabled on an ESX host, the sparse disk can be uploaded to the ESX data store through scp and the vmkfstools local to the ESX host can use used to perform the conversion. After you log in to the host through ssh, run this command:
vmkfstools -i /vmfs/volumes/datastore1/sparse.vmdk /vmfs/volumes/datastore1/converted.vmdk- vmware-vdiskmanager
vmware-vdiskmanager is a utility that comes bundled with VMware Fusion and VMware Workstation. The following example converts a sparse disk to preallocated format:
'/Applications/VMware Fusion.app/Contents/Library/vmware-vdiskmanager' -r sparse.vmdk -t 4 converted.vmdk
In the previous cases, the converted vmdk is actually a pair of files:
- The descriptor file converted.vmdk.
- The actual virtual disk data file converted-flat.vmdk.
The file to be uploaded to the Image service is converted-flat.vmdk.
Image handling
The ESX hypervisor requires a copy of the VMDK file in order to boot up a virtual machine. As a result, the vCenter OpenStack Compute driver must download the VMDK via HTTP from the Image service to a data store that is visible to the hypervisor. To optimize this process, the first time a VMDK file is used, it gets cached in the data store. A cached image is stored in a folder named after the image ID. Subsequent virtual machines that need the VMDK use the cached version and don’t have to copy the file again from the Image service.
Even with a cached VMDK, there is still a copy operation from the cache location to the hypervisor file directory in the shared data store. To avoid this copy, boot the image in linked_clone mode. To learn how to enable this mode, see Configuration reference.
Note
You can also use the img_linked_clone property (or legacy property vmware_linked_clone) in the Image service to override the linked_clone mode on a per-image basis.
If spawning a virtual machine image from ISO with a VMDK disk, the image is created and attached to the virtual machine as a blank disk. In that case img_linked_clone property for the image is just ignored.
If multiple compute nodes are running on the same host, or have a shared file system, you can enable them to use the same cache folder on the back-end data store. To configure this action, set the cache_prefix option in the nova.conf file. Its value stands for the name prefix of the folder where cached images are stored.
Note
This can take effect only if compute nodes are running on the same host, or have a shared file system.
You can automatically purge unused images after a specified period of time. To configure this action, set these options in the DEFAULT section in the nova.conf file:
- remove_unused_base_images
- Set this option to True to specify that unused images should be removed after the duration specified in the remove_unused_original_minimum_age_seconds option. The default is True.
- remove_unused_original_minimum_age_seconds
- Specifies the duration in seconds after which an unused image is purged from the cache. The default is 86400 (24 hours).
Networking with VMware vSphere
The VMware driver supports networking with the nova-network service or the Networking Service. Depending on your installation, complete these configuration steps before you provision VMs:
The nova-network service with the FlatManager or FlatDHCPManager. Create a port group with the same name as the flat_network_bridge value in the nova.conf file. The default value is br100. If you specify another value, the new value must be a valid Linux bridge identifier that adheres to Linux bridge naming conventions.
All VM NICs are attached to this port group.
Ensure that the flat interface of the node that runs the nova-network service has a path to this network.
Note
When configuring the port binding for this port group in vCenter, specify ephemeral for the port binding type. For more information, see Choosing a port binding type in ESX/ESXi in the VMware Knowledge Base.
The nova-network service with the VlanManager. Set the vlan_interface configuration option to match the ESX host interface that handles VLAN-tagged VM traffic.
OpenStack Compute automatically creates the corresponding port groups.
If you are using the OpenStack Networking Service: Before provisioning VMs, create a port group with the same name as the vmware.integration_bridge value in nova.conf (default is br-int). All VM NICs are attached to this port group for management by the OpenStack Networking plug-in.
Volumes with VMware vSphere
The VMware driver supports attaching volumes from the Block Storage service. The VMware VMDK driver for OpenStack Block Storage is recommended and should be used for managing volumes based on vSphere data stores. For more information about the VMware VMDK driver, see VMware VMDK driver. Also an iSCSI volume driver provides limited support and can be used only for attachments.
Configuration reference
To customize the VMware driver, use the configuration option settings documented in Description of VMware configuration options.

Except where otherwise noted, this document is licensed under Creative Commons Attribution 3.0 License. See all OpenStack Legal Documents.