A Use Case of VNFFG Update
This guide walks you through a specific usecase in which you can leverage the Zabbix monitoring software to create a dynamic VNF Forwarding Graph (VNFFG) or Service Function Chaining (SFC). You can check out the video presentation here [1] and slides here [2] to see how to do it in action.
Prerequisites
1. Two libvirt VMs to install devstack and Zabbix server.
2. Two libvirt networks which can reach the internet (one management, one devstack external)
Topology
1. Chain: IDS (Suricata), Openwrt (VNFs)
2. Target to protect: Server nova instance.
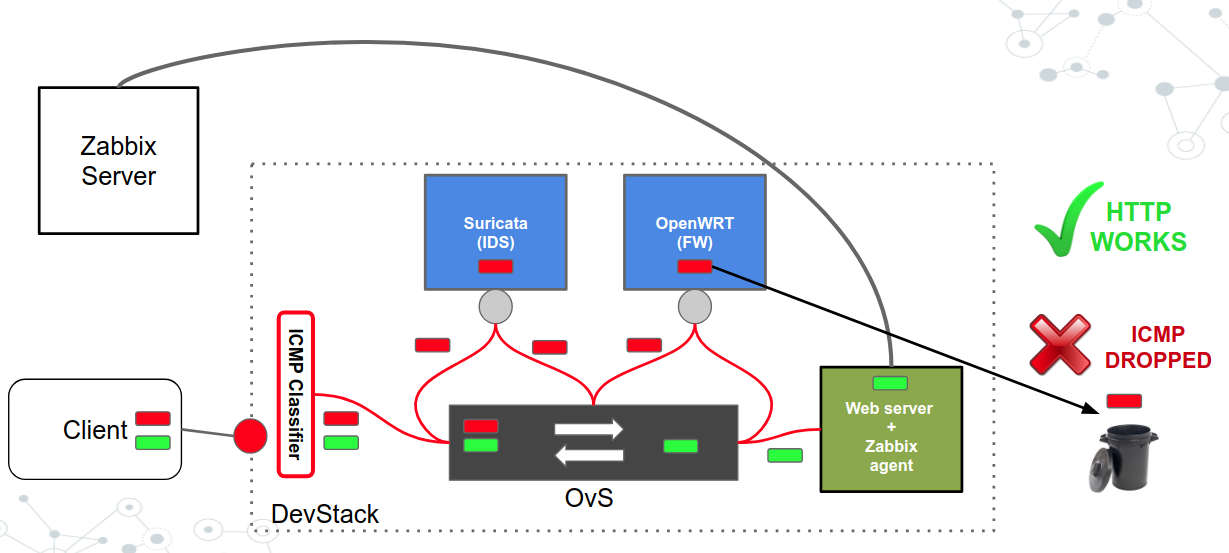
- SFC with no classifier (HTTP works, ICMP works)
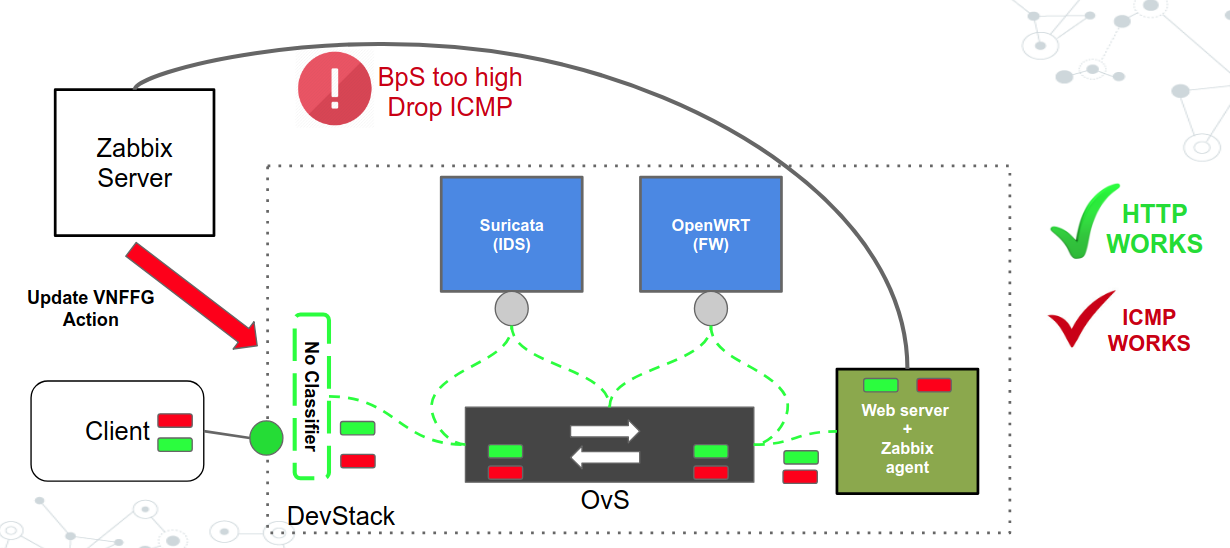
- SFC with ICMP classifier (HTTP works, ICMP dropped)
Setting up and produce the scenario
1. Install devstack in a VM as it is described here [3] using the configuration sample here [4] (Please add here the right configuration for the management and external networks). Two network interfaces, one for the management and one for the external network.
2. Create a second VM where you will install the Zabbix server according to these instructions [5]. Please be sure that the Zabbix server has an interface on the same network as the external network of devstack to be able to monitor the server nova instance through the floating IP.
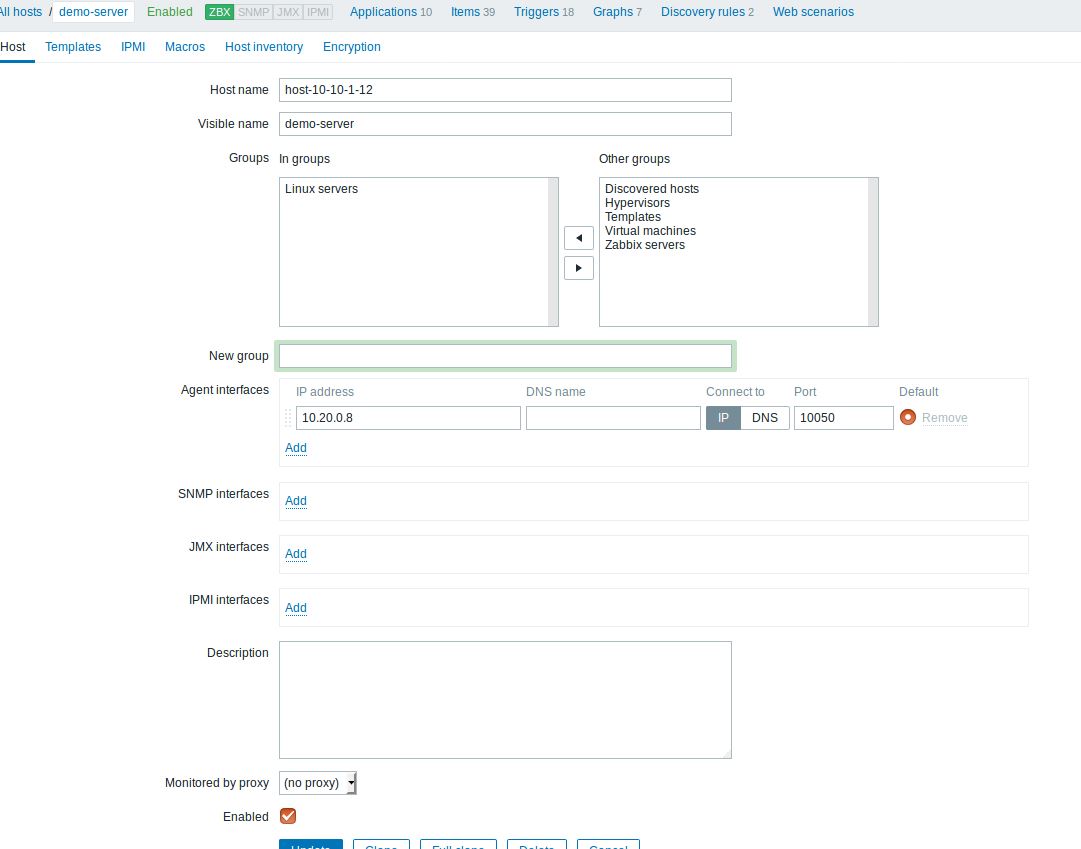
Config the Zabbix server as below:
- Register the devstack machine (the host that we want to monitor and it should have installed the Zabbix agent, see step 3)
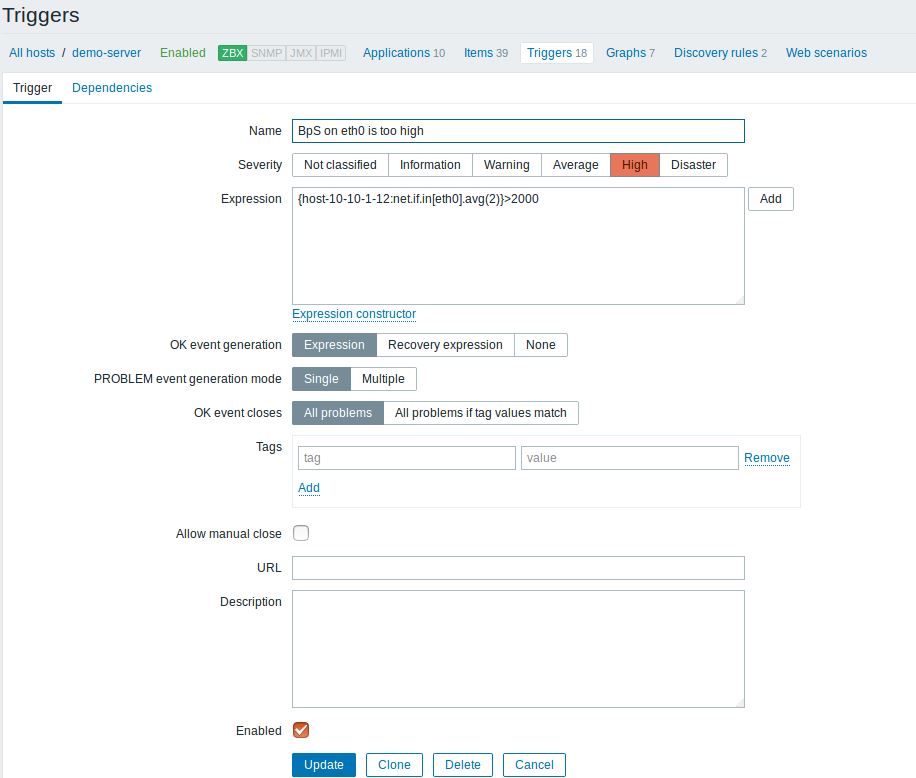
- Create a trigger with a name which contains the keyword BpS (e.g. BpS in the eth0 is too high) and add to that trigger an expression-condition which will generate an event if the traffic will set this expression-condition to True. The expression-condition is:
{host-10-10-1-12:net.if.in[eth0].avg(2)}>2000
- Create an action which will update the classifier if a trigger with the BpS name will generated by the Zabbix server. To do this you need to create an action , set the keyword of the Trigger which will make this action to actually come to play and also you need to create an operation inside that action where you will write the update-vnffg command which you will execute to update the current classifier.

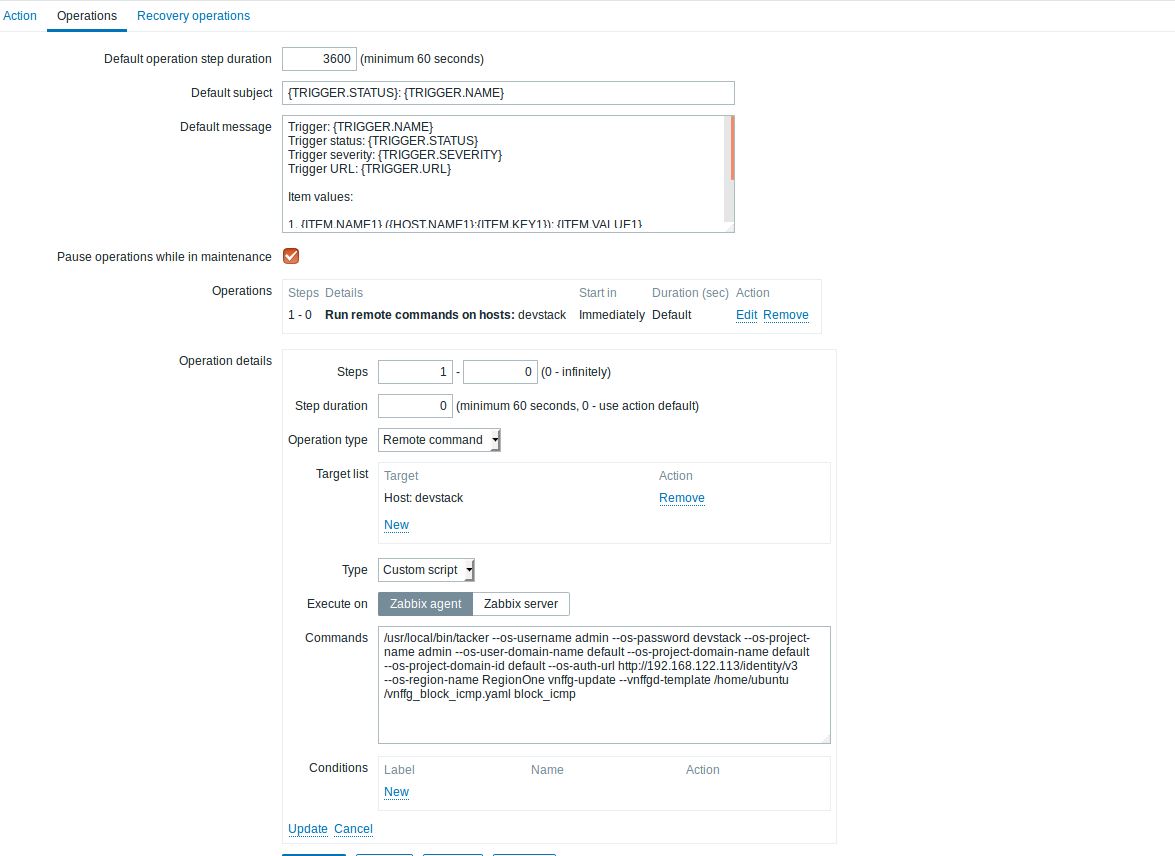
The action command is as follows:
/usr/local/bin/openstack --os-username admin \
                         --os-password devstack \
                         --os-project-name admin \
                         --os-user-domain-name default \
                         --os-project-domain-name default \
                         --os-project-domain-id default \
                         --os-auth-url http://<devstack ip address>/identity/v3 \
                         --os-region-name RegionOne \
                         vnf graph set \
                         --vnffgd-template vnffg_block_icmp.yaml block_icmp
3. Install in the server nova instance and in the devstack VM natively the Zabbix agent. The Zabbix agent in the server nova instance is used to send data back to the Zabbix server. The Zabbix agent in the devstack VM is essential because we execute from the Zabbix server the vnffg-update command so we can update the classifier of the chain. And for this we need the Zabbix agent to the devstack VM.
4. Deploy two Service Functions (SFs) via two VNFs:
- The first one is Suricata (IDS) which will be deployed using this VNFD template
tosca_definitions_version: tosca_simple_profile_for_nfv_1_0_0
description: suricata
metadata:
  template_name: suricata

topology_template:
  node_templates:
    VDU1:
      type: tosca.nodes.nfv.VDU.Tacker
      capabilities:
        nfv_compute:
          properties:
            num_cpus: 1
            mem_size: 4096 MB
            disk_size: 15 GB
      properties:
        image: danube
        availability_zone: nova
        mgmt_driver: noop
        config: |
          param0: key1
          param1: key2
        service_type: firewall
        monitoring_policy:
          name: ping
          parameters:
            monitoring_delay: 10
            count: 3
            interval: 2
            timeout: 2
            action:
              failure: respawn
            retry: 5
            port: 22

    CP2:
      type: tosca.nodes.nfv.CP.Tacker
      properties:
        management: true
        order: 0
        anti_spoofing_protection: false
      requirements:
        - virtualLink:
            node: VL1
        - virtualBinding:
            node: VDU1

    VL1:
      type: tosca.nodes.nfv.VL
      properties:
        network_name: net1
        vendor: Tacker
After the VNF instance has been deployed successfully, SSH to it and configure as in [6].
- The second one is OpenWrt with the configuration is the same as it is described in the Tacker docs [7], use the VNFD template here [8] and param file here [9].
5. Create a VNFFG with a chain (IDS, Openwrt) and no classifier
vnffg_no_classifier.yaml
tosca_definitions_version: tosca_simple_profile_for_nfv_1_0_0

description: Sample VNFFG template

topology_template:
  node_templates:

    Forwarding_path1:
      type: tosca.nodes.nfv.FP.TackerV2
      description: demo chain
      properties:
        id: 51
        path:
          - forwarder: IDS
            capability: CP2
          - forwarder: openwrt
            capability: CP4

  groups:
    VNFFG1:
      type: tosca.groups.nfv.VNFFG
      description: Traffic to server
      properties:
        vendor: tacker
        version: 1.0
        number_of_endpoints: 2
        dependent_virtual_link: [VL1,VL2]
        connection_point: [CP2,CP4]
        constituent_vnfs: [IDS,openwrt]
      members: [Forwarding_path1]
6. Generate ICMP traffic using PING towards the floating IP of the server nova instance and when that traffic reaches a threshold a specific event is published to the Zabbix server and Zabbix server executes the vvnffg-update action which update the already created VNFFG with a classifier which classifies the ICMP traffic
vnffg_block_icmp.yaml
tosca_definitions_version: tosca_simple_profile_for_nfv_1_0_0

description: Sample VNFFG template

topology_template:
  node_templates:

    Forwarding_path1:
      type: tosca.nodes.nfv.FP.TackerV2
      description: demo chain
      properties:
        id: 51
        policy:
          type: ACL
          criteria:
            - name: block_icmp
              classifier:
                network_src_port_id: 654eaf96-3737-4b72-9dd7-445a26dfc2ee
                ip_proto: 1
        path:
          - forwarder: IDS
            capability: CP2
          - forwarder: openwrt
            capability: CP4

  groups:
    VNFFG1:
      type: tosca.groups.nfv.VNFFG
      description: Traffic to server
      properties:
        vendor: tacker
        version: 1.0
        number_of_endpoints: 2
        dependent_virtual_link: [VL1,VL2]
        connection_point: [CP2,CP4]
        constituent_vnfs: [IDS,openwrt]
      members: [Forwarding_path1]
That means that the traffic will be steered to the SFs and it will be mitigated.
Footnotes
| [1] | https://www.openstack.org/videos/vancouver-2018/dynamic-sfc-from-tacker-to-incept-specific-traffic-of-vm-1 |
| [2] | https://github.com/dangtrinhnt/DynamicSFCDemo/blob/master/DynamicSFC_OpenStackSummit2018Vancouver.pdf |
| [3] | https://docs.openstack.org/devstack/latest/ |
| [4] | https://github.com/openstack/tacker/blob/master/devstack/local.conf.example |
| [5] | https://www.digitalocean.com/community/tutorials/how-to-install-and-configure-zabbix-to-securely-monitor-remote-servers-on-ubuntu-16-04 |
| [6] | https://blog.rapid7.com/2017/02/14/how-to-install-suricata-nids-on-ubuntu-linux/ |
| [7] | https://docs.openstack.org/tacker/latest/install/deploy_openwrt.html |
| [8] | https://github.com/openstack/tacker/blob/master/samples/tosca-templates/vnfd/tosca-vnfd-openwrt.yaml |
| [9] | https://github.com/openstack/tacker/blob/master/samples/tosca-templates/vnfd/tosca-config-openwrt-firewall.yaml |

Except where otherwise noted, this document is licensed under Creative Commons Attribution 3.0 License. See all OpenStack Legal Documents.