OpenStack VIM Installation
This document describes how to install a simple OpenStack which can be a Tacker VIM. Since the kolla-ansible provides a good and stable way to deploy an OpenStack environment, this document adopts it to finish this task.
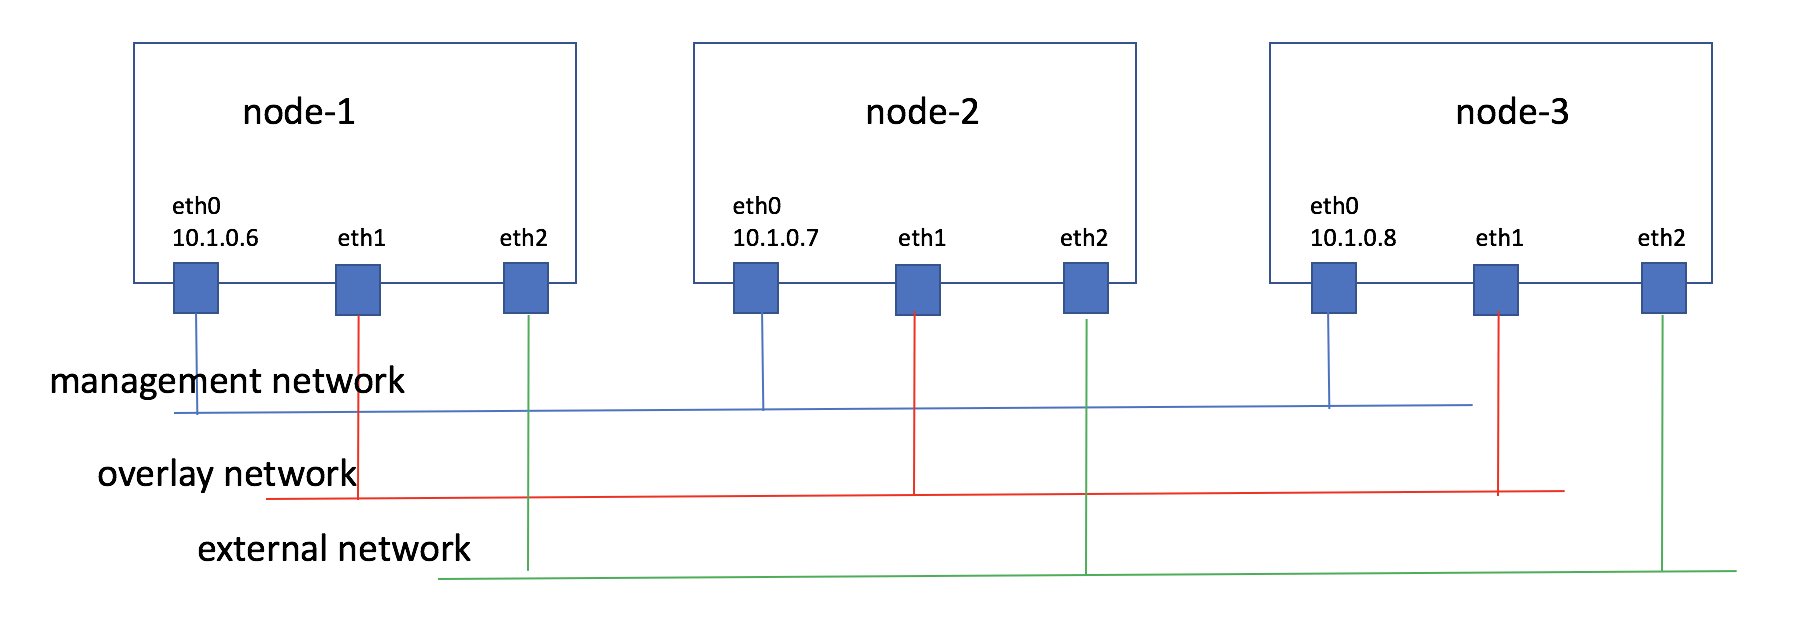
The target OpenStack consists of three nodes. Besides the OpenStack role, the first one plays kolla-ansible deploy role, which will run a local registry, and be used to run kolla-ansible tool.
The basic information and the topology of these nodes is like this:
Prepare kolla-ansible
About how to prepare Docker and kolla-ansible environment, please refer to https://docs.openstack.org/kolla-ansible/latest/user/quickstart.html
Set up local kolla-ansible docker registry
Kolla-ansible is publishing the packaged Docker images at http://tarballs.openstack.org/kolla/images/. This document will use centos-source-registry-pike.tar.gz. So Download it:
# wget http://tarballs.openstack.org/kolla/images/centos-source-registry-pike.tar.gz
And unpack it:
# tar xzvf centos-source-registry-pike.tar.gz -C /opt/registry/
And start Docker registry container:
# docker run -d -v /opt/registry:/var/lib/registry -p 4000:5000 --restart=always --name registry registry:2
And set Docker to access local registry via insecure channel:
# cat /usr/lib/systemd/system/docker.service | grep insecure
ExecStart=/usr/bin/dockerd --insecure-registry 10.1.0.6:4000
# systemctl daemon-reload
# systemctl restart docker
Note
The way to set up Docker to access insecure registry depends on operating system and Docker version, above way is just an example.
And verify the local registry contains the needed images:
# curl -k localhost:4000/v2/_catalog
# curl -k localhost:4000/v2/lokolla/centos-source-fluentd/tags/list
{"name":"lokolla/centos-source-fluentd","tags":["5.0.1"]}
Install OpenStack
- Edit kolla ansible’s configuration file /etc/kolla/globals.yml:
---
kolla_install_type: "source"
openstack_release: "5.0.1"
kolla_internal_vip_address: "10.1.0.5"
docker_registry: "10.1.0.6:4000"
docker_namespace: "lokolla"
api_interface: "eth0"
tunnel_interface: "eth1"
neutron_external_interface: "eth2"
enable_glance: "yes"
enable_haproxy: "yes"
enable_keystone: "yes"
enable_mariadb: "yes"
enable_memcached: "yes"
enable_neutron: "yes"
enable_nova: "yes"
enable_rabbitmq: "yes"
enable_aodh: "yes"
enable_ceilometer: "yes"
enable_gnocchi: "yes"
enable_heat: "yes"
enable_horizon: "yes"
enable_neutron_sfc: "yes"
Note
If nodes are using different network interface names to connect each other, please define them in inventory file.
“10.1.0.5” is an un-used ip address, will be used as VIP address, realized by keepalived container.
- Run kolla-genpwd to generate system passwords:
$ sudo cp etc/kolla/passwords.yml /etc/kolla/passwords.yml
$ sudo kolla-genpwd
Note
If the pypi version is used to install kolla-ansible the skeleton passwords file may be under ‘/usr/share/kolla-ansible/etc_examples/kolla’.
With this command, /etc/kolla/passwords.yml will be populated with generated passwords.
- Editor inventory:
First copy the sample multinode inventory file from kolla-ansible:
# cp inventory/multinode ~/
Then edit it to contain all of the OpenStack nodes.
[all_vim_nodes]
10.1.0.8
10.1.0.7
10.1.0.6

[control:children]
all_vim_nodes

[network:children]
all_vim_nodes

[compute:children]
all_vim_nodes

[monitoring:children]
all_vim_nodes

[storage:children]
#if the tacker needs volume feature, put related nodes here
- Run kolla ansible deploy to install OpenStack system:
# kolla-ansible deploy -i ~/multinode
- Run kolla ansible post-deploy to generate tacker access environment file:
# kolla-ansible post-deploy
With this command, the “admin-openrc.sh” will be generated at /etc/kolla/admin-openrc.sh.
Prepare OpenStack
After installation, OpenStack administrator needs to:
- Initialized the flavors that the platform will support. Most Tacker sample TOSCA templates will ask Tacker to create Flavor on demand. If not, the specified flavor in templates must exist in OpenStack.
- Upload related images. Tacker repo’s sample TOSCA templates are referring to cirros image named ‘cirros-0.4.0-x86_64-disk’, so this image should uploaded into OpenStack before Tacker uses it.
In additions, following steps are needed:
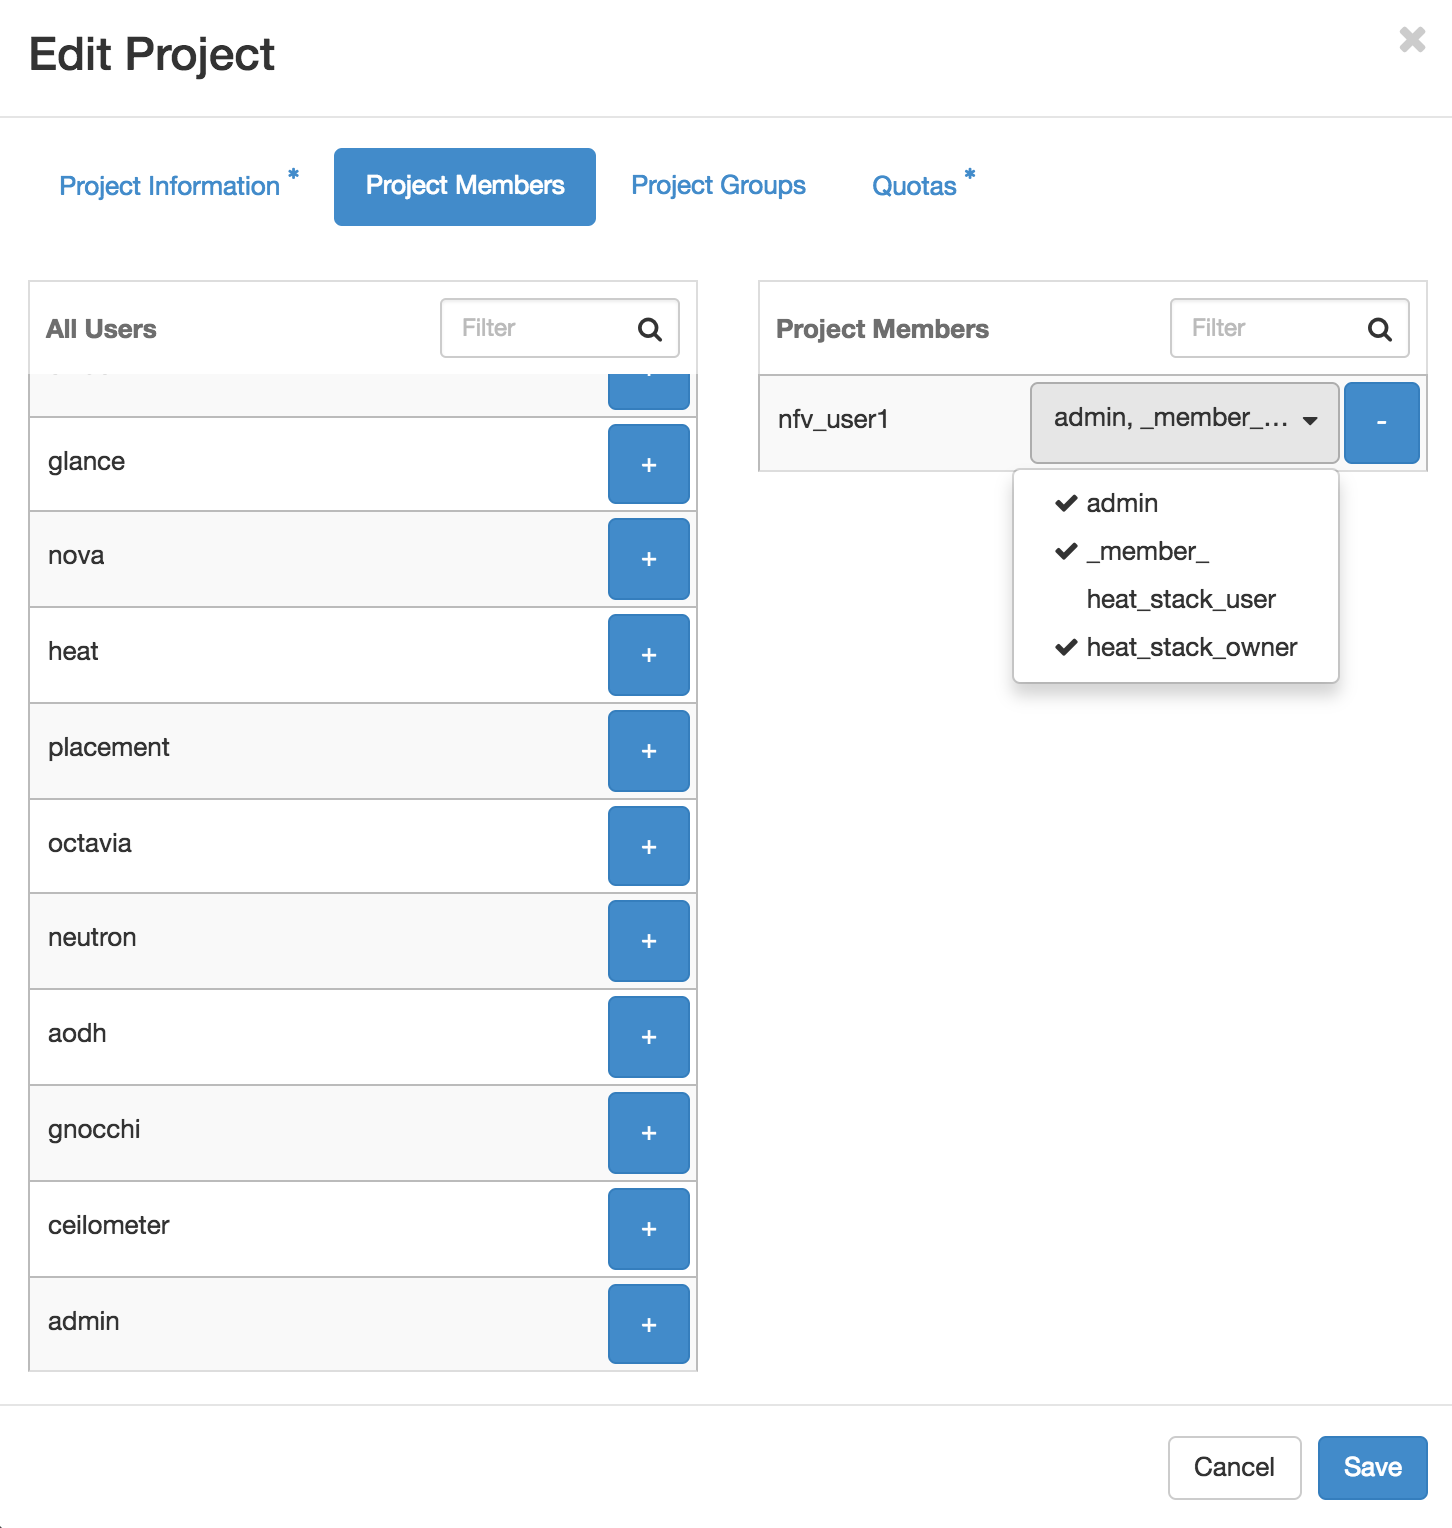
- Create projects and users which can be used by Tacker:
This is a simple task for any OpenStack administrator, but one thing to pay attention to is that the user must have ‘admin’ and ‘heat_stack_owner’ roles on the user’s project.
- Create Neutron networks:
Most sample TOSCA templates assume there are three Neutron networks in target OpenStack that the VIM user can use:
- net_mgmt, which is a network Tacker system can access to. Some Tacker features, such as monitor policies, need Tacker to access started VNF virtual machines. For Tacker to access VNF via net_mgmt, net_mgmt can be a provider network.
- net0 and net1, which are two business networks which VNFs will use. How to connected them depends on the VNFs’ business.
So create these three networks accordingly. For commands to create Neutron networks, please refer to https://docs.openstack.org/python-openstackclient/latest/cli/command-objects/network.html
