自服务网络
如果你选择网络选项2,你还可以创建一个私有网络通过NAT连接到物理网络设施。这个网络包括一个DHCP服务器为实例分配IP地址。在这个网络上的实例可以自动连接到外部网络如互联网。不过,从互联网这样的外部网络访问实例需要配置 :浮动IP。
demo 或者其他非管理员用户也可以创建这个网络,因为它只在 `demo``项目中提供对实例的访问。
警告
在创建私有项目网络前,你必须:ref:create the provider network <launch-instance-networks-provider>。
注解
下面的说明和框图使用示例IP 地址范围。你必须依据你的实际环境修改它们。
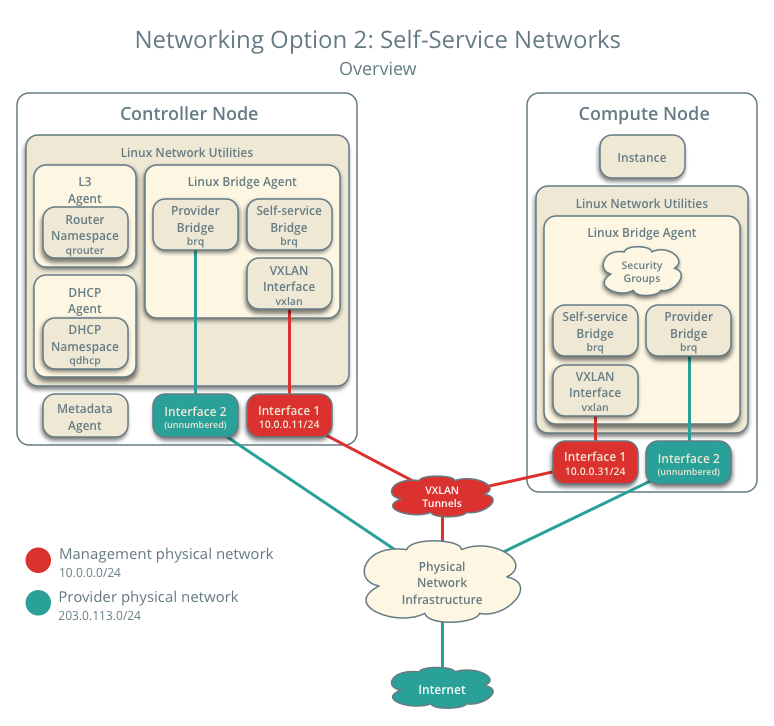
Networking Option 2: Self-service networks - Overview
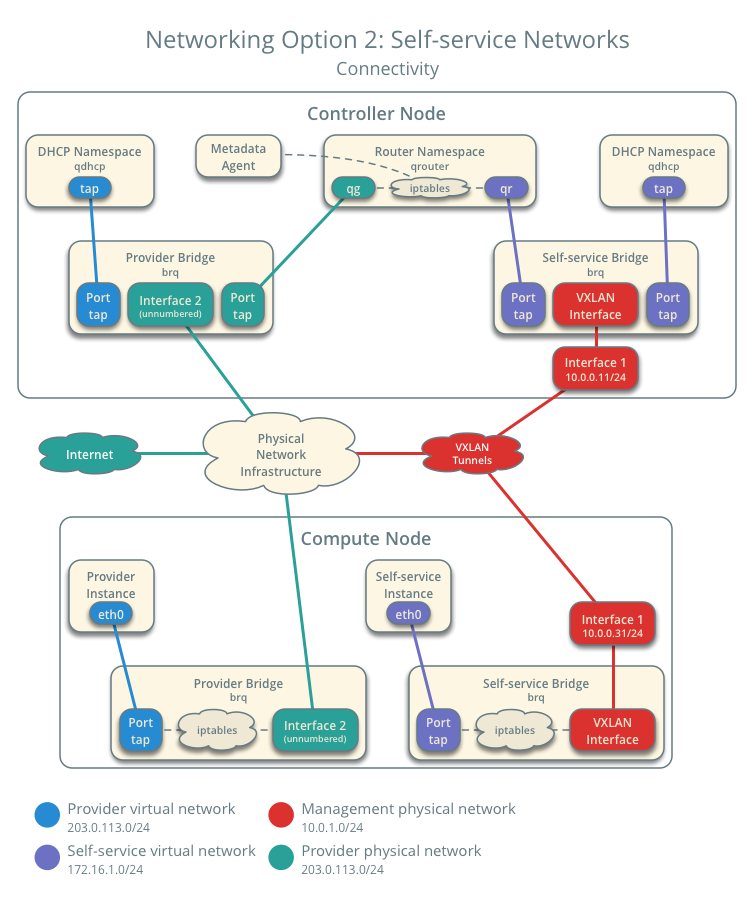
Networking Option 2: Self-service networks - Connectivity
创建自服务网络
在控制节点上,获得
admin凭证来获取只有管理员能执行的命令的访问权限:$ . demo-openrc创建网络:
$ openstack network create selfservice

Created a new network:
+-------------------------+--------------------------------------+
| Field                   | Value                                |
+-------------------------+--------------------------------------+
| admin_state_up          | UP                                   |
| availability_zone_hints |                                      |
| availability_zones      |                                      |
| created_at              | 2016-11-04T18:20:59Z                 |
| description             |                                      |
| headers                 |                                      |
| id                      | 7c6f9b37-76b4-463e-98d8-27e5686ed083 |
| ipv4_address_scope      | None                                 |
| ipv6_address_scope      | None                                 |
| mtu                     | 1450                                 |
| name                    | selfservice                          |
| port_security_enabled   | True                                 |
| project_id              | 3828e7c22c5546e585f27b9eb5453788     |
| project_id              | 3828e7c22c5546e585f27b9eb5453788     |
| revision_number         | 3                                    |
| router:external         | Internal                             |
| shared                  | False                                |
| status                  | ACTIVE                               |
| subnets                 |                                      |
| tags                    | []                                   |
| updated_at              | 2016-11-04T18:20:59Z                 |
+-------------------------+--------------------------------------+
非特权用户一般不能在这个命令制定更多参数。服务会自动从下面的文件中的信息选择参数:
ml2_conf.ini:[ml2] tenant_network_types = vxlan [ml2_type_vxlan] vni_ranges = 1:1000
在网络上创建一个子网:
$ openstack subnet create --network selfservice \
  --dns-nameserver DNS_RESOLVER --gateway SELFSERVICE_NETWORK_GATEWAY \
  --subnet-range SELFSERVICE_NETWORK_CIDR selfservice
将
DNS_RESOLVER替换为DNS解析服务的IP地址。在大多数情况下,你可以从主机``/etc/resolv.conf`` 文件选择一个使用。将``PRIVATE_NETWORK_GATEWAY`` 替换为私有网络的网关,网关IP形如 ”.1”。
将
PRIVATE_NETWORK_CIDR替换为私有网络的子网。你可以使用任意值,但是我们推荐遵从`RFC 1918 <https://tools.ietf.org/html/rfc1918>`_的网络。Example
自服务网络使用172.16.1.0/24 网关172.16.1.1。DHCP服务负责为每个实例从172.16.1.2 到172.16.1.254中分配IP地址。所有实例使用8.8.4.4作为DNS。
$ openstack subnet create --network selfservice \
  --dns-nameserver 8.8.4.4 --gateway 172.16.1.1 \
  --subnet-range 172.16.1.0/24 selfservice

Created a new subnet:
+-------------------+--------------------------------------+
| Field             | Value                                |
+-------------------+--------------------------------------+
| allocation_pools  | 172.16.1.2-172.16.1.254              |
| cidr              | 172.16.1.0/24                        |
| created_at        | 2016-11-04T18:30:54Z                 |
| description       |                                      |
| dns_nameservers   | 8.8.4.4                              |
| enable_dhcp       | True                                 |
| gateway_ip        | 172.16.1.1                           |
| headers           |                                      |
| host_routes       |                                      |
| id                | 5c37348e-e7da-439b-8c23-2af47d93aee5 |
| ip_version        | 4                                    |
| ipv6_address_mode | None                                 |
| ipv6_ra_mode      | None                                 |
| name              | selfservice                          |
| network_id        | b9273876-5946-4f02-a4da-838224a144e7 |
| project_id        | 3828e7c22c5546e585f27b9eb5453788     |
| project_id        | 3828e7c22c5546e585f27b9eb5453788     |
| revision_number   | 2                                    |
| service_types     | []                                   |
| subnetpool_id     | None                                 |
| updated_at        | 2016-11-04T18:30:54Z                 |
+-------------------+--------------------------------------+
创建路由器
私有网络通过虚拟路由来连接到公有网络,以双向NAT最为典型。每个路由包含至少一个连接到私有网络的接口以及一个连接到公有网络的网关的接口
The provider network must include the router:external option to
enable self-service routers to use it for connectivity to external networks
such as the Internet. The admin or other privileged user must include this
option during network creation or add it later. In this case, the
router:external option was set by using the --external parameter
when creating the provider network.
在控制节点上,加载
admin凭证来获取管理员能执行的命令访问权限:$ . admin-openrc加载
demo证书获得用户能执行的命令访问权限:$ . demo-openrc创建路由:
$ openstack router create router

Created a new router:
+-------------------------+--------------------------------------+
| Field                   | Value                                |
+-------------------------+--------------------------------------+
| admin_state_up          | UP                                   |
| availability_zone_hints |                                      |
| availability_zones      |                                      |
| created_at              | 2016-11-04T18:32:56Z                 |
| description             |                                      |
| external_gateway_info   | null                                 |
| flavor_id               | None                                 |
| headers                 |                                      |
| id                      | 67324374-396a-4db6-9443-c70be167a42b |
| name                    | router                               |
| project_id              | 3828e7c22c5546e585f27b9eb5453788     |
| project_id              | 3828e7c22c5546e585f27b9eb5453788     |
| revision_number         | 2                                    |
| routes                  |                                      |
| status                  | ACTIVE                               |
| updated_at              | 2016-11-04T18:32:56Z                 |
+-------------------------+--------------------------------------+
给路由器添加一个私网子网的接口:
$ neutron router-interface-add router selfservice

Added interface bff6605d-824c-41f9-b744-21d128fc86e1 to router router.
给路由器设置公有网络的网关:
$ neutron router-gateway-set router provider

Set gateway for router router
验证操作
我们推荐您在操作之前,确认并修复问题。以下步骤将使用网络和子网创建示例中的IP地址。
在控制节点上,加载
admin凭证来获取管理员能执行的命令访问权限:$ . admin-openrc列出网络命名空间。你应该可以看到一个’ qrouter ‘命名空间和两个’qdhcp ‘ 命名空间
$ ip netns

qrouter-89dd2083-a160-4d75-ab3a-14239f01ea0b
qdhcp-7c6f9b37-76b4-463e-98d8-27e5686ed083
qdhcp-0e62efcd-8cee-46c7-b163-d8df05c3c5ad
列出路由器上的端口来确定公网网关的IP 地址:
$ neutron router-port-list router

+--------------------------------------+------+-------------------+------------------------------------------+
| id                                   | name | mac_address       | fixed_ips                                |
+--------------------------------------+------+-------------------+------------------------------------------+
| bff6605d-824c-41f9-b744-21d128fc86e1 |      | fa:16:3e:2f:34:9b | {"subnet_id":                            |
|                                      |      |                   | "3482f524-8bff-4871-80d4-5774c2730728",  |
|                                      |      |                   | "ip_address": "172.16.1.1"}              |
| d6fe98db-ae01-42b0-a860-37b1661f5950 |      | fa:16:3e:e8:c1:41 | {"subnet_id":                            |
|                                      |      |                   | "5cc70da8-4ee7-4565-be53-b9c011fca011",  |
|                                      |      |                   | "ip_address": "203.0.113.102"}           |
+--------------------------------------+------+-------------------+------------------------------------------+
从控制节点或任意公共物理网络上的节点Ping这个IP地址:
$ ping -c 4 203.0.113.102

PING 203.0.113.102 (203.0.113.102) 56(84) bytes of data.
64 bytes from 203.0.113.102: icmp_req=1 ttl=64 time=0.619 ms
64 bytes from 203.0.113.102: icmp_req=2 ttl=64 time=0.189 ms
64 bytes from 203.0.113.102: icmp_req=3 ttl=64 time=0.165 ms
64 bytes from 203.0.113.102: icmp_req=4 ttl=64 time=0.216 ms

--- 203.0.113.102 ping statistics ---
rtt min/avg/max/mdev = 0.165/0.297/0.619/0.187 ms

Except where otherwise noted, this document is licensed under Creative Commons Attribution 3.0 License. See all OpenStack Legal Documents.