Set up Fuel
During installation, Fuel prompts you to access the Fuel setup screen where you can modify the default network and authentication parameters.
Typically, you want to modify network settings to meet the requirements of your existing network infrastructure. Also, you must change the default Fuel administrator password. Although you can change some of the network interface settings after you install the Fuel Master node, we recommend that you finalize network configuration before you install the Fuel Master node.
Warning
Do not modify settings of the Admin (PXE) network after you deploy the Fuel Master node, because Fuel will lose the ability to PXE boot and manage OpentStack environments.
If you are installing Fuel for testing purposes, you can keep the default settings and proceed to Install the Fuel Master node.
To set up Fuel:
Configure the following settings as required:
- Change the Fuel administrator password.
For security purposes, we strongly recommend that you change the Fuel administrator password during installation. - Modify the network interface settings.
By default, Fuel assigns the following network parameters to the Admin (PXE) network (
eth0):- Subnetwork: 10.20.0.2/24
- Gateway: 10.20.0.1
Modify these settings according to the requirements of your existing network infrastructure.
- Configure the Admin (PXE) network and a DHCP pool for the Fuel Slave nodes.
By default, Fuel configures the Admin (PXE) network on eth0 and configures the following DHP pool settings:
- DHCP pool start: 10.20.0.3
- DHCP pool end: 10.20.0.254
- DHCP gateway: 10.20.0.2
Modify these settings as needed.
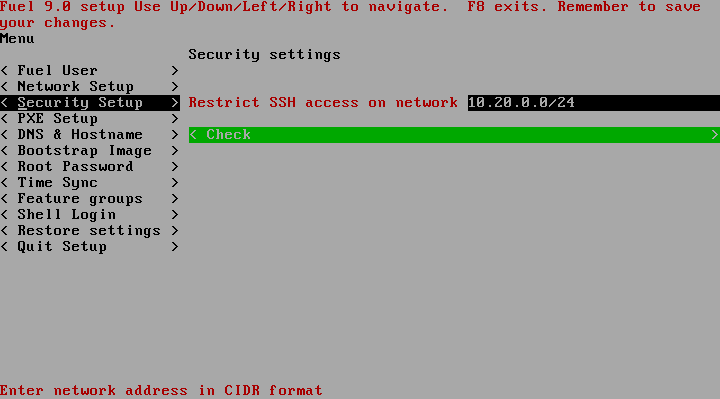
- Configure the security settings.
By default, SSH access to the Fuel Master node is restricted to the Admin (PXE) network. You can change it, if needed, by entering a new network address in the CIDR format. Once applied, SSH access to the Fuel Master node will be allowed from the provided network only. - Configure DNS and hostname.
Configure the DNS and hostname settings, if needed. If your Fuel Master node is not connected to the Internet, leave the External DNS field blank. - Configure the bootstrap image that Fuel will use to discover the Fuel Slave nodes through PXE.
Fuel ISO includes the CentOS bootstrap image that Fuel uses to discover the Fuel Slave nodes. Although CentOS is the default and preferred option, it may not include drivers for your hardware, therefore, you may want to use the Ubuntu bootstrap image instead.
Some organizations may configure the Fuel Master node in a network protected by a firewall, so that the Fuel Master node may not have an access to the Internet. In this case, you can specify a repository located in the accessible network, HTTP or HTTPS, by adding proxy parameters in the Ubuntu repository field. To configure the Ubuntu repository mirror on a local host, use the
fuel-mirrorscript shipped with the Fuel ISO.For more information, see: Set up a local repository.
- Configure the network time protocol.
To avoid issues with the time settings inconsistency on the Fuel Master node and other servers in your IT environment, verify that the Fuel Master node uses correct NTP settings. - Change the root password.
For security reasons, change the default root password. Fuel will apply this password to all new OpenStack nodes. Existing OpenStack nodes will continue to use the old password. - Configure network settings using shell.
You can configure all settings available on the Fuel Setup screen using shell. Particularly, use shell to apply complex network configurations.
- Proceed to Install the Fuel Master node.

Except where otherwise noted, this document is licensed under Creative Commons Attribution 3.0 License. See all OpenStack Legal Documents.